Load testing with k6
Category: en
At OGP, I had to do load testing of the product. It was my first time therefore, I have no idea what tool to choose for this task, and I started looking through different tools and ended up using k6.io.
Before I talk about why I chose k6, let’s talk about why load testing is important.
1. Why load test?
Load testing enable you do measure response time, resource utilization levels, able to identify bottle-necks and the breaking point of the application.
There are 2 success criteria for load testing.
- load forecasting
- how the system handles usage spikes
Load forecasting
Based on the previous usage collected, we can predict the growth for the near future and put some rooms ahead for the system to be able to scale when the growth hits. With the forecasting result, we can add or remove resources accordingly.
In AWS, this strategy can analyze history for up to 14 days to forecast what demand is for the following two days. Updated every day, the data is created to reflect one-hour intervals.
Usage spike
In this case, the usage will grow by 4-5 times in a very short period.
E.g, one particular Reddit post gets popular, and the link is then shared on other social media. Everyone including ghost users (without Reddit accounts) started visiting the page. First, we need to see how the system scales automatically, and how it performs to the spike. By doing so, we will also learn what is the breaking point of the system.
Successful criteria should be
- Alerts are produced during the spike.
- This can be achieved by setting up the resource monitoring and alert systems in place.
- System should auto-scale horizontally in general. Although scaling can be done manually, I still encourage the auto-scaling mechanism.
- System recovers by itself once the spike is over, aka self-healing.
2. Why k6? How about the alternatives?
So I spent few days finding out what is the most suitable tool out there for my need.
Locust.io
Python-based load testing library, and the oldest among the alternatives.
Pros
- Tests are written in Python.
- Docker support
Cons
- No official supports for result exports except CSV
Artillery
Another widely popular tool based on Javascript/Typescript.
Pros
- Artillery scripts are written in YAML with some Javascript injection for custom testing flow (this is also a con)
- Can easily integrate with CI/CD
- Has cloud version
- WebSockets supports other than HTTP
- Got plugins for additional functionalities such as exporting for Grafana
- Docker support
Cons
- DSL (YAML) is limited because YAML with Javascript injection makes the testing flow hard to read as the test gets larger. The use of YAML to control test flow feels unnatural. For example, you can look at the HTTP flow from the documentation.
- Artillery is slow compared to k6, and more resource hungry (this is debatable however, Artillery is running NodeJS at its core). You can look at the following benchmark by GitLab for comparison.
k6
Popular load testing framework made by Grafana Lab. Therefore, it has first-party support for Grafana.
Pros
- Has extensive examples for different test cases.
- Support several protocols (HTTP, WebSockets, gRPC) that can be useful in the future.
- Scriptable in JavaScript
- Official support for different visualization tools (Grafana dashboard, Prometheus metrics, Datadog, etc)
- Has cloud version
- Better documentation compared to artillery.io
- CI/CD support
- Has official Docker image
Cons
- No Typescript support yet, only Javascript for scripting
I chose k6 for these reasons
Documentation is one of the most important factors for choosing it because if it is not well documented, and lack of an extensive list of examples for different scenarios could slow down our progress at writing load testing. In addition to that, I look for export formats and support for several protocols so that we can use the same load testing library for our future projects. Also, CI/CD will be crucial when we start integrating all these testing into automated processes.
3. Plan/Pricing with k6
k6 is a great tool, however it is quite expensive compared to the rest.
- Developer plan costs only $99 a month however, with only up to 100 concurrent virtual users maximum, it is not feasible for most of the use case.
- Team Plan cost $500 a month, with 1000 concurrent virtual users maximum, this is the most suitable plan for most projects. However, this plan has a limitation of a 30-minute max duration per test. Therefore, if we need to run a soak test (I will explain below of each load tests), we will need to buy a larger plan instead.
- Pro Plan costs $1.5k a month with up to 3000 concurrent users, and 60 minutes max duration. This is quite expensive imo.
4. Privacy concerns
If your project is not accessible by public, and cannot be exposed to public/third party services, you can still use k6.
Tests can be run using our own local machine or using their cloud service.
The same applies to the visualization of the result. We can
- export the output in CSV
- send it to the self-hosted or cloud Prometheus instance and visualize it on the Grafana
- send the test result to the k6 cloud (not an option if you cannot expose to third party services)
If we do not want to share any information with the third-party services, we can use self-hosted option. However, the k6 cloud offers ease to set up, and its web UI shows a very details summary of the test, and it can also compare the result performance with previous tests.
With a pro plan, we can also generate a PDF summary of the test on k6 cloud.
5. Load test types
Before we talk about k6 any further, let me explain the different type of load tests and what are their purposes.
1. Load Test
- This is the generic testing strategy to determine how many concurrent users/requests per second the server can handle.
- It usually takes a reasonable amount of time, ~15 minutes.
- This is also the test we run to find the basic benchmark of the system, and how far we can push the system before it breaks.
2. Stress Test
- It is used to determine the limit of the system by sending the requests in different stages. It shows the stability and reliability of the system under extreme conditions.
- It starts with a slow load, and gradually increases the load to see what’s the limit.
- With multiple stages, it can also help us determine if the system can recover without manual intervention.
- Stress test usually lasts about 30-60 minutes, depending on how many stages are in the test, and how we gradually increase the load.
3. Spike Test
- It is very similar to a stress test, however, the key difference is unlike a stress test, it spikes the usage within a short period.
- This scenario is similar to cases where one Reddit post went viral and everyone starts visiting.
- The system will react in one of the following manners
- An excellent system will not degrade during the spike and manage to respond in a reasonable amount of time.
- Good system will respond slower than usual, however, no error is raised.
- Poor system may respond to some request or will raise an error, but manage to recover automatically after the surge.
- Bad system will crash, and not recover even after the surge is gone.
- Spike test does not take very long, as it only tests one scenario, having a large number of users in a short period.
4. Soak Test
- Soak test is the longest load test of all because its purpose is to find out errors that one occurs after running the system for a long time. This test helps us find an error that could not be produced easily, such as the limitation in the infrastructure, and the hardware the system is running on.
- Before we run the soak test, we need to determine the maximum number of users the system can handle, and we run the test with the large user but without crushing the system.
- Here are the cases where soak testing is useful
- Find out memory leaks, in which one starts showing obvious symptoms after the system is up for long period, and the allocated memory is not free properly
- Race conditions
- Database usage, whether the constant requests to the system by a large number of users exhaust the database resource
- Determine how many logs do we output by a certain number of users in a long run and whether it exhausts the disk space
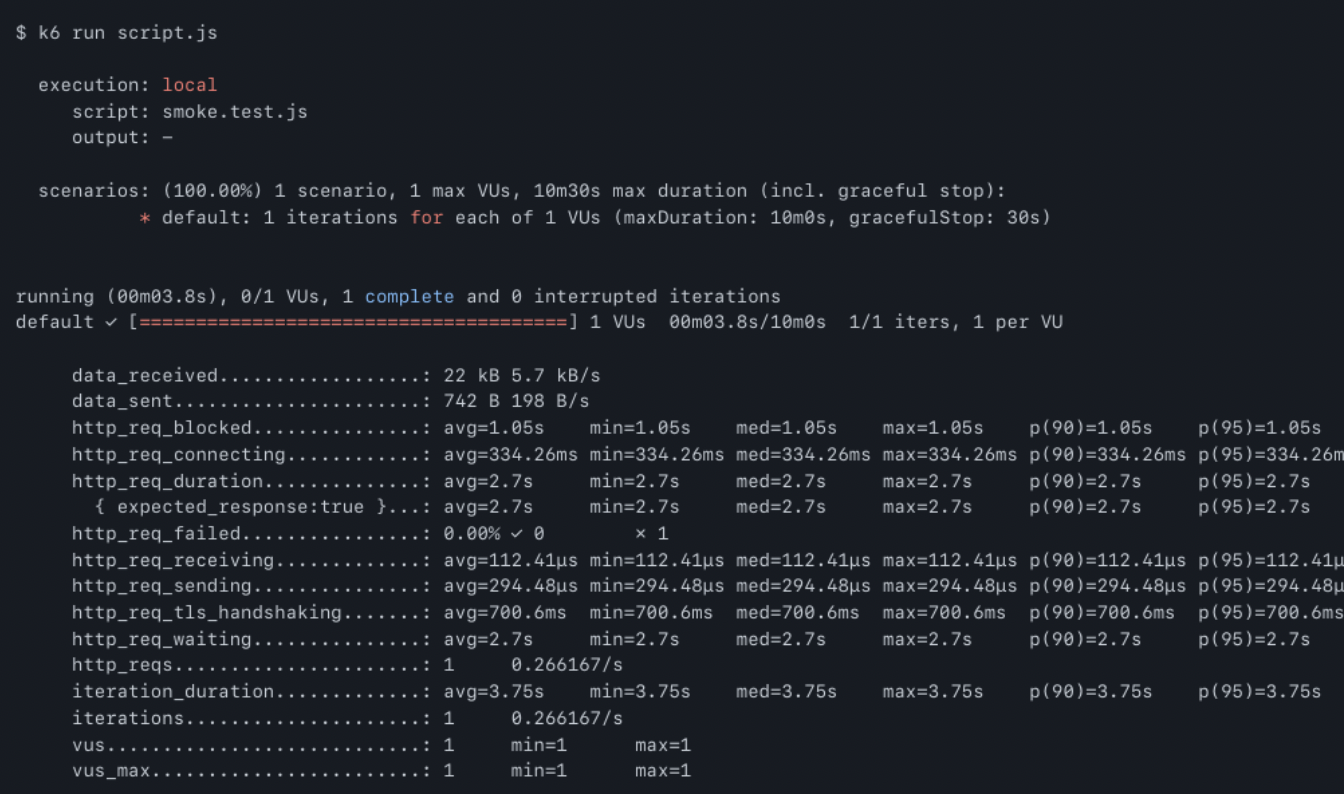
5. Smoke Test
- A smoke test, aka confidence testing, is to run as a sanity check.
- The purpose of the test is to simply verify if the system gives out obvious errors under minimal load.
- Also unlike the other test, this can be run in CI as it finishes within ~1-2 minutes, and also it is only to see whether any small changes made to the underlying infra break the software.
6. k6 metrics
However, here are the key points we need to focus on in the metrics.
- http_req_duration
- http_req_connecting
- http_req_failed
http_req_duration
This metric is the combined duration of receiving, sending, tls_handshaking, and waiting. It helps us determine how long each HTTP request takes on average.
http_req_connecting
This metric shows how long it takes for the client to establish a connection with the server. This combined with the above metric basically shows how long it will take for the user to see the webpage for example.
http_req_failed
This shows the rate of failure, especially during the time of large requests coming into the system. We should be focusing more on this metric, especially in tests like stress and spike.
For a more detailed explanation of each metric, you can look at the following documentation.
7. How to do it k6 way
Write load testing script on local and configured the test to submit the result to the k6 cloud.
Configuration
First, you need to get the api-token from your k6 account.
Then follow the instructions from this page to set up the k6 cloud and k6 CLI.
Once it is done, go to the k6 cloud, create a new project, copy the project ID, and add it to the test script configuration as below.

Writing API code
When you need to interact with the API or application server, write it in api.js (using k6 HTTP modules) and import it back into different load tests (smoke, spike, load, etc). This way, you can reduce the duplication of the application flow.
Setup and teardown of the test
Sometimes, you may need to set up some stuff before running the test and clean up the data after the test. This can be done in k6 via setup and teardown methods.
setup()
If defined, k6 will run the code inside the function before running the actual load test.
teardown()
If defined, k6 will run the code after it finishes running the test.
Sharing data across different test phases
In k6, you can also send additional information from the previous phase to the next phase.
For example, after you have created a new user in setup() phase, by returning the values in the Javascript object, we can pass those values to the next phases (load testing default function, and teardown method).

8. Conclusion
k6 is pretty great tool if you can afford the price. I wanted to share how k6 cloud visualization looks like but for privacy reasons I cannot. Therefore, you can take a look at their k6 cloud promo page and how to visulization with their cloud for how their cloud service.